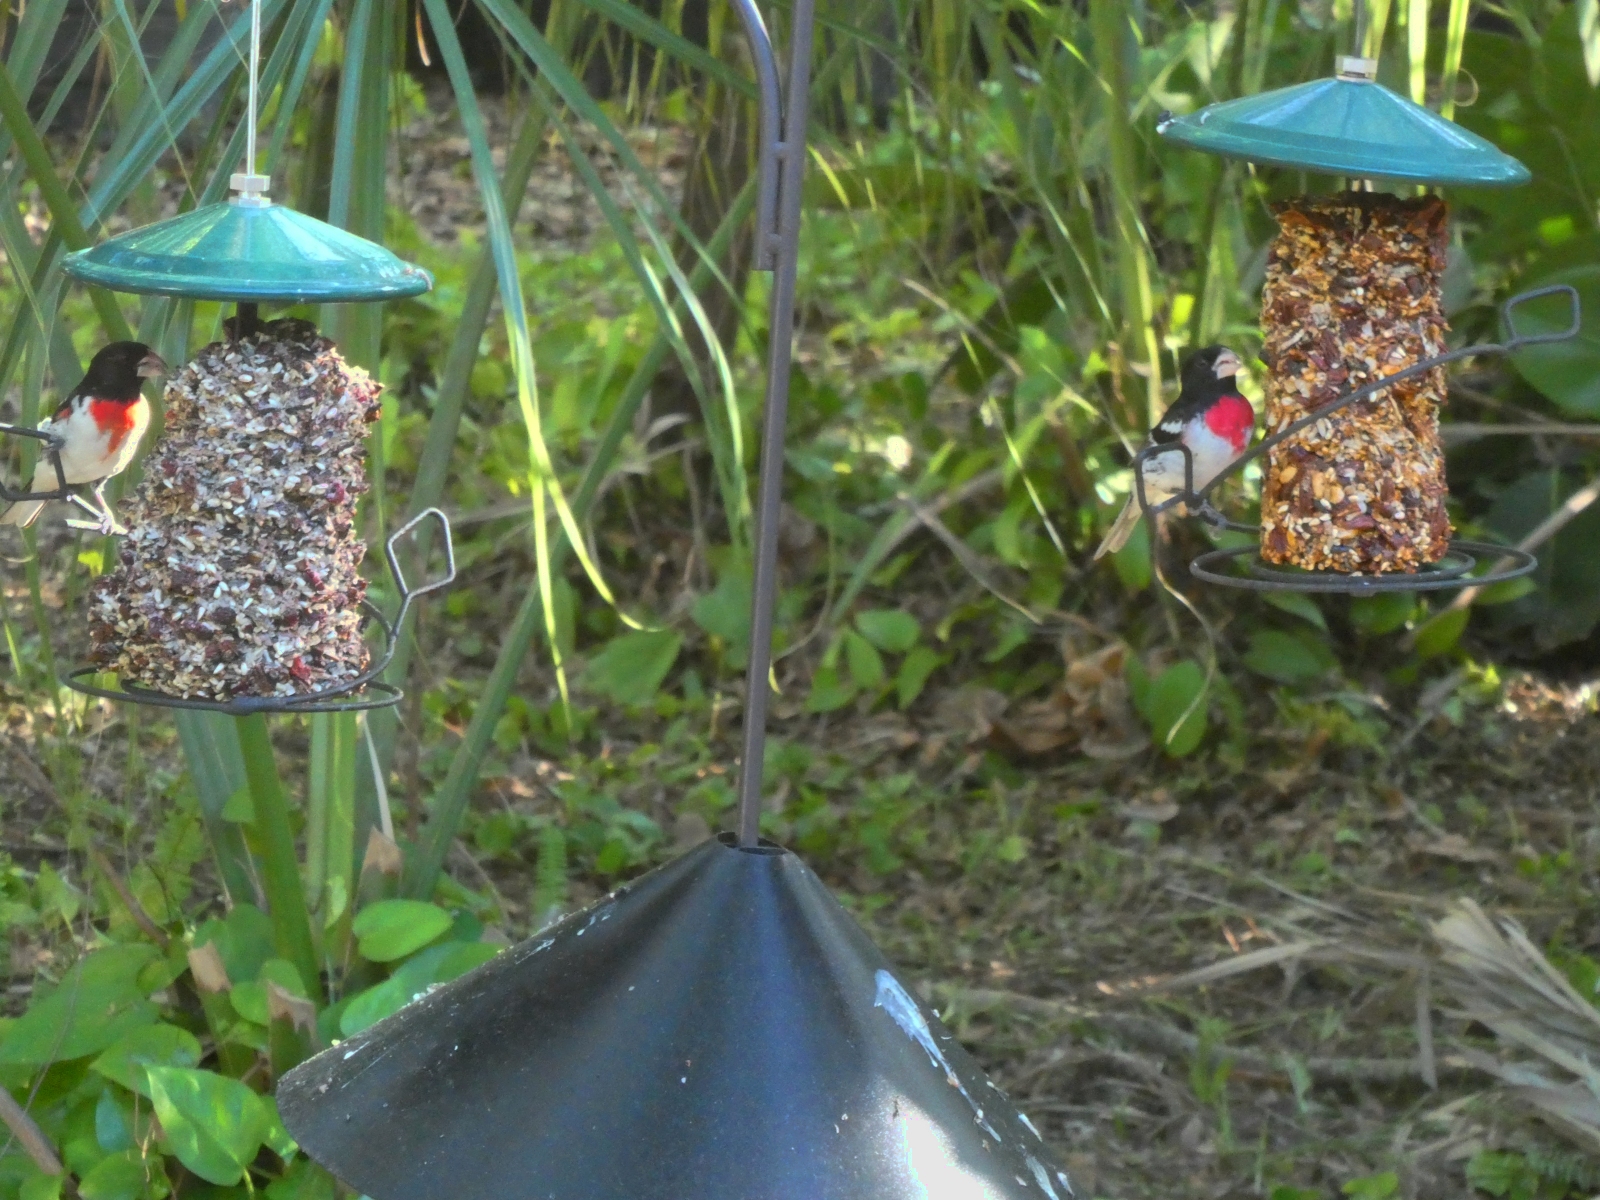
 Here is a photo of a pair of rose-breasted grosbeaks on our feeders. We are big bird lovers and bird watchers. We have several feeders right outside our dining room windows. We love to watch the birds that come to them. We have
both loose seed feeders and seed cylinder feeders like the ones shown here. Bird seed is cheap, but pre-made seed cylinders or cakes for our feeders cost a small fortune. I eventually got tired of listening to my wife grumble
about how expensive the seed cylinders are, and decided to figure out how to make my own as a nice project while locked down during the Corona Virus pandemic. How hard could it be? Famous last words, right? Well,
not in this case. It actually turned out to be pretty darn easy. Here's how I did it.
Here is a photo of a pair of rose-breasted grosbeaks on our feeders. We are big bird lovers and bird watchers. We have several feeders right outside our dining room windows. We love to watch the birds that come to them. We have
both loose seed feeders and seed cylinder feeders like the ones shown here. Bird seed is cheap, but pre-made seed cylinders or cakes for our feeders cost a small fortune. I eventually got tired of listening to my wife grumble
about how expensive the seed cylinders are, and decided to figure out how to make my own as a nice project while locked down during the Corona Virus pandemic. How hard could it be? Famous last words, right? Well,
not in this case. It actually turned out to be pretty darn easy. Here's how I did it.
Click on any photo for a larger version.
 The first thing I needed was something to use as a mold for making the seed cylinders. It needed to be round and between 4 and 6 inches in diameter so the resulting cylinders would fit on our cylinder feeders. I happened to
notice an empty plastic gallon jug in our recycling bin. I measured it and decided it would be just about perfect for the job. It is right about 6 inches in diameter. I cut the tapered top off and then was
left with a cylinder the perfect diameter, and just a little shorter than the cylinders we normally buy. The only issue with it was that it flares out a bit at the base. I figured this would mean I'd have to
slit the side of it to get the finished cylinder out. I didn't see that as a real problem.
The first thing I needed was something to use as a mold for making the seed cylinders. It needed to be round and between 4 and 6 inches in diameter so the resulting cylinders would fit on our cylinder feeders. I happened to
notice an empty plastic gallon jug in our recycling bin. I measured it and decided it would be just about perfect for the job. It is right about 6 inches in diameter. I cut the tapered top off and then was
left with a cylinder the perfect diameter, and just a little shorter than the cylinders we normally buy. The only issue with it was that it flares out a bit at the base. I figured this would mean I'd have to
slit the side of it to get the finished cylinder out. I didn't see that as a real problem.
You may want to try a smaller diameter mold too. I plan on making cylinders of a couple different diameters. A smaller diameter cylinder will get eaten up faster, and is less likely to spoil or go moldy if left exposed to
the weather for a long time. Another strategy to prevent spoiling is to make shorter seed cakes by not filling the molds all the way full. You can also make different types of seed cakes and stack a variety on
one feeder to attract a larger variety of birds. I'm starting out with a large diameter mold to learn the ropes.
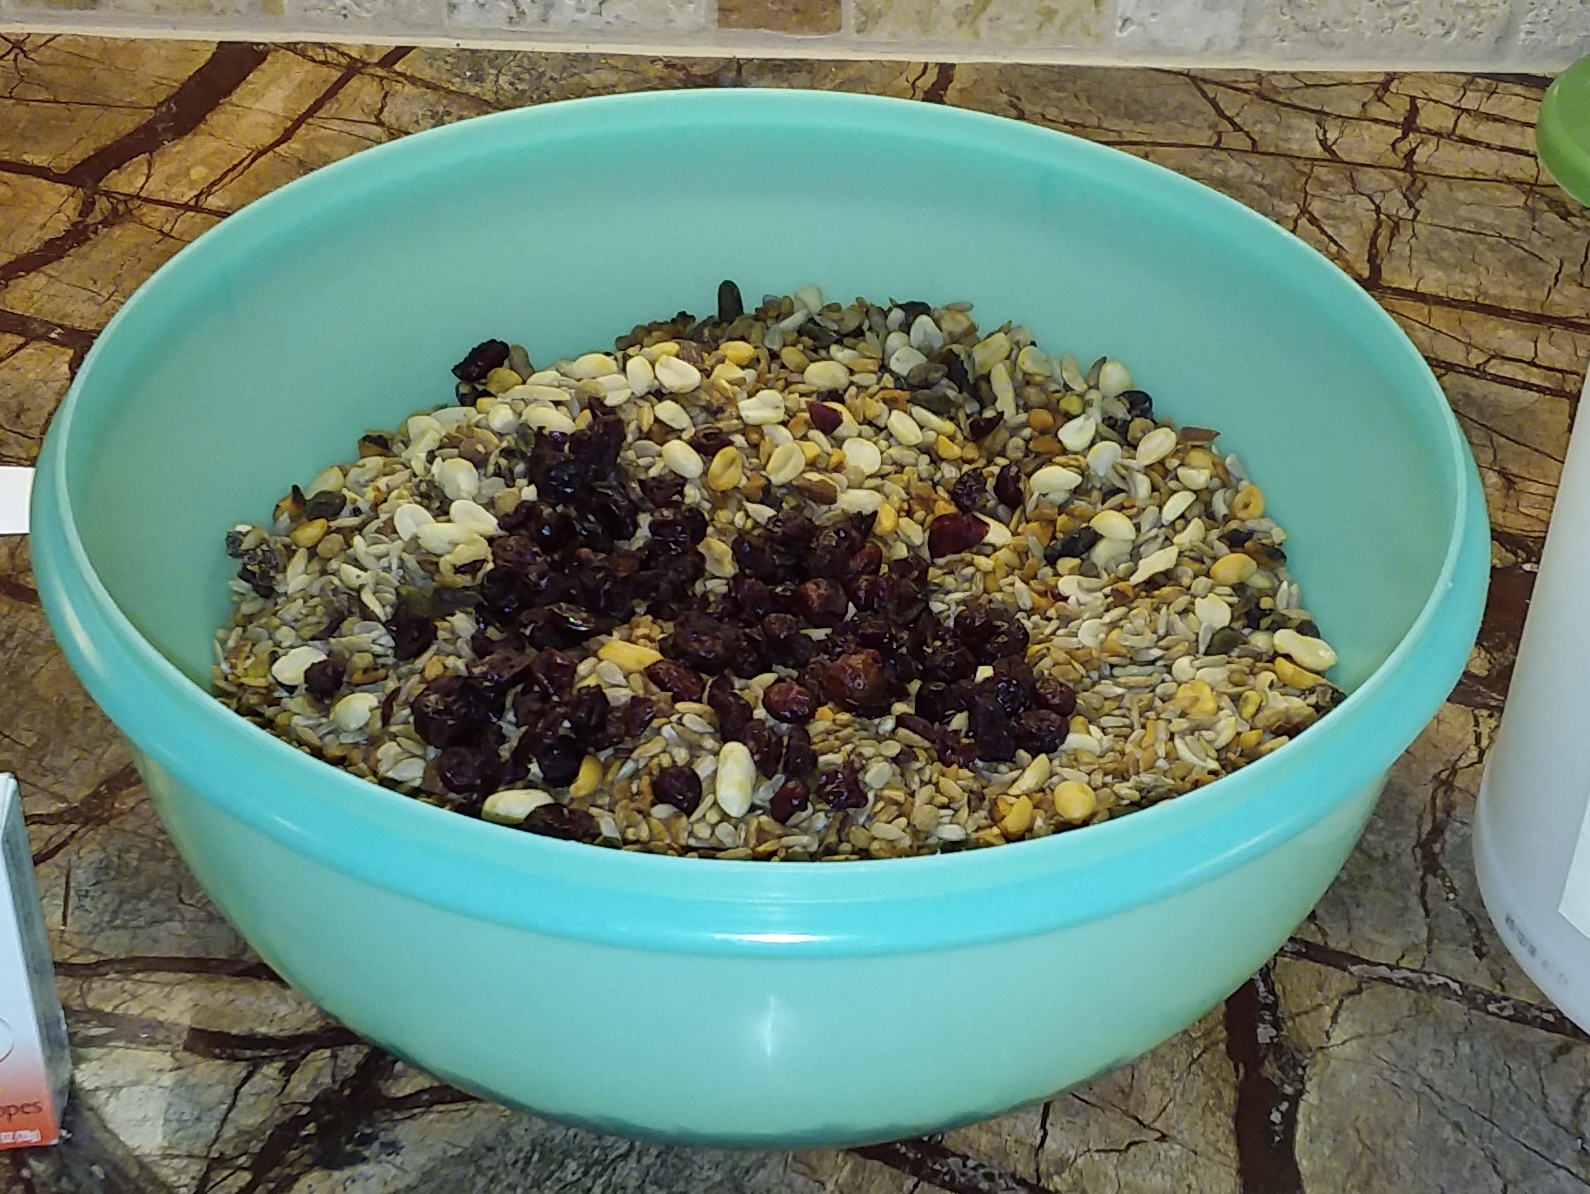 We buy bird seed practically by the ton. I wheeled the bin of seed into the kitchen and got busy. The first thing I did was fill my makeshift mold almost full of seed, so I'd know how much I'd need.
It turned out to be around 14 cups worth. I poured the seed into a large mixing bowl. The seed mix we use already contains a large variety of seeds, plus peanuts and raisins. Birds absolutely love it,
and empty our loose seed feeders of it every couple of days. I decided to jazz up my seed cylinder even more by adding some whole raw almonds and some crasins to the mix to make it irresistable to any self-respecting
hungry bird.
We buy bird seed practically by the ton. I wheeled the bin of seed into the kitchen and got busy. The first thing I did was fill my makeshift mold almost full of seed, so I'd know how much I'd need.
It turned out to be around 14 cups worth. I poured the seed into a large mixing bowl. The seed mix we use already contains a large variety of seeds, plus peanuts and raisins. Birds absolutely love it,
and empty our loose seed feeders of it every couple of days. I decided to jazz up my seed cylinder even more by adding some whole raw almonds and some crasins to the mix to make it irresistable to any self-respecting
hungry bird.
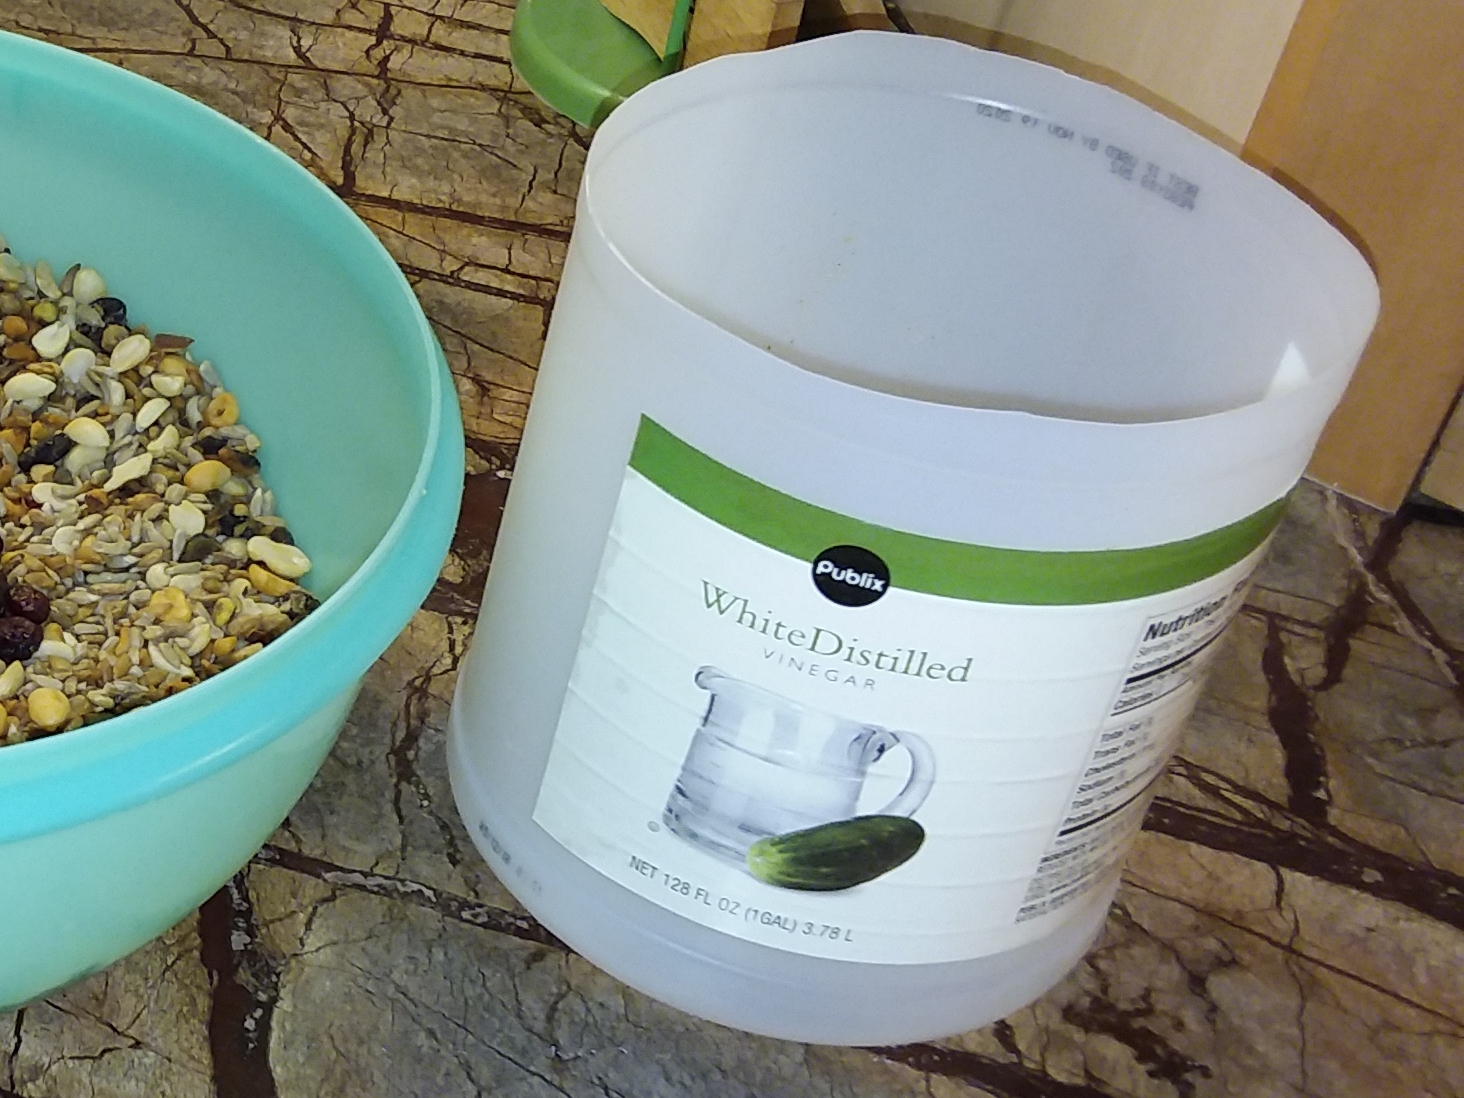
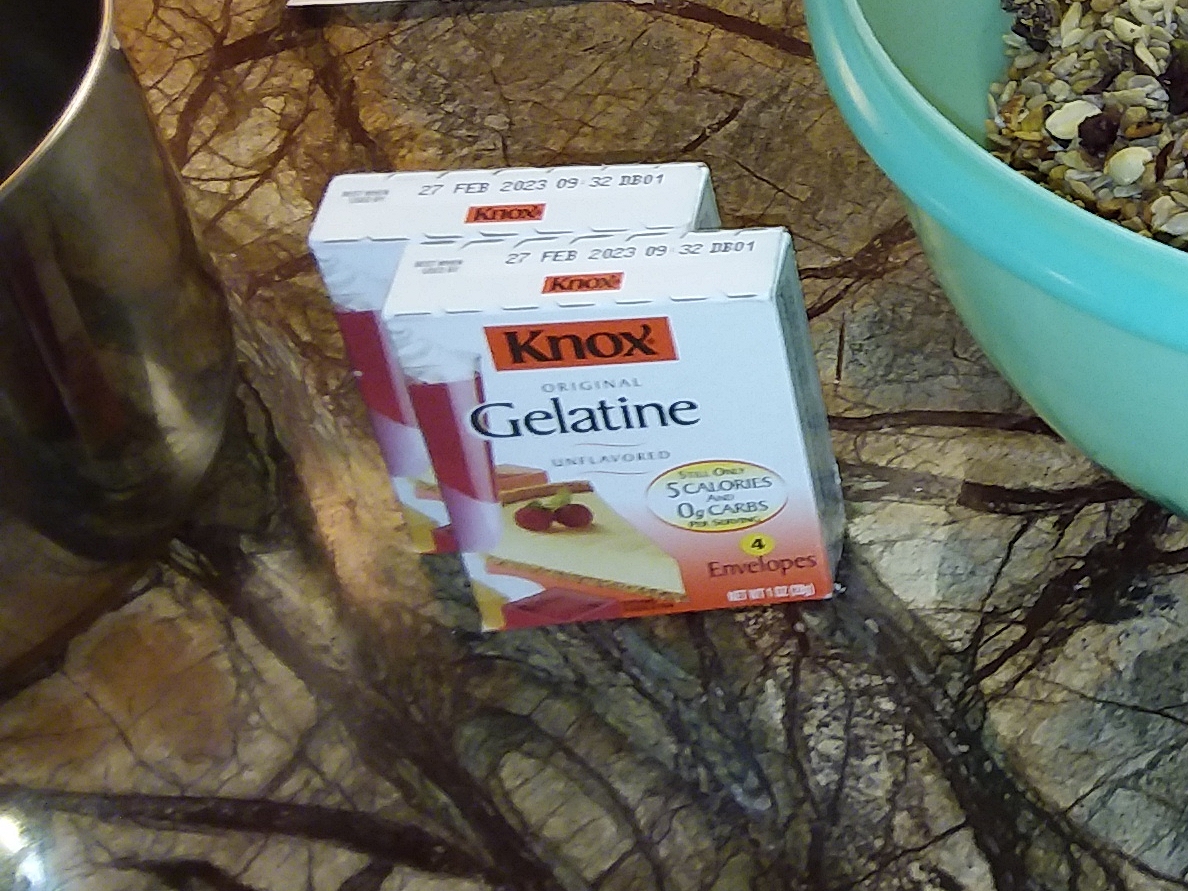 Next came the secret ingredient to make everything stick together. Shhhh. Don't tell anyone. It's gelatine. I wracked my brain wondering what the seed cylinder manufacturers could be using to glue the cylinders
together. I could think of potential problems that would eliminate every "sticky" substance in our kitchen. After some online research, and label reading, I settled on gelatine. It's perfect
for the job. It just needs to be un-flavored, and mixed up a lot thicker than you normally would. For my prototype first seed cylinder I used 3 cups of hot water and 8 packets of gelatine.
Next came the secret ingredient to make everything stick together. Shhhh. Don't tell anyone. It's gelatine. I wracked my brain wondering what the seed cylinder manufacturers could be using to glue the cylinders
together. I could think of potential problems that would eliminate every "sticky" substance in our kitchen. After some online research, and label reading, I settled on gelatine. It's perfect
for the job. It just needs to be un-flavored, and mixed up a lot thicker than you normally would. For my prototype first seed cylinder I used 3 cups of hot water and 8 packets of gelatine.
The prototype cylinder turned out ok in the end, but it was excessively soggy at first. It took a long time in front of a fan to dry out and firm up. For later cylinders I cut back on the liquid and gelatine by 25%.
 UPDATE: I have been experimenting with the ratio of liquid to seed to gelatine. Here are a couple of seed cylinders I made using less liquid so they will not be so soggy and dry quicker.
The new recipe is 20 cups of seed mix, 3 1/4 cups of water and 8 packets of gelatine. This is a much less soggy, but no less sticky mixture. Just multiply or divide the ingredients as needed for your
application. I decided to work with 20 cups of seed since that would make one large diameter and one skinnier seed cylinder using empty jugs of various sizes as molds. Together they hold about 20 cups.
This mix is still a bit wetter than I would like. I may try cutting back by another 1/4 cup on the water in the future and see how that works.
UPDATE: I have been experimenting with the ratio of liquid to seed to gelatine. Here are a couple of seed cylinders I made using less liquid so they will not be so soggy and dry quicker.
The new recipe is 20 cups of seed mix, 3 1/4 cups of water and 8 packets of gelatine. This is a much less soggy, but no less sticky mixture. Just multiply or divide the ingredients as needed for your
application. I decided to work with 20 cups of seed since that would make one large diameter and one skinnier seed cylinder using empty jugs of various sizes as molds. Together they hold about 20 cups.
This mix is still a bit wetter than I would like. I may try cutting back by another 1/4 cup on the water in the future and see how that works.
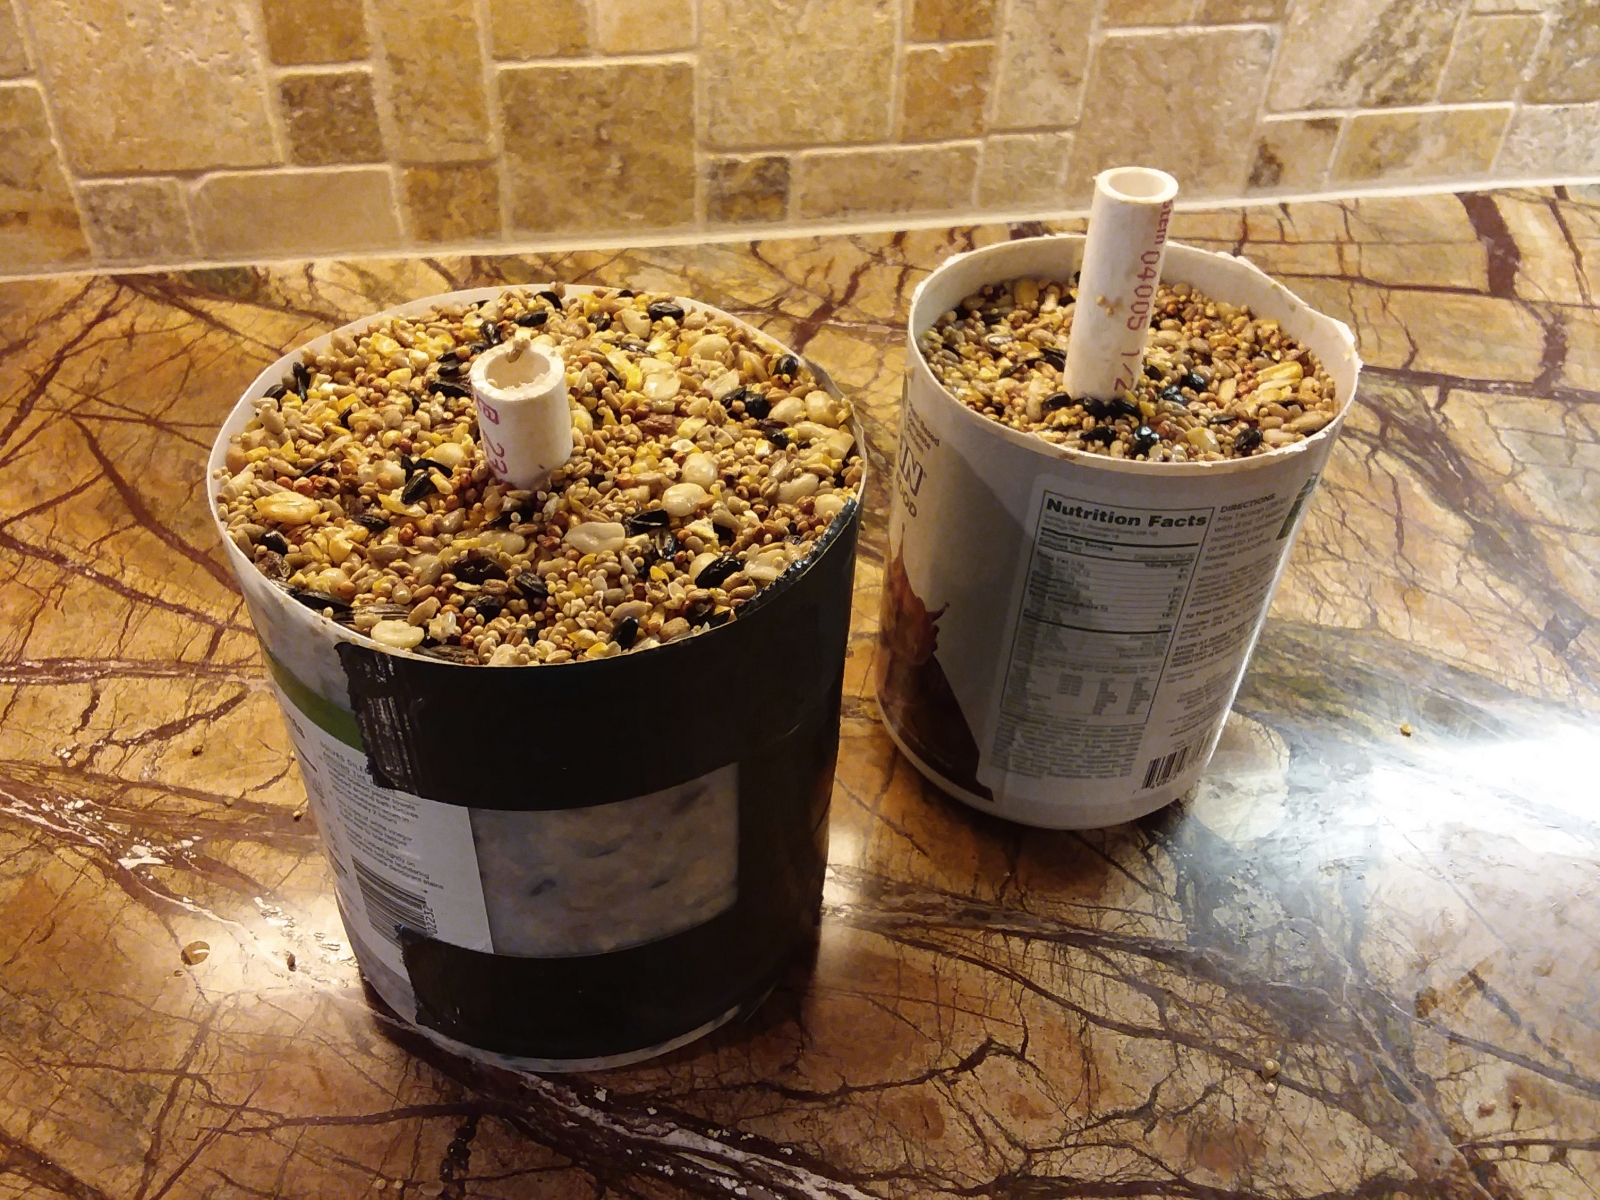
I have also switched to using skinny PVC pipe to make the central hole through the cylinders. The pipe was well greased with coconut oil before the seed mix was packed in. The smooth pipe is much easier to
extract than the wood dowel I used in the beginning.
As you can see, I am also using a smaller 4 inch diameter mold as well as my original larger 6 inch diameter mold. We get a lot of birds to our feeders, so spoilage isn't much of a problem even with the large
cylinders. They eat them down to nothing pretty quickly. However, I wanted to try making some smaller ones too. I may also experiment with making shorter seed cakes by not filling the molds all the way up.
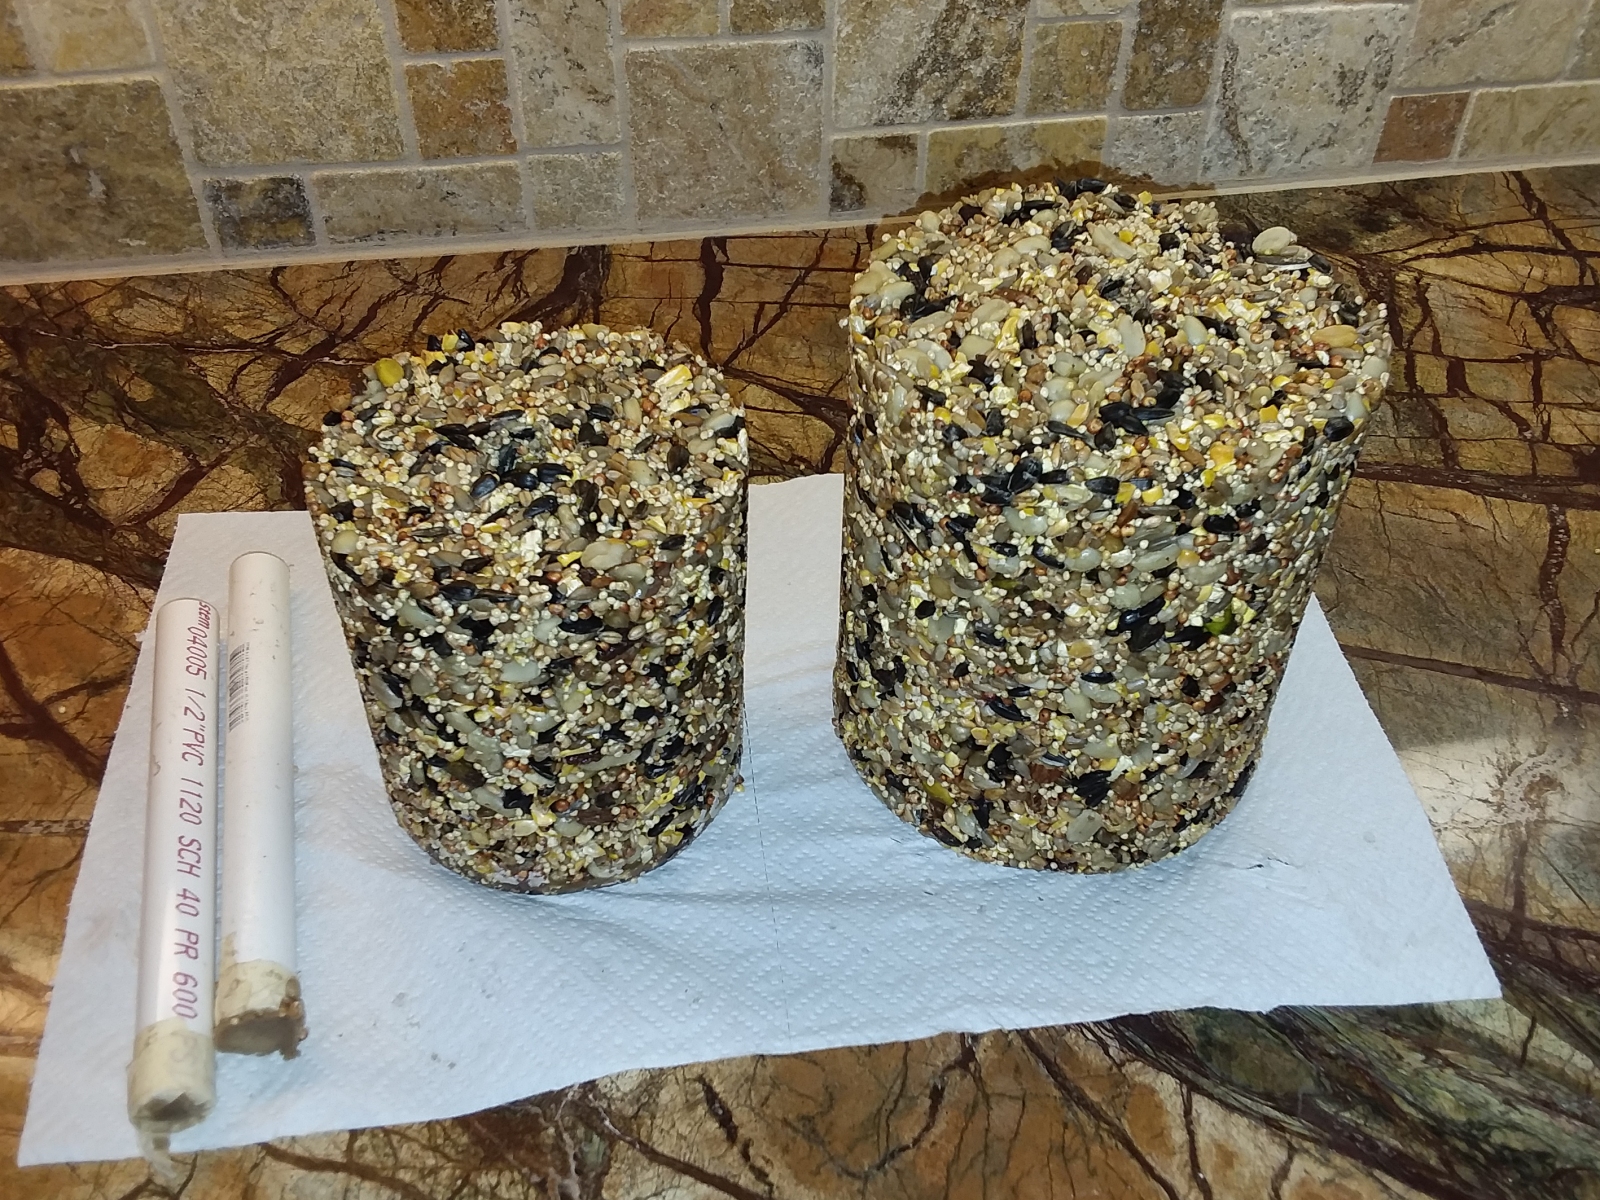 As with my first attempt, I had to slit the sides of the molds to get the cylinders out. The big mold was already slit from the first use and just held back together with duct tape. So getting the cylinder out of
it was just a matter of peeling back the tape. I had to slit the smaller mold because it was new. The greased PVC pipes came out fairly easily. I'll be using them again in the future instead of my original
idea of wood dowels which glued themselves stubbornly in place no matter how much I greased them with vegetable oil. All in all, these are some good looking seed cylinders. Not nearly as soggy as my first effort.
The smaller one is still a bit wetter than i'd like. So as I said above, I may cut back even further on the liquid next time.
As with my first attempt, I had to slit the sides of the molds to get the cylinders out. The big mold was already slit from the first use and just held back together with duct tape. So getting the cylinder out of
it was just a matter of peeling back the tape. I had to slit the smaller mold because it was new. The greased PVC pipes came out fairly easily. I'll be using them again in the future instead of my original
idea of wood dowels which glued themselves stubbornly in place no matter how much I greased them with vegetable oil. All in all, these are some good looking seed cylinders. Not nearly as soggy as my first effort.
The smaller one is still a bit wetter than i'd like. So as I said above, I may cut back even further on the liquid next time.
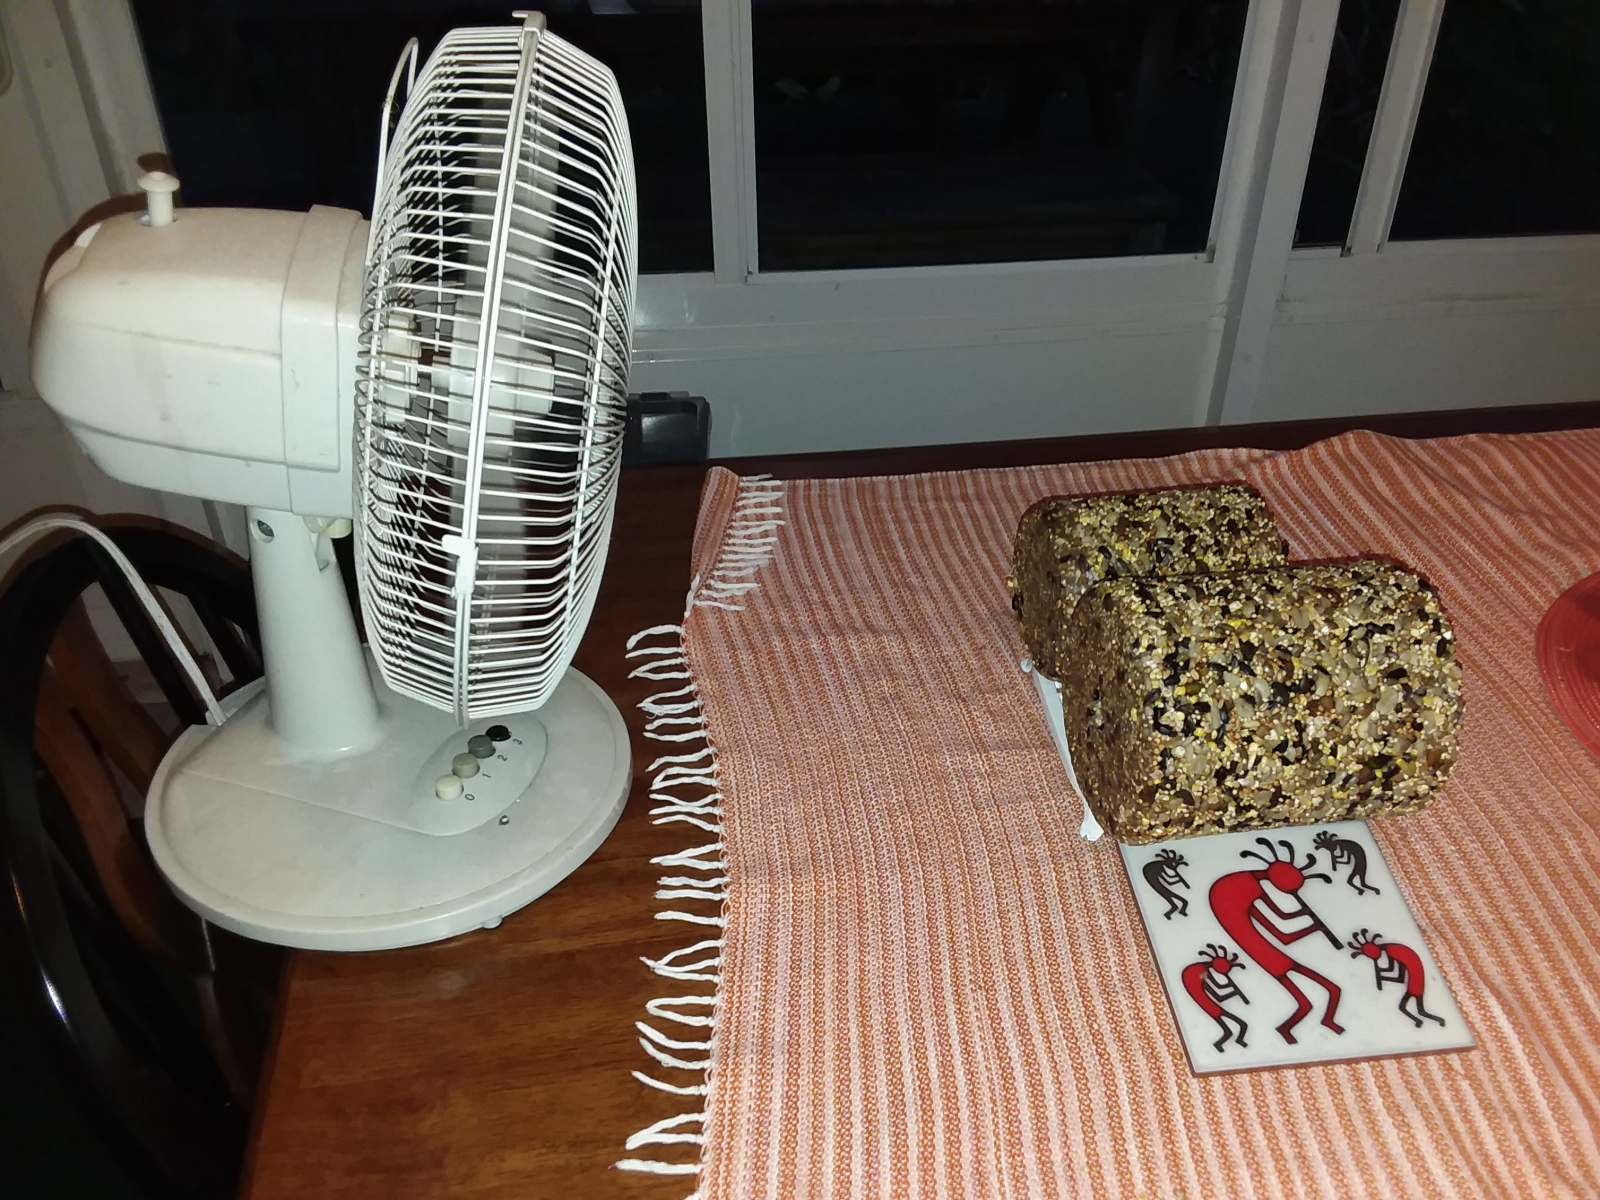 Here are the two new recipe cylinders drying in front of a fan on our back porch. Since they aren't as soggy as the original recipe, I expect they will dry out very quickly. They are already quite hard. In fact
the large one rolled off the table and landed on the floor with no ill effects other than scattering a few errant seeds. I wedged the Kokopelli trivet against it to stop that from happening again.
Here are the two new recipe cylinders drying in front of a fan on our back porch. Since they aren't as soggy as the original recipe, I expect they will dry out very quickly. They are already quite hard. In fact
the large one rolled off the table and landed on the floor with no ill effects other than scattering a few errant seeds. I wedged the Kokopelli trivet against it to stop that from happening again.
Since the cylinders likely won't be needed on our feeders for a while, I gave some thought about how to store them until they are needed. I plan on wrapping them in cling wrap once they are good and dry.
Aluminum foil would probably work too.
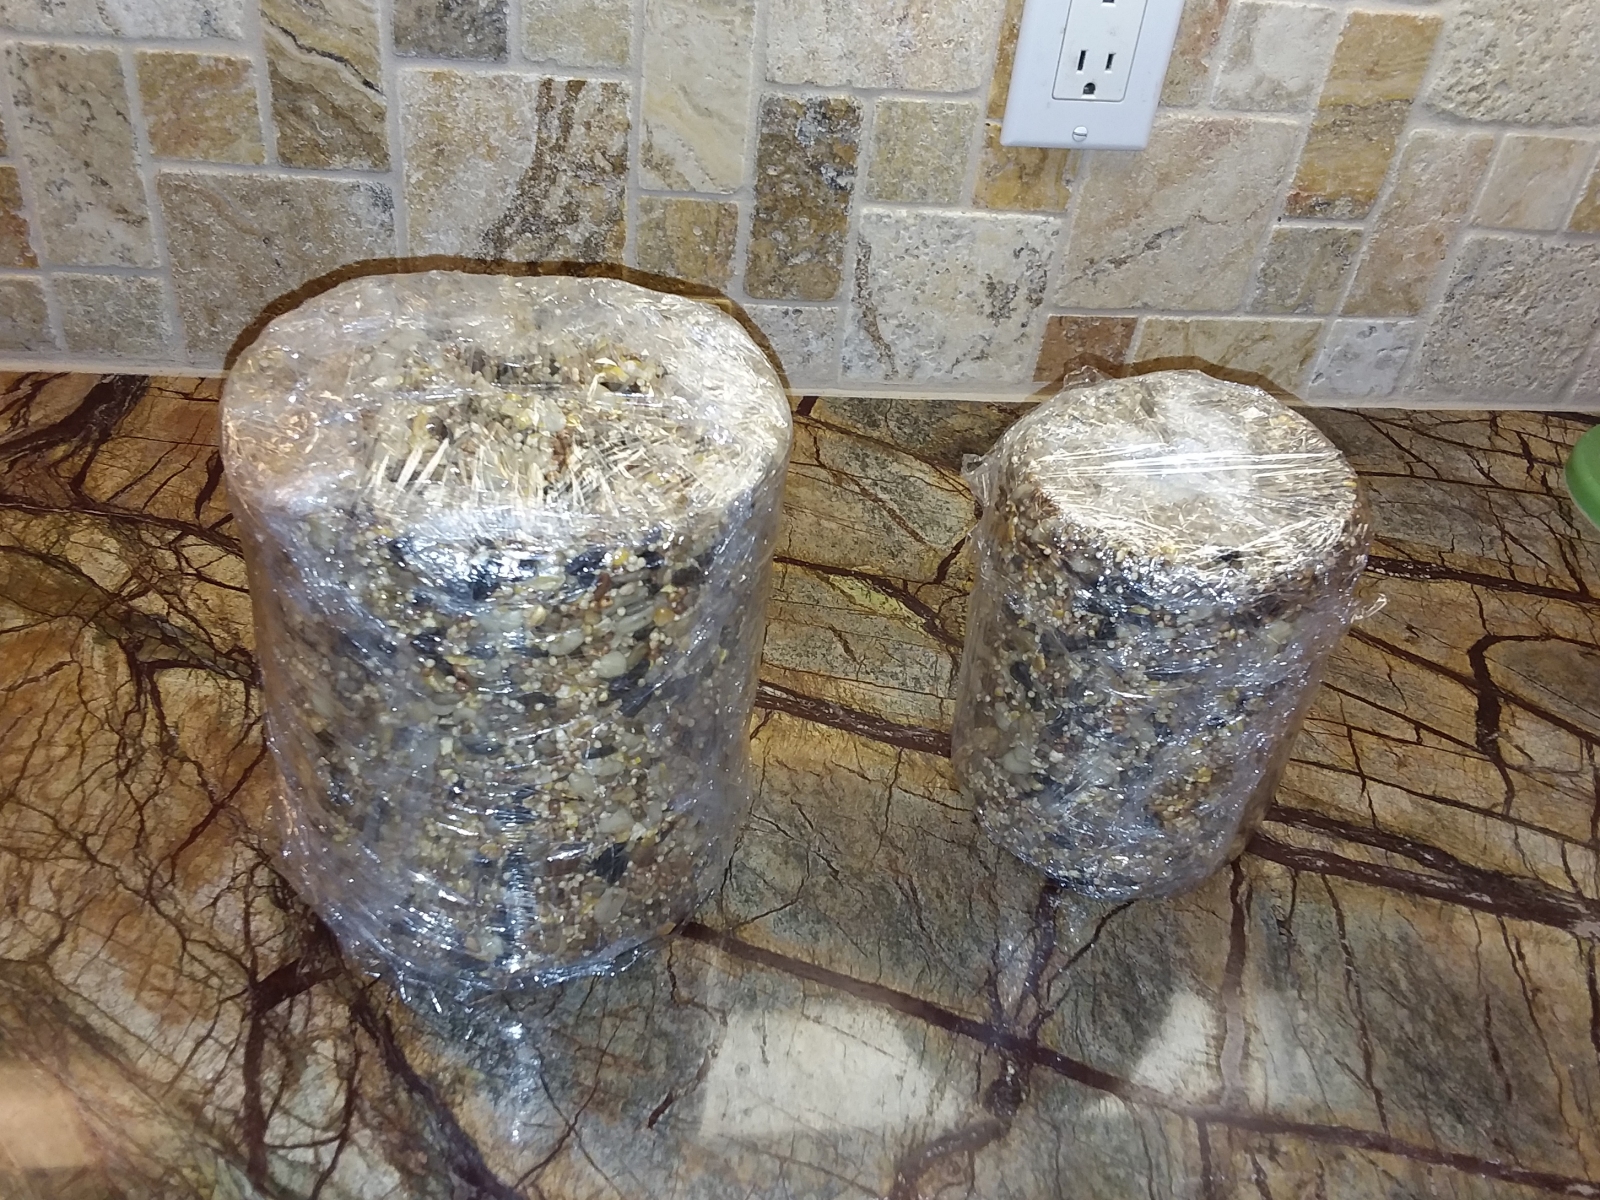 Wrapping the cylinders in cling wrap once they are thoroughly dried seems to work for storage. At the very least it prevents them from shedding seeds everywhere each time they are handled or moved.
End of Update.
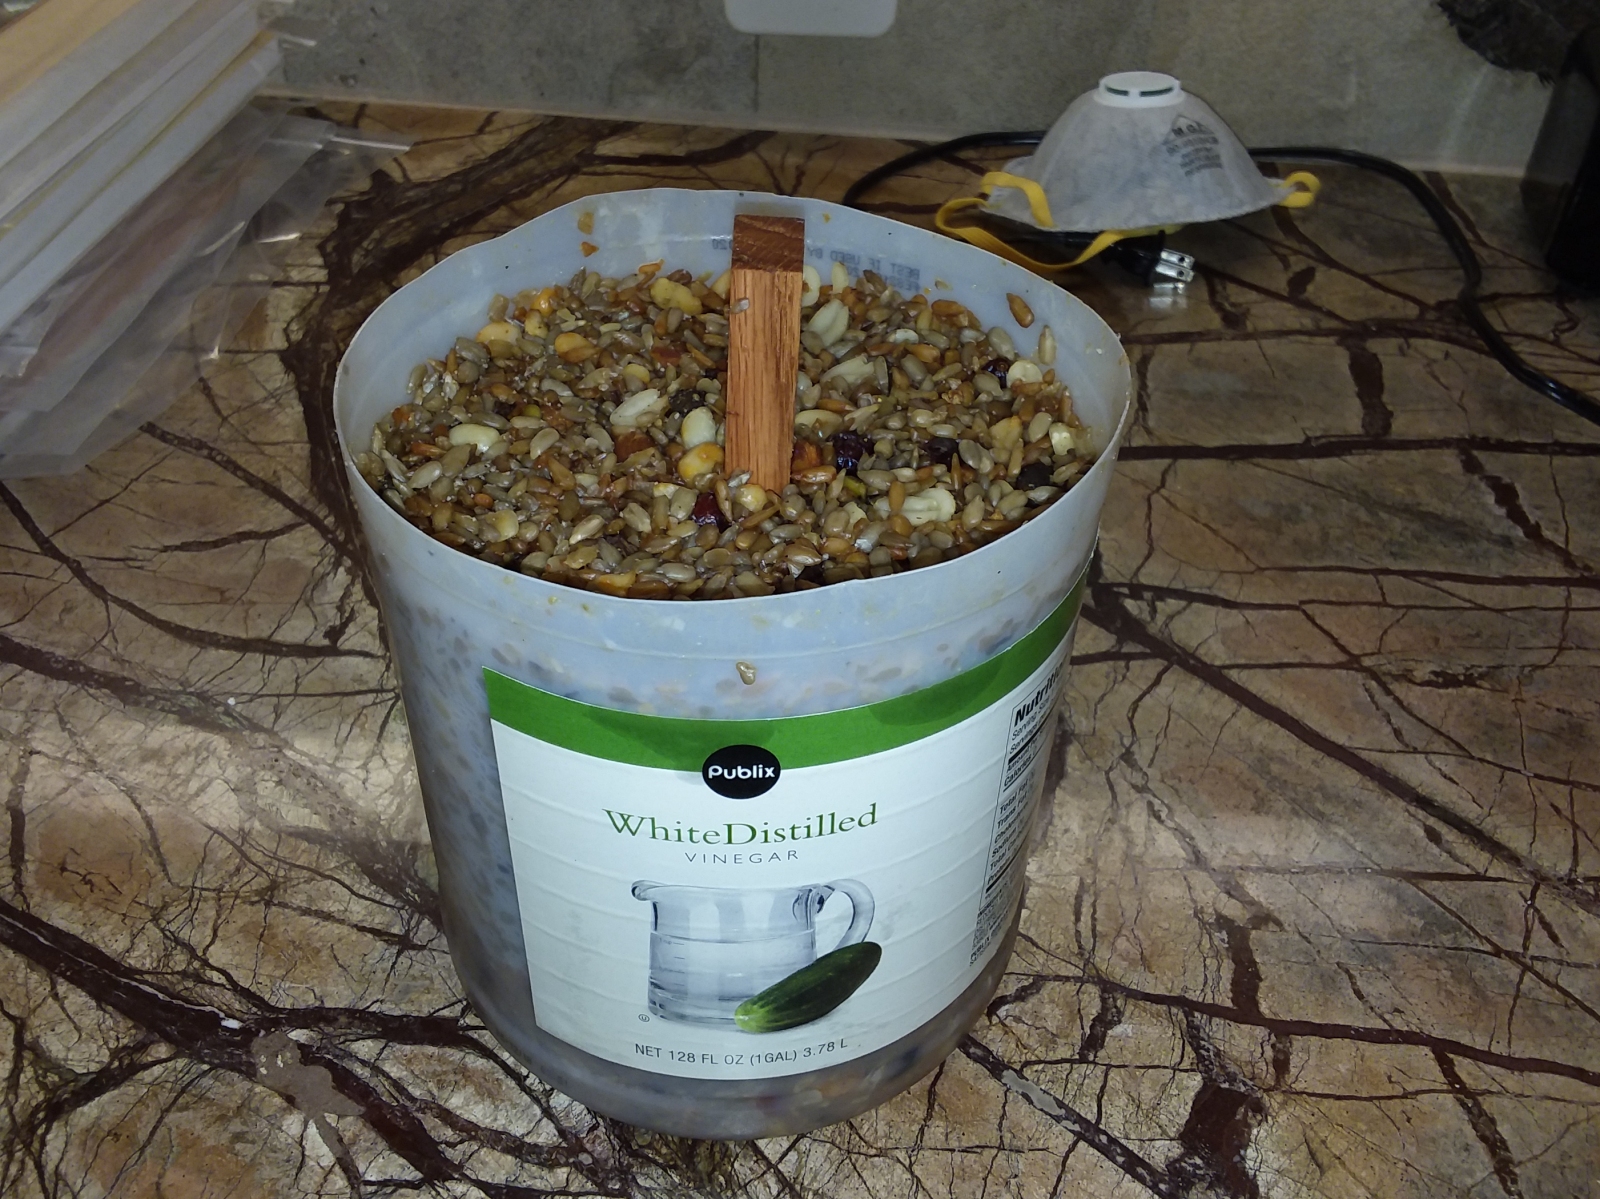 Once I had all the seed packed into the mold, I pushed a wood dowel greased with vegetable oil down through the center of the cylinder. This will provide the needed hole through the center of the cylinder to hold it
on our cylinder feeders. I re-packed everything down nice and tight again after inserting the dowel. Then the mold went into the refrigerator to firm up. It got hard very quickly, but I left it in the fridge
overnight just to make sure.
Once I had all the seed packed into the mold, I pushed a wood dowel greased with vegetable oil down through the center of the cylinder. This will provide the needed hole through the center of the cylinder to hold it
on our cylinder feeders. I re-packed everything down nice and tight again after inserting the dowel. Then the mold went into the refrigerator to firm up. It got hard very quickly, but I left it in the fridge
overnight just to make sure.
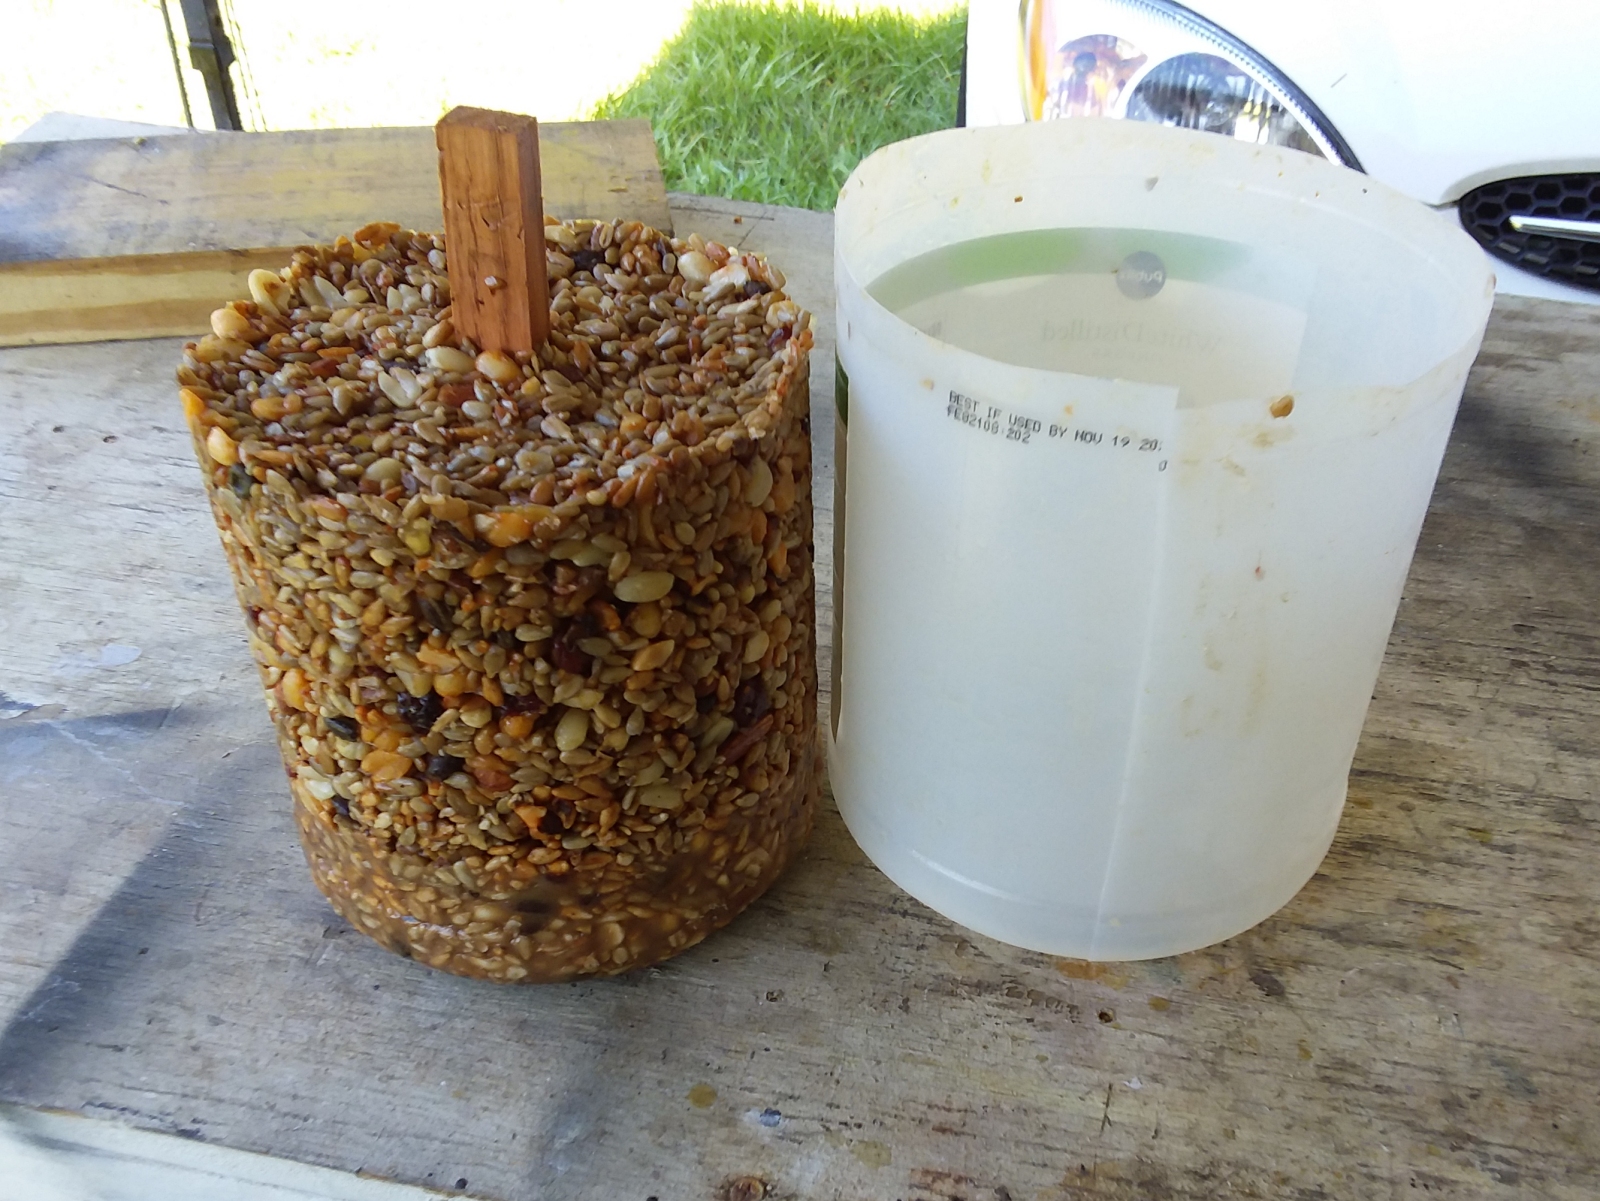 The next morning I took the experimental seed cylinder out of it's mold. Just as I thought, I had to slit the side of the mold to get it out. I can always tape it back together and reuse it. Getting the stick
out of the center of the cylinder proved to be difficult. It was pretty thoroughly glued in. Eventually I got it out. Future cylinders use some slick plastic pipe, greased very thoroughly, rather than using wood
which is rough on the surface. Still, not bad for a first effort. Things get better with practice.
The next morning I took the experimental seed cylinder out of it's mold. Just as I thought, I had to slit the side of the mold to get it out. I can always tape it back together and reuse it. Getting the stick
out of the center of the cylinder proved to be difficult. It was pretty thoroughly glued in. Eventually I got it out. Future cylinders use some slick plastic pipe, greased very thoroughly, rather than using wood
which is rough on the surface. Still, not bad for a first effort. Things get better with practice.
|
Click to learn how
to meet them
|
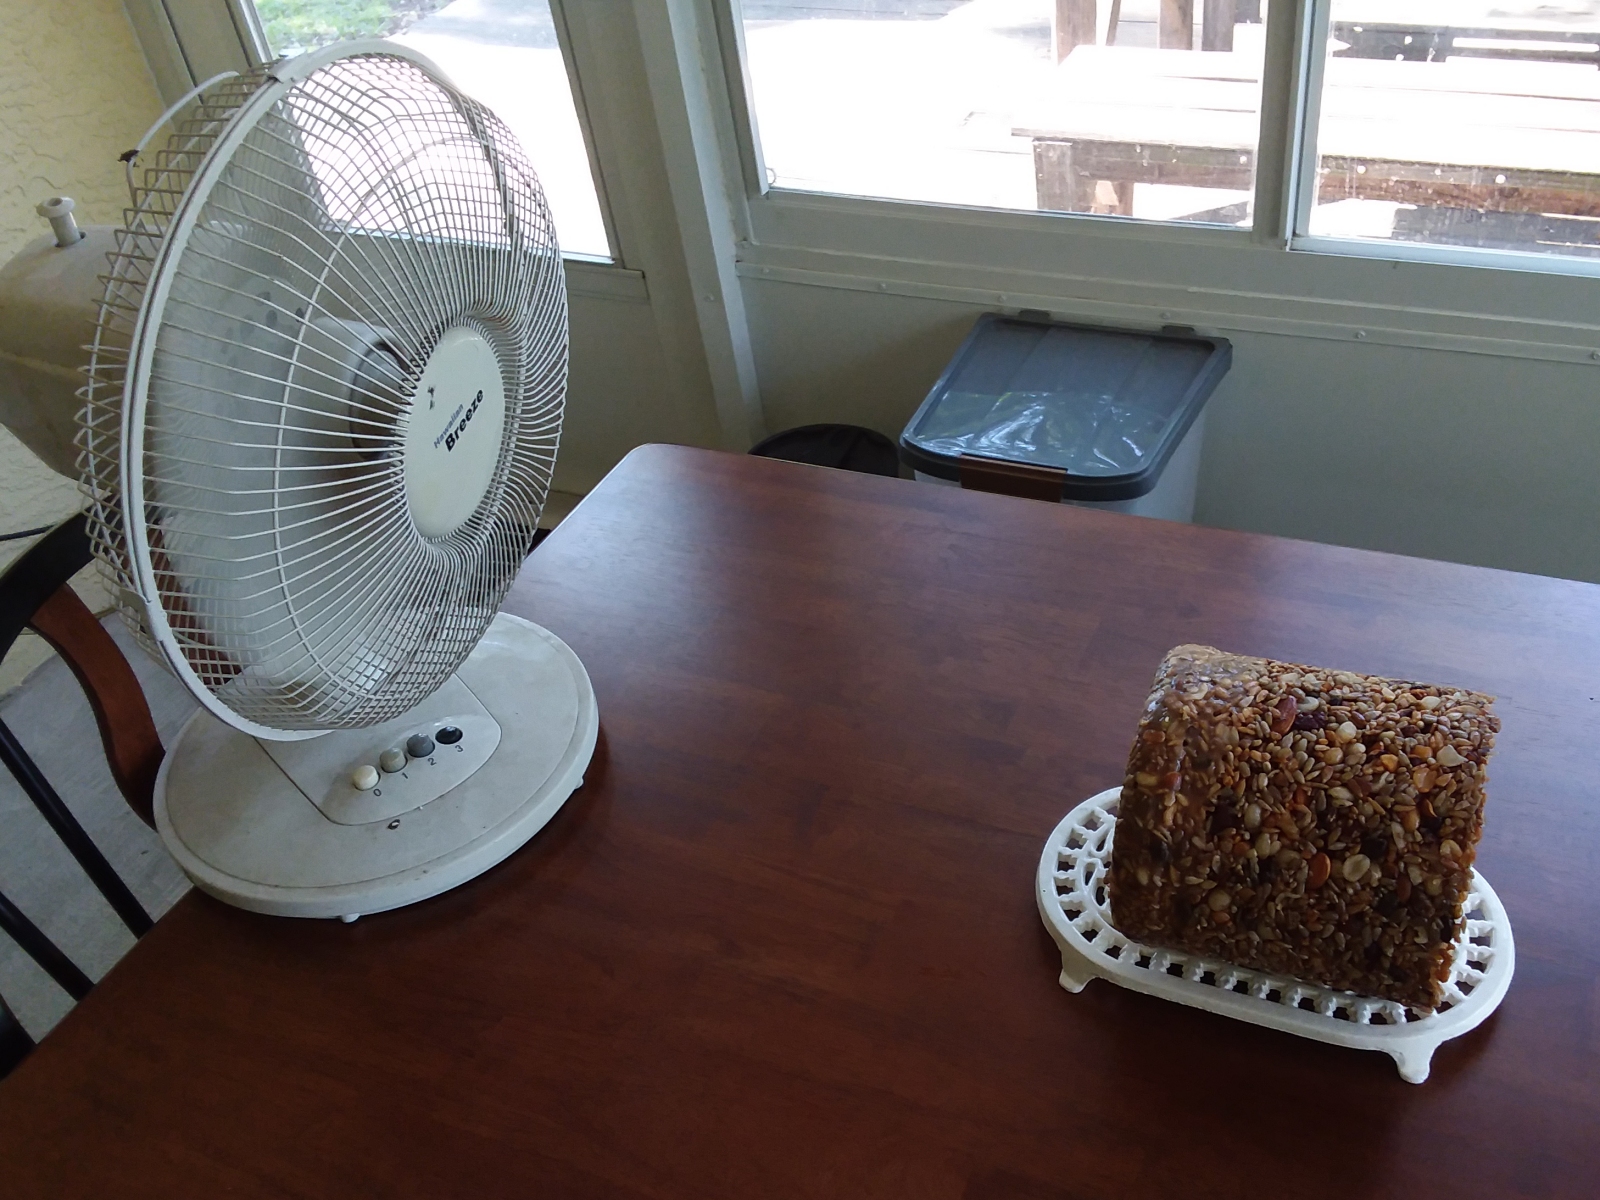 Next I put the damp seed cylinder in front of a fan on our back porch to dry. The bottom quarter of the cylinder was quite soggy. I suspect I used too much liquid and the excess pooled in the bottom of the mold.
This is what prompted me to try cutting back on the amount of water and gelatine by about 25% on future cylinders so they weren't as soggy. In spite of the sogginess, the cylinder dried quickly. By dinner time
that night it was already noticeably dryer and firmer. I let it dry in front of the fan for a week before putting it outside on one of the feeders. It probably only needed a couple of days, but
I left it there until I needed to replace one of the cylinders on the feeders. By then it was very firm and dry.
Next I put the damp seed cylinder in front of a fan on our back porch to dry. The bottom quarter of the cylinder was quite soggy. I suspect I used too much liquid and the excess pooled in the bottom of the mold.
This is what prompted me to try cutting back on the amount of water and gelatine by about 25% on future cylinders so they weren't as soggy. In spite of the sogginess, the cylinder dried quickly. By dinner time
that night it was already noticeably dryer and firmer. I let it dry in front of the fan for a week before putting it outside on one of the feeders. It probably only needed a couple of days, but
I left it there until I needed to replace one of the cylinders on the feeders. By then it was very firm and dry.
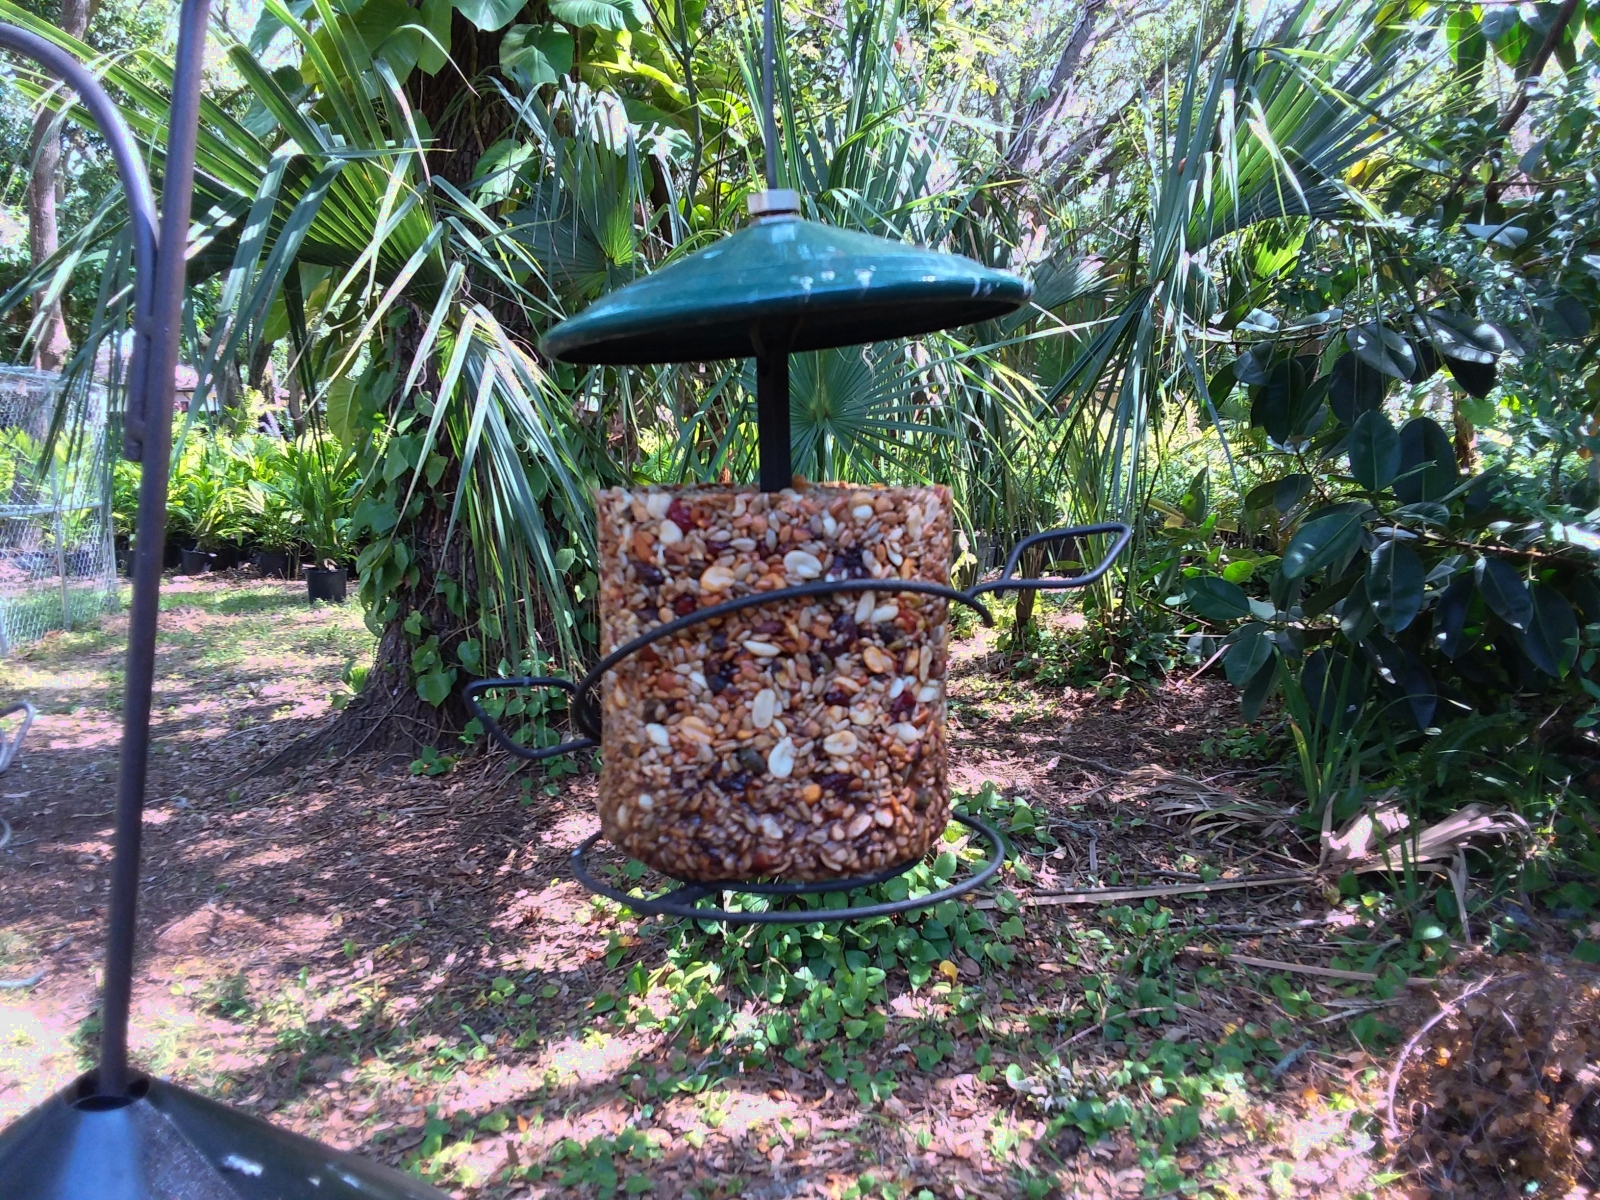 My home-made seed cylinder proved to be a perfect fit for our cylinder feeders. Here it is right after I installed it on one of them. Now it was up to the birds to pass their judgment on it. Would they like it?
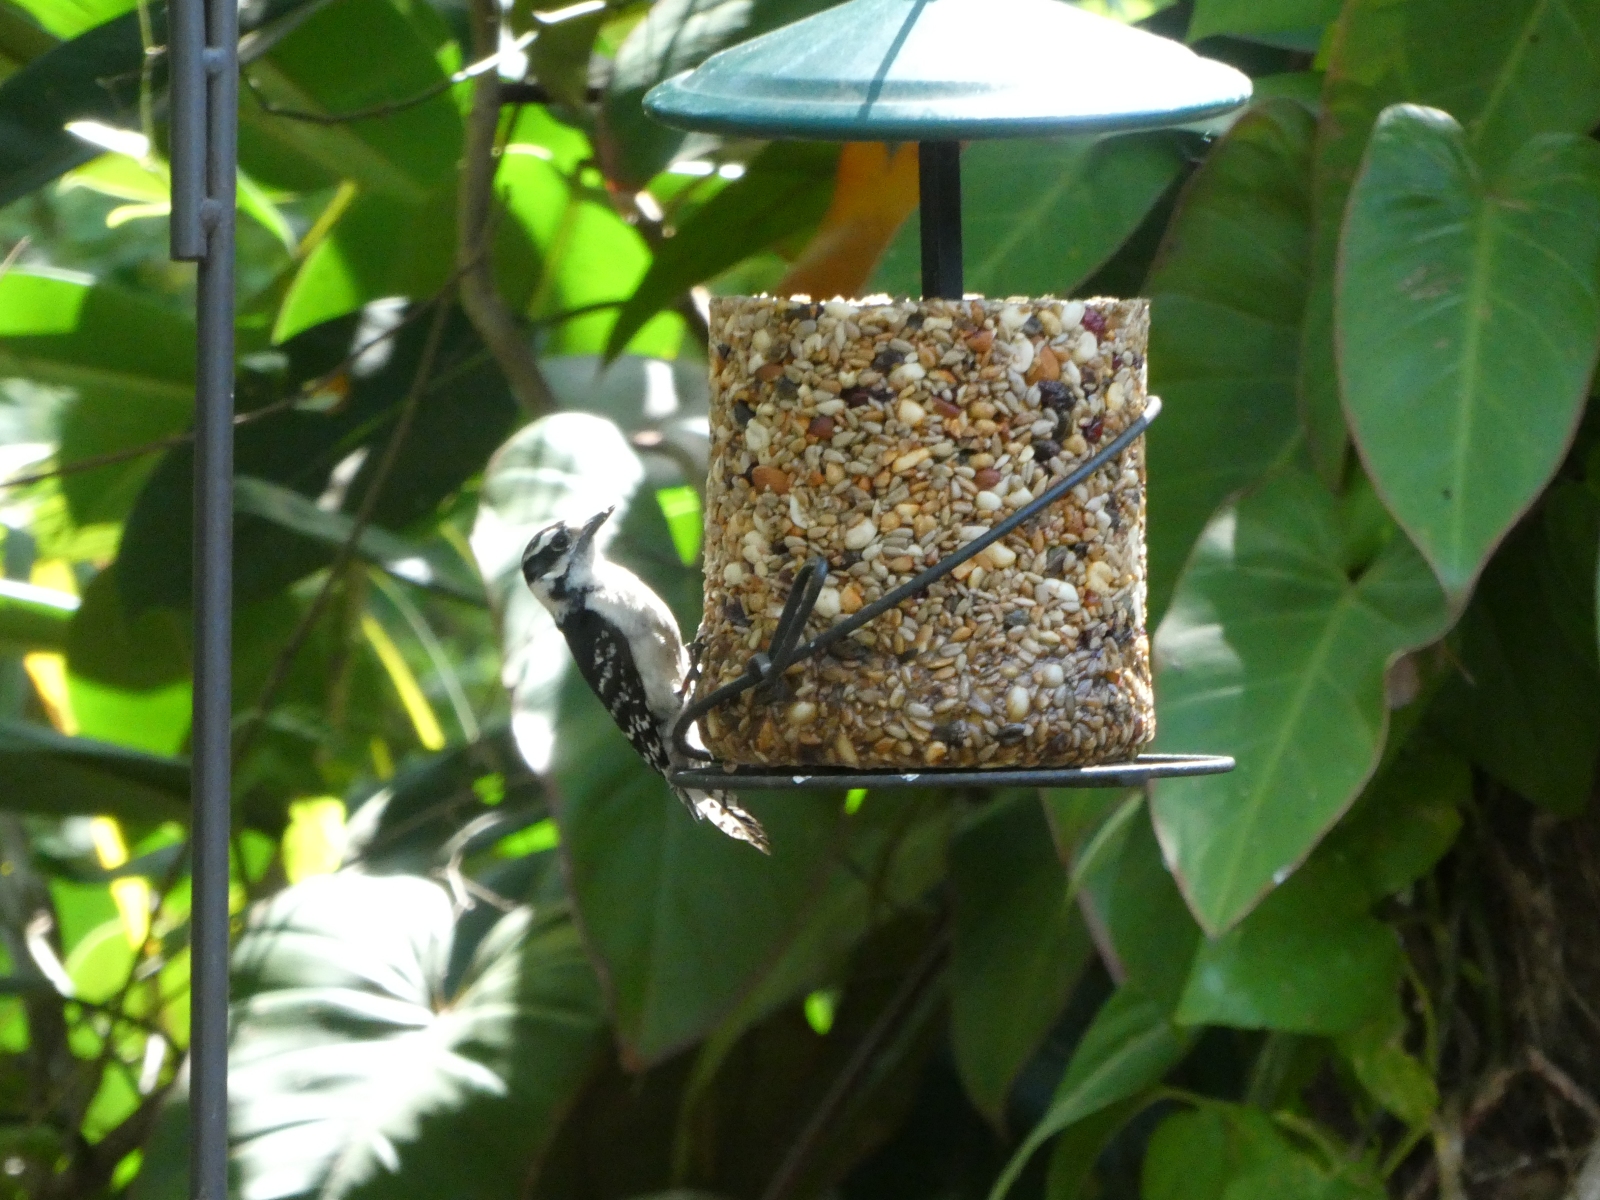 I had hardly walked away from the feeders when the first customer arrived. A female downy woodpecker landed on the fresh, new seed cylinder and began pecking away at it. We have several mated pairs of downy
woodpeckers on our property. They are near constant fixtures at our feeders.
I had hardly walked away from the feeders when the first customer arrived. A female downy woodpecker landed on the fresh, new seed cylinder and began pecking away at it. We have several mated pairs of downy
woodpeckers on our property. They are near constant fixtures at our feeders.
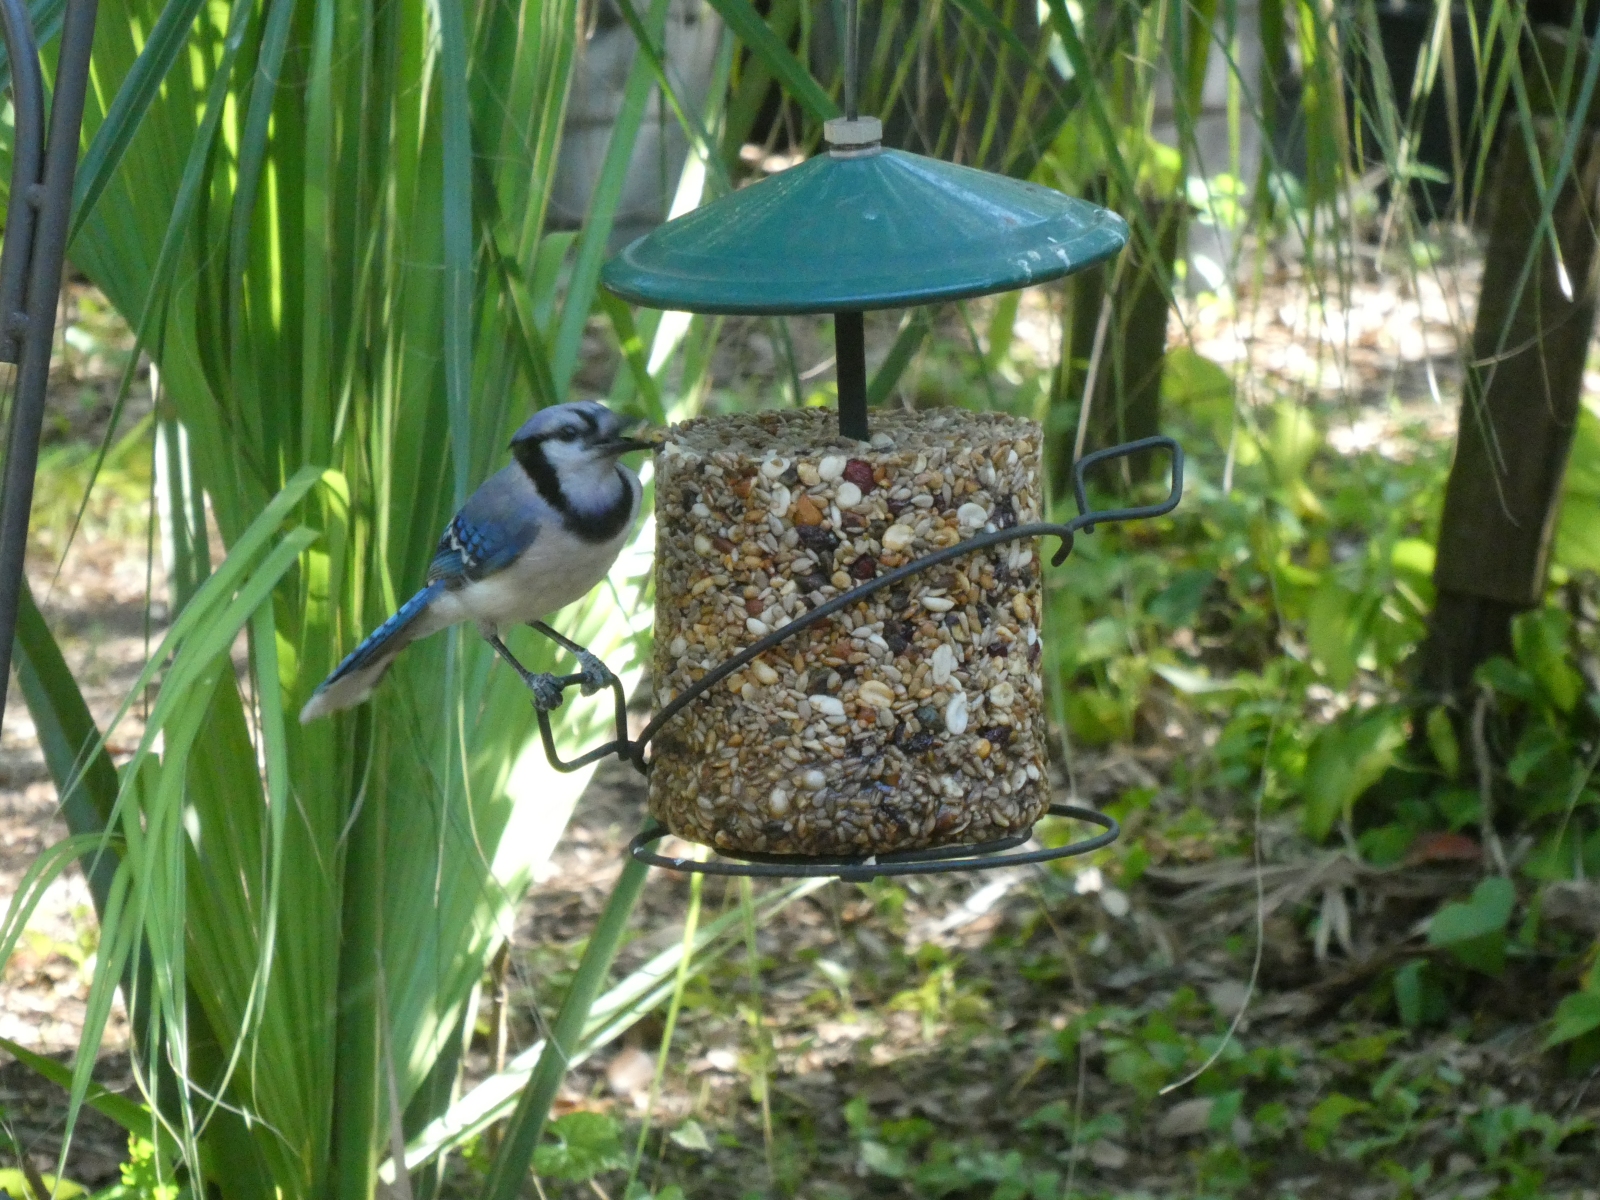 A short time later a blue jay arrived to sample the seed cylinder.
 Later a male downy woodpecker arrived to take his turn at the seed cylinder.
 The next morning it rained really hard. There were strong thunderstorms and hard, blowing rain. I was glad to see my home-made seed cylinder didn't melt away in the rain.
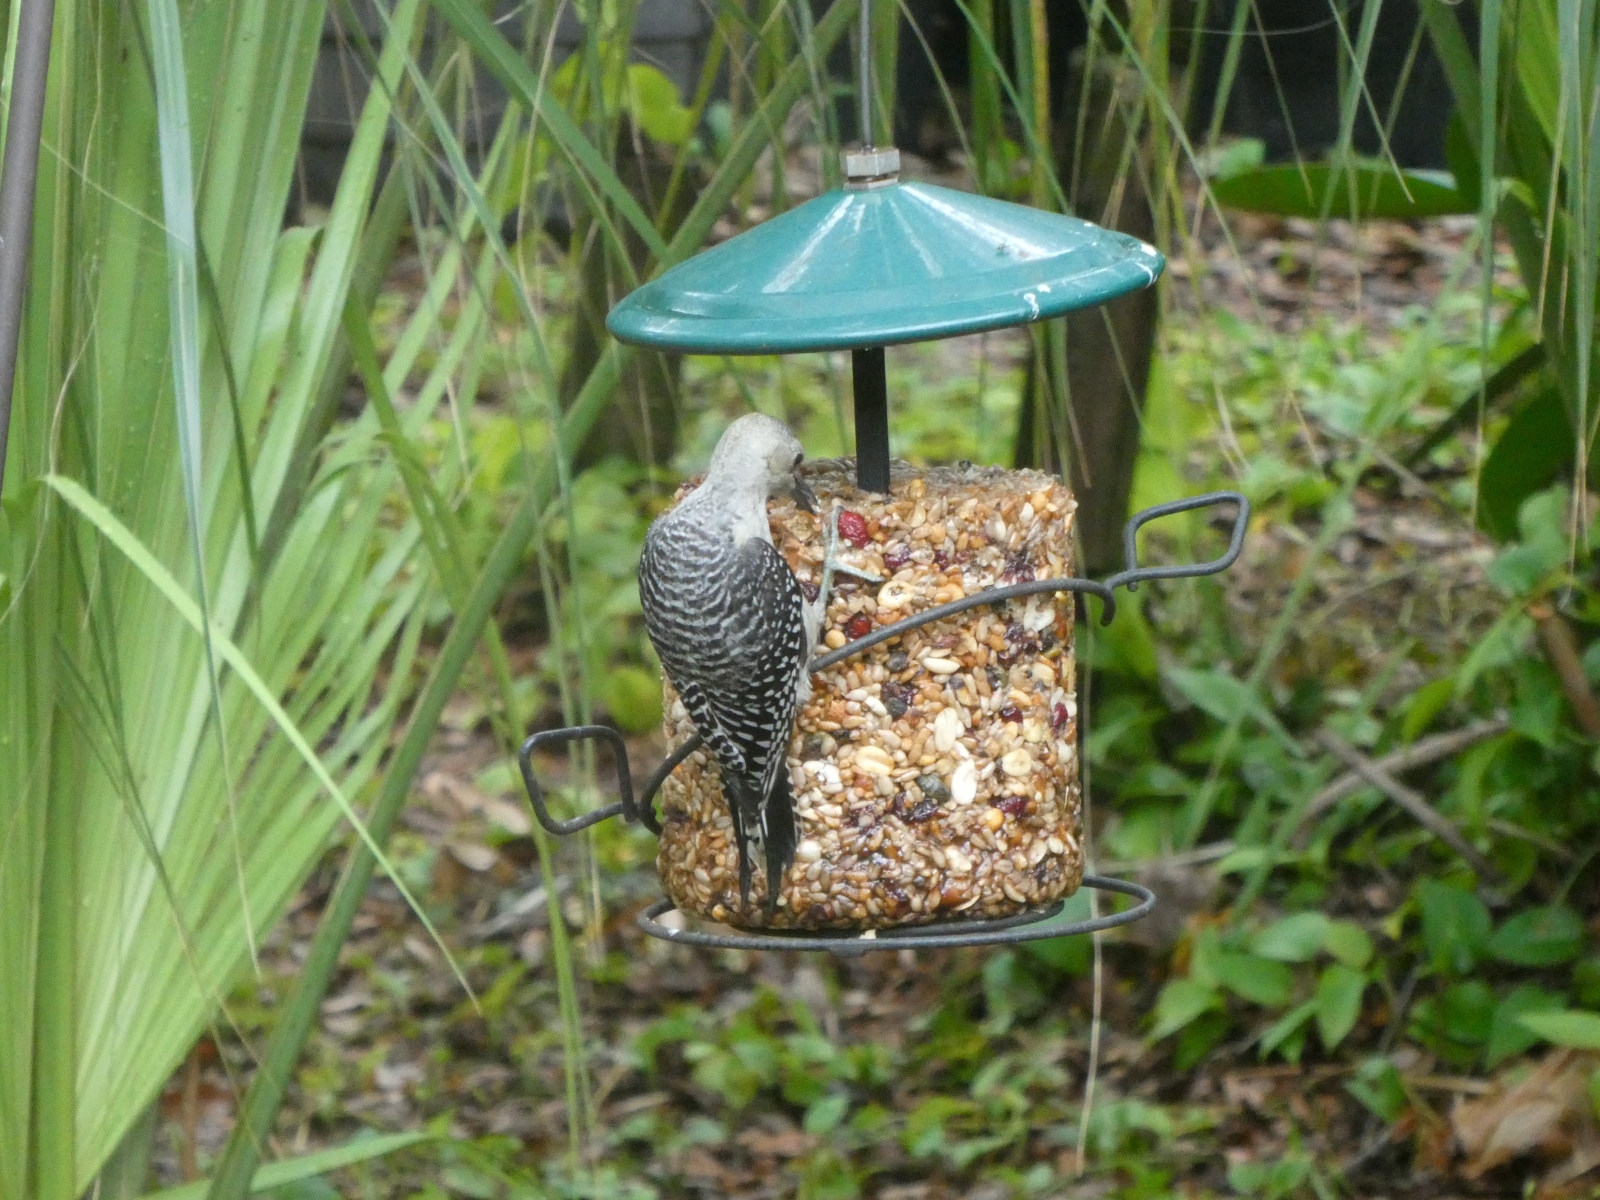
After the weather cleared up, an immature red bellied woodpecker came to the cylinder and ate its fill.
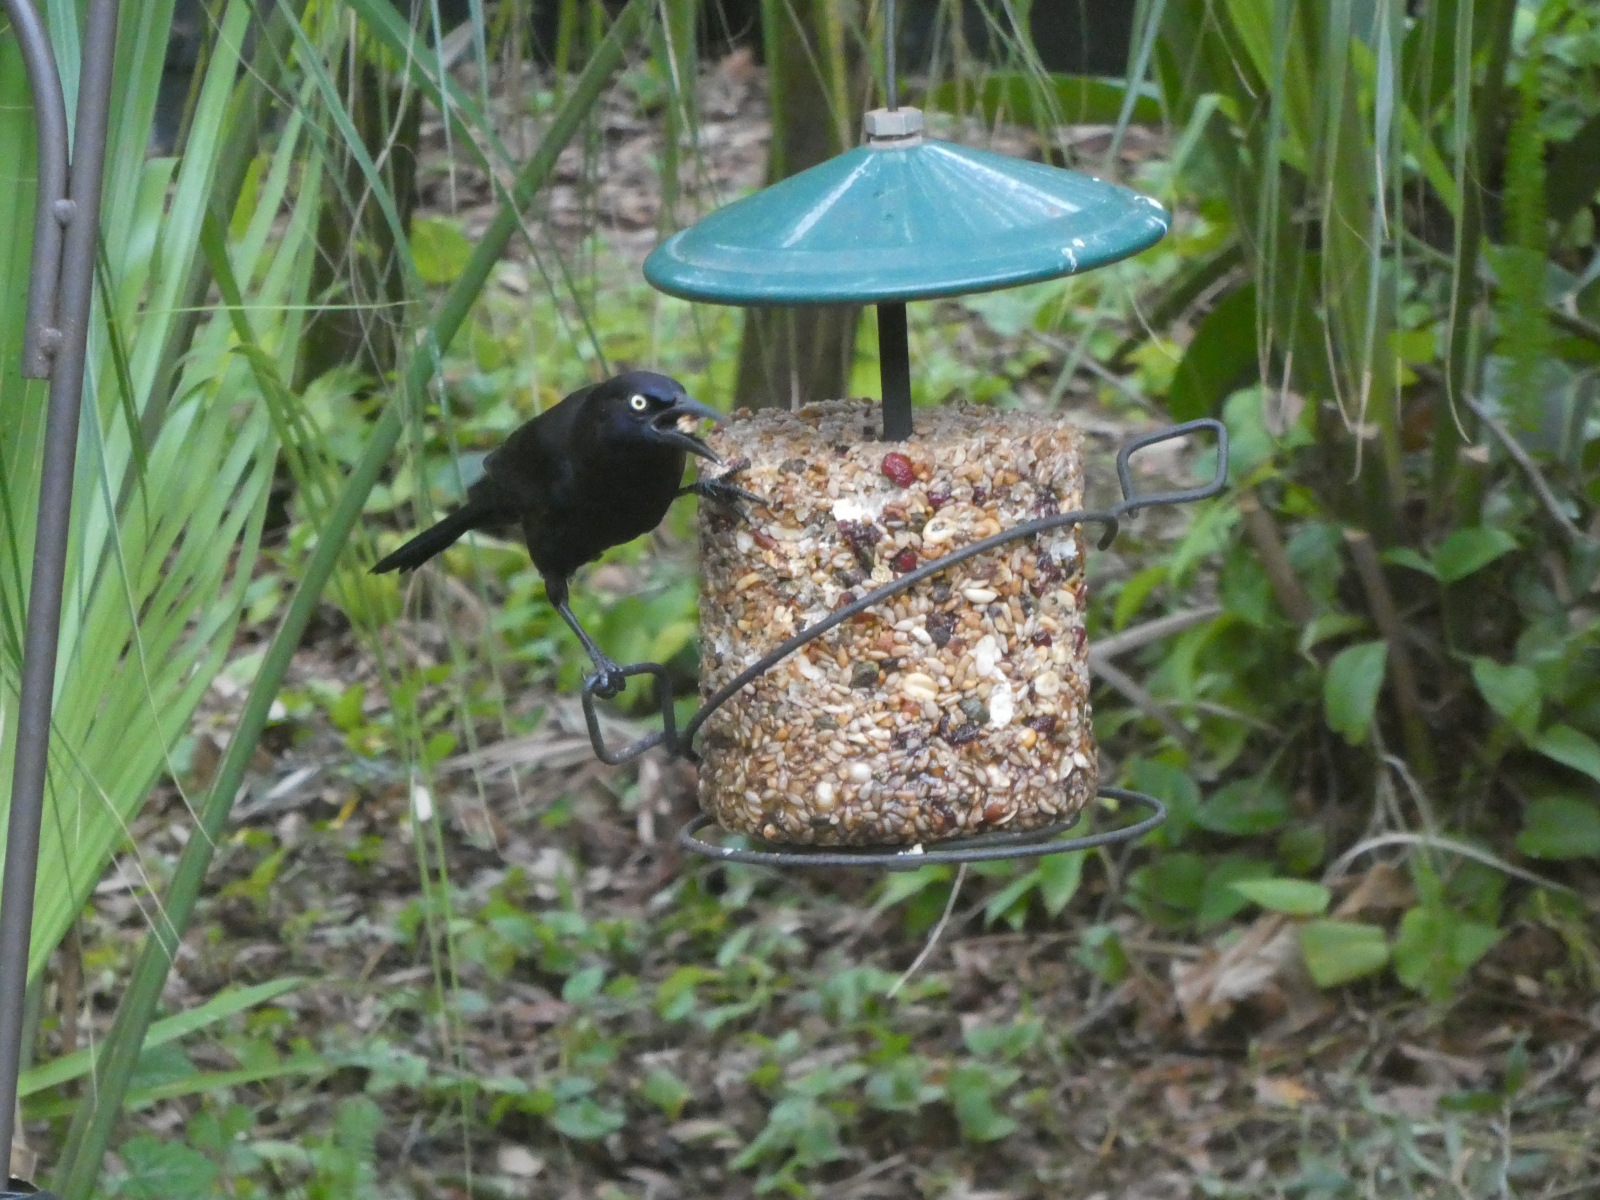 Later in the day a bunch of grackles passed through the back yard. Several of them took their turns on the new seed cylinder.
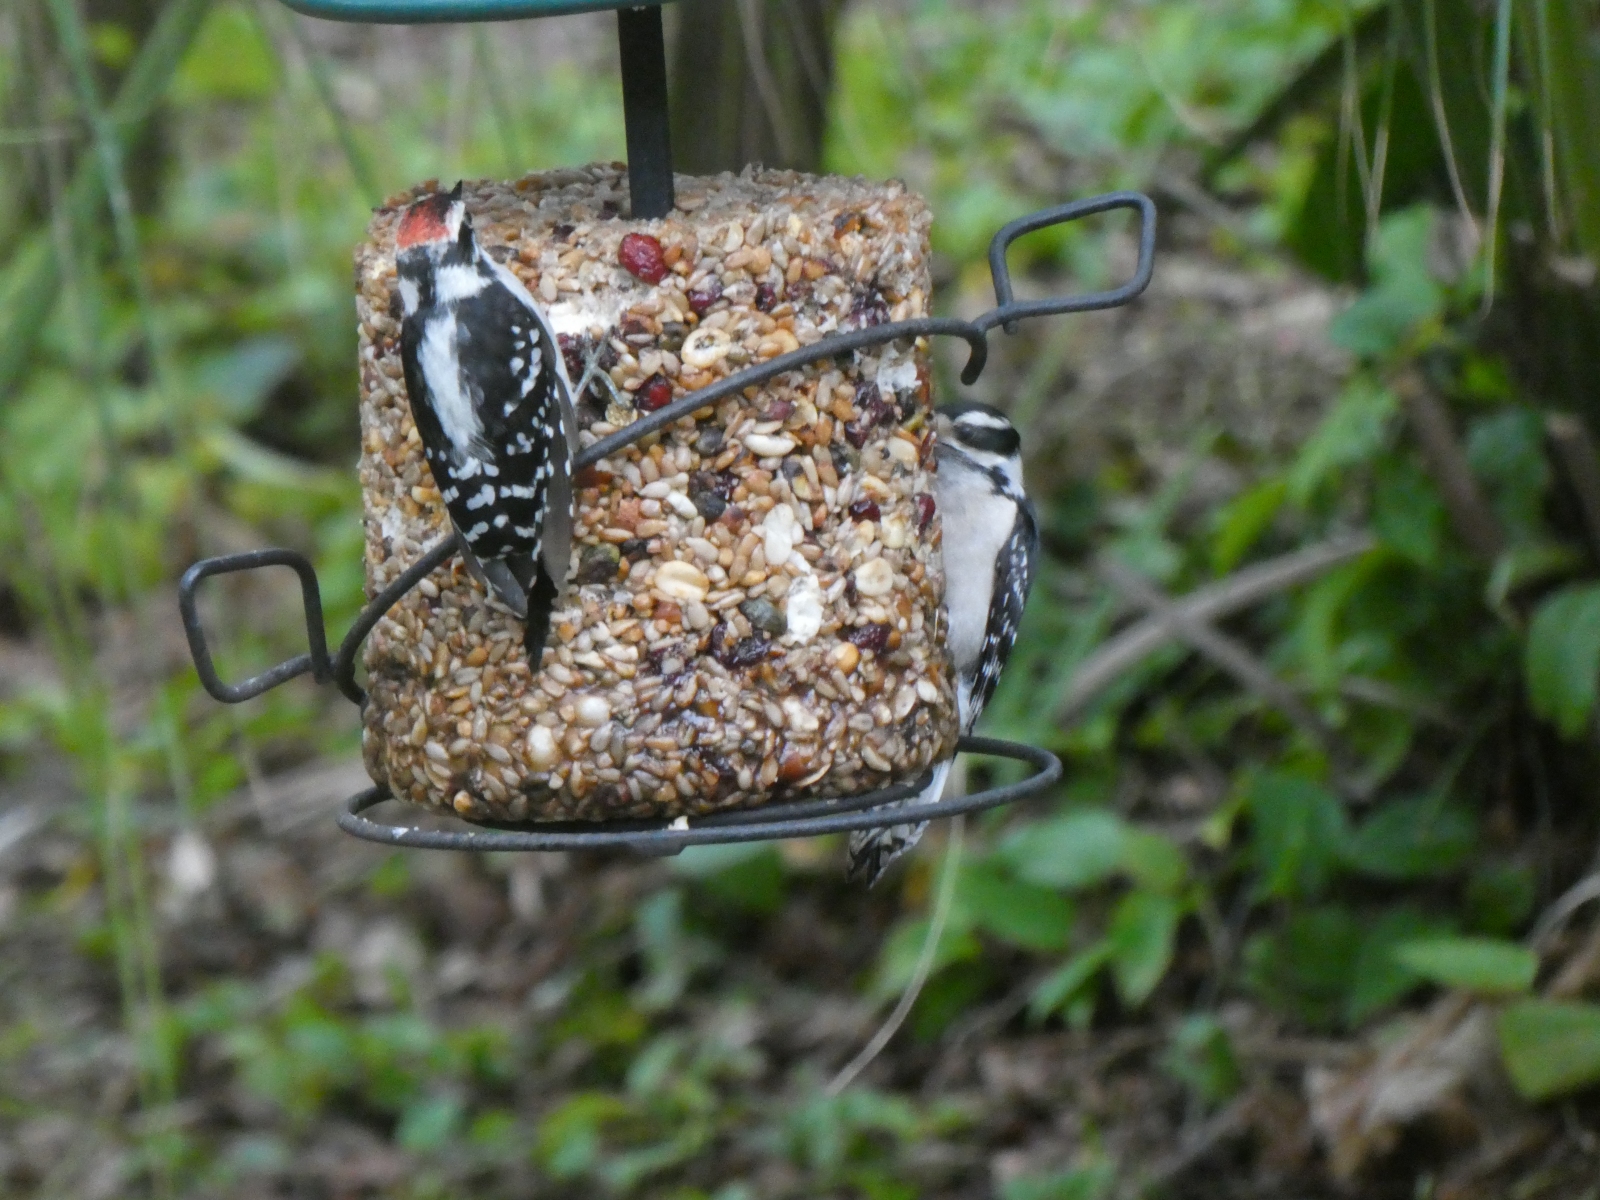 In the evening the downy woodpeckers were back. This time we had both a male and a female on the seed cylinder at the same time.
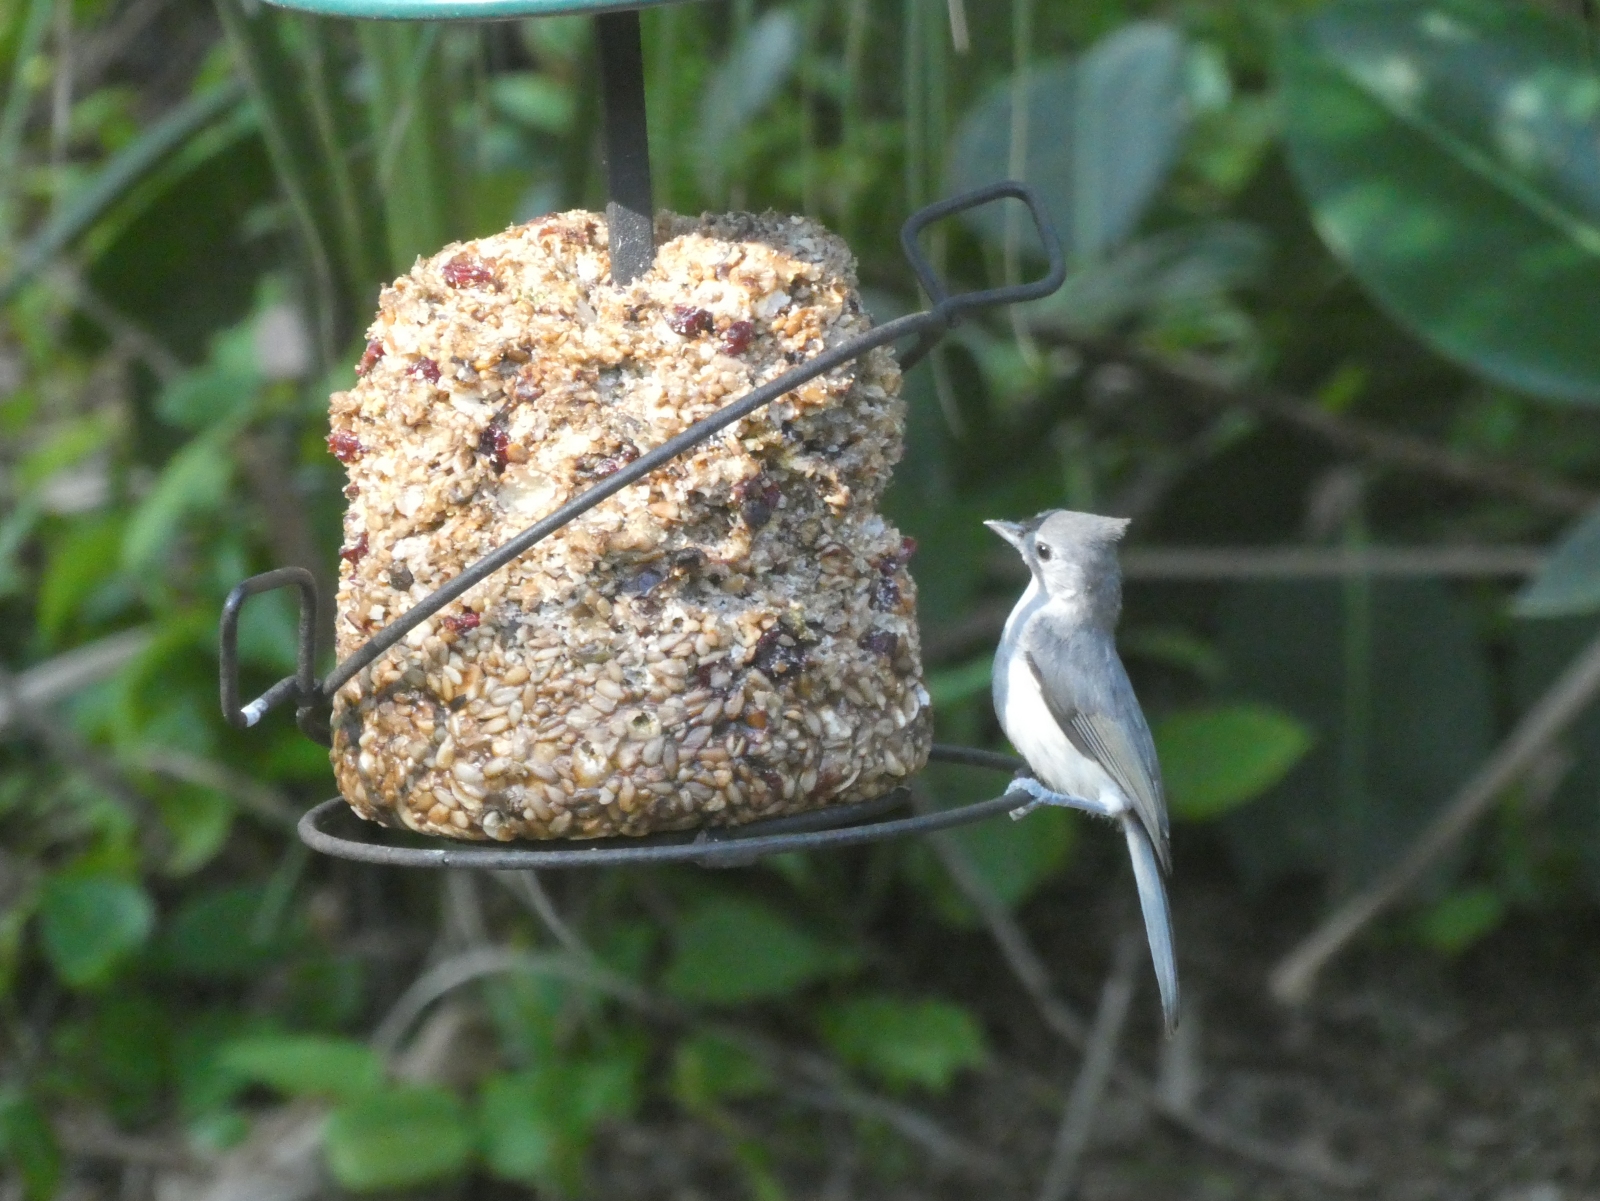 A few days later, the seed cylinder was starting to look quite picked at. That's when a tufted titmouse came to visit and get a snack.
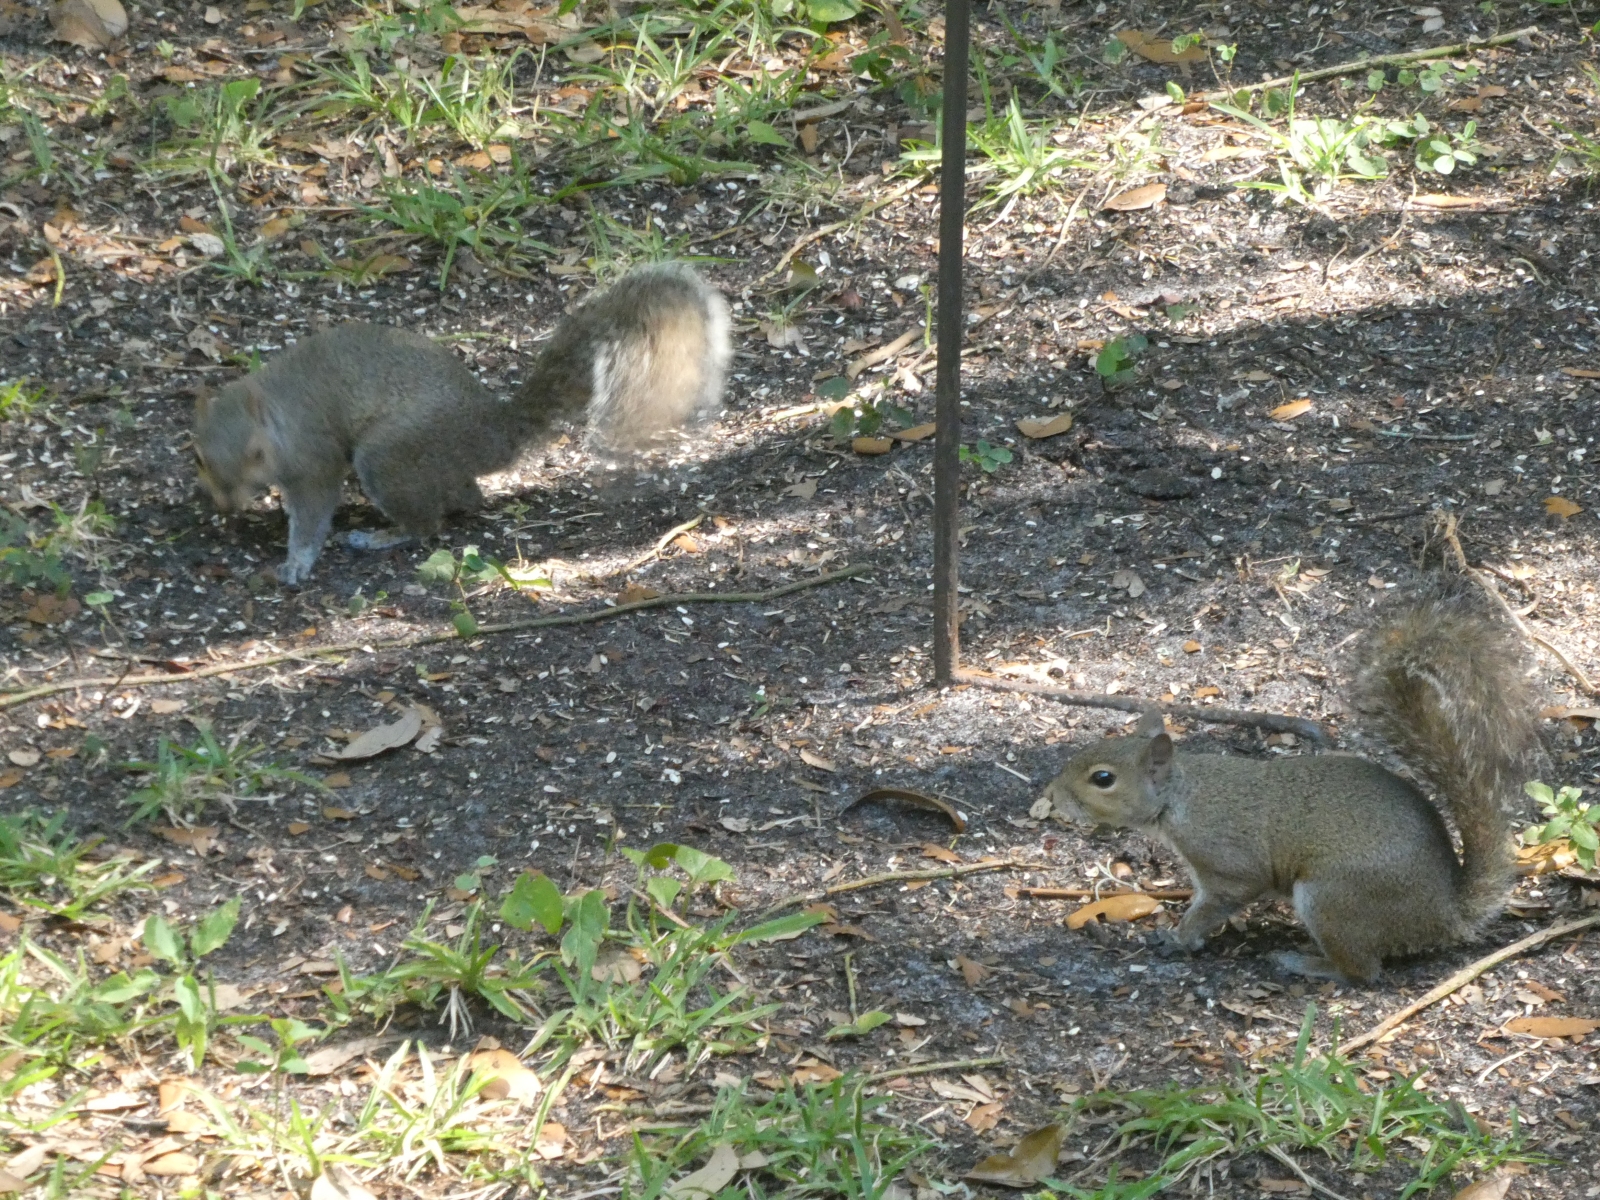 Looks like everyone likes my seed cylinders, even the squirrels.
There are always a lot of squirrels scurrying around under our feeders. Birds are messy eaters, seemingly dropping as much or more than they actually eat. This is a boon to the squirrels, who can't get onto
our feeders. We've gone to great lengths to squirrel-proof them. There are metal cones to prevent them from climbing the Shepard's crook poles. We have positioned them far enough away from anything the squirrels
could jump from that they can't make the leap to the feeders. The one loose seed feeder we hang in a tree is a squirrel-proof type. It stays open when light birds land on it, but the weight of a squirrel on it causes
the feeder openings to close up. So, sorry fellows. You'll just have to make do with what the birds drop.
Looks like everyone likes my seed cylinders, even the squirrels.
There are always a lot of squirrels scurrying around under our feeders. Birds are messy eaters, seemingly dropping as much or more than they actually eat. This is a boon to the squirrels, who can't get onto
our feeders. We've gone to great lengths to squirrel-proof them. There are metal cones to prevent them from climbing the Shepard's crook poles. We have positioned them far enough away from anything the squirrels
could jump from that they can't make the leap to the feeders. The one loose seed feeder we hang in a tree is a squirrel-proof type. It stays open when light birds land on it, but the weight of a squirrel on it causes
the feeder openings to close up. So, sorry fellows. You'll just have to make do with what the birds drop.
|
Click to learn how
to meet them
|
a lady to
learn how
to meet her