Building A Recirculating Sluice Box For Gold Prospecting
An easy modification to any sluice box
One of my many hobbies is recreational gold prospecting. I started out just gold panning. Panning is lots of fun, but to find any serious gold, you need
to process a lot of dirt. Doing that with only a gold pan is no fun at all. Any serious prospector eventually acquires a sluice box. Sluice boxes allow
you to process many times more dirt than you could with a pan alone, and do it quickly and easily. The only problem with sluice boxes is that they need
a source of running water to work. That's fine as long as the streams you want to prospect are flowing. What happens though when the streams dry up in the
heat of summer? Your sluice box becomes a paperweight until the rains come again. The solution to the problem is to build a re-circulating sluice and carry
some water with you out to the diggings. Then you can process material in even the driest conditions. Not just your favorite gold panning streams once they
dry up in the heat of summer, but also in desert washes that hardly ever see any running water. You can even do high-banking, which is working benches and other
areas well up out of the stream channel. The possibilities are nearly endless.
Just about any sluice can easily be converted into a recirculating sluice box. Only a few easy to find parts and an afternoon's work are required. It's easy.
Here is a brief video of the re-circulating sluice in operation. Read below to see how I built it.
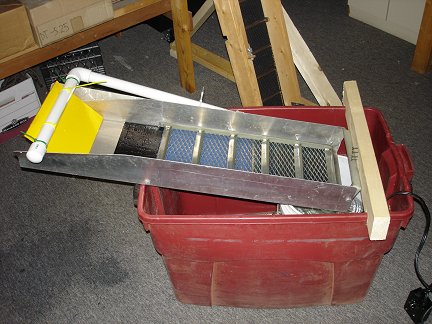
My first recirculating sluice was entirely home-built. It was built from wood with
angle-iron riffles. It worked well, but there was room for improvement. The sluice was narrow which limited the amount of material I could process.
Also the right angle riffles were not as efficient as true Hungarian riffles. It was also too shallow to use miner's moss in the bottom.
I was at the point of starting over and building a new sluice when I saw a famous, commercially-made
model for sale, used, cheap on Ebay. I grabbed it, and then set about building a recirculating system for it.
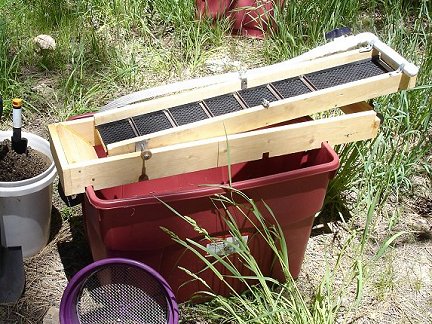
Once I had the new sluice box, I set about designing a recirculating system for it. My goals were to keep it as simple as possible, and use mostly
just items I would normally be taking into the field with me anyway on my prospecting trips. Re-using the big red tub was an obvious choice. It
has worked well in the past, and since I store all my prospecting equipment in it anyway, it always goes into the field with me. I also always take
a few 5 gallon buckets with me, so I incorporated one into the design. Of course the sluice would always be going into the field with me. I already
had the bilge pump and hose. That just left the spray bar and slope adjustment system to fabricate.
Something new I am trying this time is putting a bucket under the sluice to catch the waste material that falls out of it. That way the tub doesn't
fill up with dirt and rocks. Emptying the bucket occasionally is much easier than shoveling dirt out of the tub. I also don't have to worry about the
bilge pump getting buried and clogged by the waste material.
I am re-using the 12 Volt bilge pump from the first recirculating sluice setup. The bilge pump is a beat-up, old 1750 GPH unit
I got at a yard sale for only $3. It is ugly, but it keeps on working like a champ.
I glued a PVC fitting on the output of the pump and screwed a hose barb connector onto it. A few feet of 3/4in ID hose send the water up to the
spray bar at the top of the sluice.
I am also reusing the PWM speed controller for the pump motor that I built for my first sluice.
A speed controller isn't absolutely necessary. A valve installed in line with the spray bar can also be used to control the volume of water fed
into the sluice box.
I use a couple if 12 Volt, sealed, Lead-Acid batteries to power the pump.
Click to learn how
to meet them
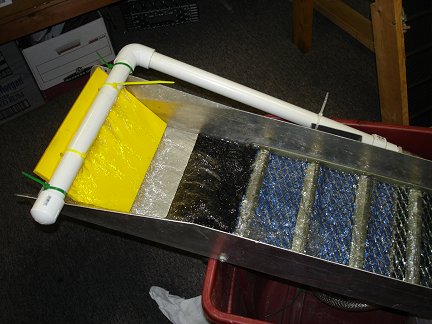
The spraybar is made from 1 inch PVC pipe and fittings. It is all glued together, except for the end cap at the top left. I left it unglued
in case I ever have to clear clogs out of the pipe. It is a tight friction-fit, and doesn't leak. The spray bar is attached to the sluice
box with zip-ties through holes drilled in the top of the box, and at the handle (not shown in this photo).
On the occasions when I can use the sluice in
a flowing stream like it was designed for, I can easily cut the zip-ties and remove the spray bar. It can also be easily re-attached later with
new zip-ties.
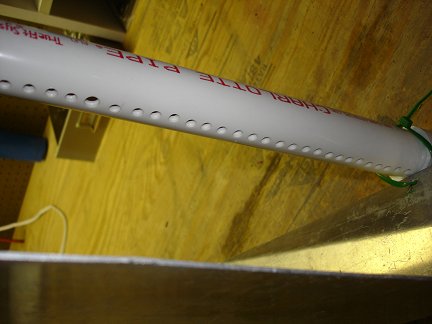
Here is a view of the underside of the spray bar showing the row of holes drilled in it for the water to spray out of.
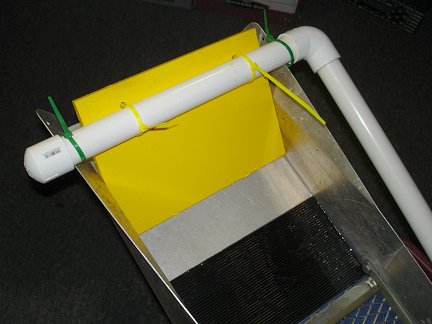
An early test showed that some water would splash out of the top of the sluice box, even at a pretty heavy slope. If you go to the trouble of
hauling a lot of water out into a dry wash, you don't want to waste it. So I made this barrier to
keep the water in. It is just a piece of scrap plastic cut to length and width to fit in the top of the sluice box. I drilled some holes in it
and attached it to the spraybar with more zip-ties.
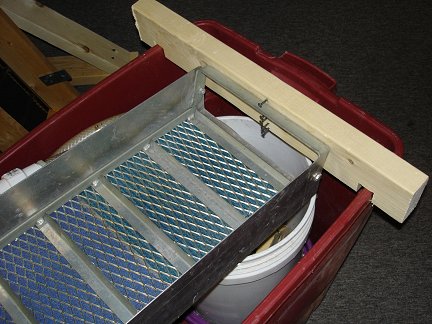
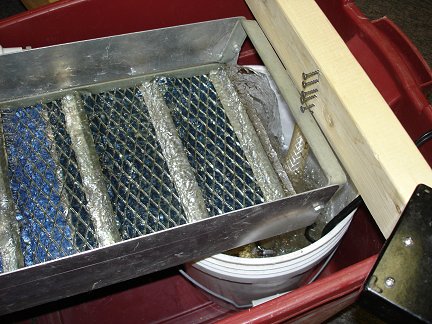
Here is a photo of the lower end of the sluice. The white bucket under the bottom of the sluice will catch all the rocks and sand that pass
through the sluice. Fairly clean water will overflow back into the red tub. This system prevents the tub from filling up with dirt. It is a lot easier to empty
the bucket occasionally than to shovel dirt out of the tub.
Click to learn how
to meet them
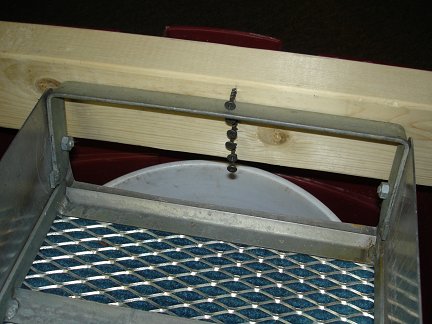
Here is a close-up shot of the super simple slope adjustment mechanism. It is just a piece of 2x4, notched to sit across the top of the tub,
with some screws sticking out of it at about 1/2 inch intervals. I can adjust the slope of the sluice by hanging the bottom end of the sluice
from different screws.
Here is a shot of the upper end of the sluice with the pump running and the water flowing out of the spray bar. It works great. The flow is good,
and there is only the occasional drip of leakage.
Here is a shot of the lower end of the sluice with the water flowing. For this test run, I put the bilge pump in the bottom of the bucket and
only filled it about with about 3 gallons of water. I just wanted to test everything without filling the tub up with water.
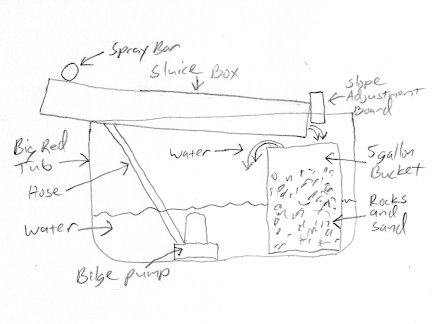
In actual use this system
will need about 8 gallons of water to work. Five gallons in the bucket, and about another three in the tub so the pump isn't sucking air. As you process
material, the water in the bucket is displaced by dirt and rocks and ends up in the tub. I normally carry two 5-gallon jugs of water with me when I go
prospecting in dry areas. Since the water is so heavy, I am limited to prospecting only in areas I can easily drive into, or areas that still have at least
some puddled water available, even if it isn't flowing. The water requirements could be reduced by using a narrower tub and a smaller catch bucket. I will
probably replace the 5 gallon bucket I used for testing with a 3 gallon bucket in the field.
I can't wait to get this new recirculating sluice out into the field and give it a workout.

 One of my many hobbies is recreational gold prospecting. I started out just gold panning. Panning is lots of fun, but to find any serious gold, you need
to process a lot of dirt. Doing that with only a gold pan is no fun at all. Any serious prospector eventually acquires a sluice box. Sluice boxes allow
you to process many times more dirt than you could with a pan alone, and do it quickly and easily. The only problem with sluice boxes is that they need
a source of running water to work. That's fine as long as the streams you want to prospect are flowing. What happens though when the streams dry up in the
heat of summer? Your sluice box becomes a paperweight until the rains come again. The solution to the problem is to build a re-circulating sluice and carry
some water with you out to the diggings. Then you can process material in even the driest conditions. Not just your favorite gold panning streams once they
dry up in the heat of summer, but also in desert washes that hardly ever see any running water. You can even do high-banking, which is working benches and other
areas well up out of the stream channel. The possibilities are nearly endless.
One of my many hobbies is recreational gold prospecting. I started out just gold panning. Panning is lots of fun, but to find any serious gold, you need
to process a lot of dirt. Doing that with only a gold pan is no fun at all. Any serious prospector eventually acquires a sluice box. Sluice boxes allow
you to process many times more dirt than you could with a pan alone, and do it quickly and easily. The only problem with sluice boxes is that they need
a source of running water to work. That's fine as long as the streams you want to prospect are flowing. What happens though when the streams dry up in the
heat of summer? Your sluice box becomes a paperweight until the rains come again. The solution to the problem is to build a re-circulating sluice and carry
some water with you out to the diggings. Then you can process material in even the driest conditions. Not just your favorite gold panning streams once they
dry up in the heat of summer, but also in desert washes that hardly ever see any running water. You can even do high-banking, which is working benches and other
areas well up out of the stream channel. The possibilities are nearly endless.
 Once I had the new sluice box, I set about designing a recirculating system for it. My goals were to keep it as simple as possible, and use mostly
just items I would normally be taking into the field with me anyway on my prospecting trips. Re-using the big red tub was an obvious choice. It
has worked well in the past, and since I store all my prospecting equipment in it anyway, it always goes into the field with me. I also always take
a few 5 gallon buckets with me, so I incorporated one into the design. Of course the sluice would always be going into the field with me. I already
had the bilge pump and hose. That just left the spray bar and slope adjustment system to fabricate.
Once I had the new sluice box, I set about designing a recirculating system for it. My goals were to keep it as simple as possible, and use mostly
just items I would normally be taking into the field with me anyway on my prospecting trips. Re-using the big red tub was an obvious choice. It
has worked well in the past, and since I store all my prospecting equipment in it anyway, it always goes into the field with me. I also always take
a few 5 gallon buckets with me, so I incorporated one into the design. Of course the sluice would always be going into the field with me. I already
had the bilge pump and hose. That just left the spray bar and slope adjustment system to fabricate.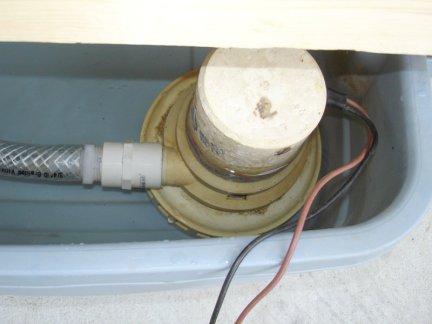 I am re-using the 12 Volt bilge pump from the first recirculating sluice setup. The bilge pump is a beat-up, old 1750 GPH unit
I got at a yard sale for only $3. It is ugly, but it keeps on working like a champ.
I am re-using the 12 Volt bilge pump from the first recirculating sluice setup. The bilge pump is a beat-up, old 1750 GPH unit
I got at a yard sale for only $3. It is ugly, but it keeps on working like a champ.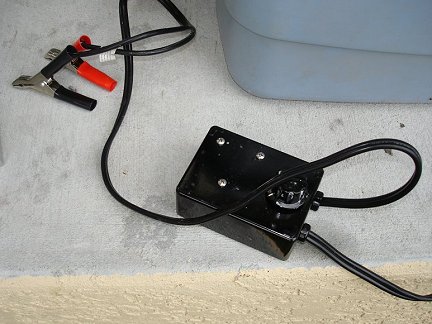 I am also reusing the PWM speed controller for the pump motor that I built for
 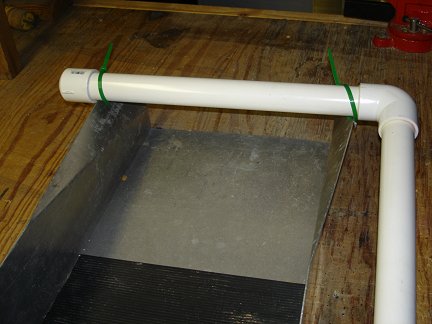 The spraybar is made from 1 inch PVC pipe and fittings. It is all glued together, except for the end cap at the top left. I left it unglued
in case I ever have to clear clogs out of the pipe. It is a tight friction-fit, and doesn't leak. The spray bar is attached to the sluice
box with zip-ties through holes drilled in the top of the box, and at the handle (not shown in this photo).
The spraybar is made from 1 inch PVC pipe and fittings. It is all glued together, except for the end cap at the top left. I left it unglued
in case I ever have to clear clogs out of the pipe. It is a tight friction-fit, and doesn't leak. The spray bar is attached to the sluice
box with zip-ties through holes drilled in the top of the box, and at the handle (not shown in this photo).
 Here is a view of the underside of the spray bar showing the row of holes drilled in it for the water to spray out of.
 An early test showed that some water would splash out of the top of the sluice box, even at a pretty heavy slope. If you go to the trouble of
hauling a lot of water out into a dry wash, you don't want to waste it. So I made this barrier to
keep the water in. It is just a piece of scrap plastic cut to length and width to fit in the top of the sluice box. I drilled some holes in it
and attached it to the spraybar with more zip-ties.
An early test showed that some water would splash out of the top of the sluice box, even at a pretty heavy slope. If you go to the trouble of
hauling a lot of water out into a dry wash, you don't want to waste it. So I made this barrier to
keep the water in. It is just a piece of scrap plastic cut to length and width to fit in the top of the sluice box. I drilled some holes in it
and attached it to the spraybar with more zip-ties.
 Here is a photo of the lower end of the sluice. The white bucket under the bottom of the sluice will catch all the rocks and sand that pass
through the sluice. Fairly clean water will overflow back into the red tub. This system prevents the tub from filling up with dirt. It is a lot easier to empty
the bucket occasionally than to shovel dirt out of the tub.
Here is a photo of the lower end of the sluice. The white bucket under the bottom of the sluice will catch all the rocks and sand that pass
through the sluice. Fairly clean water will overflow back into the red tub. This system prevents the tub from filling up with dirt. It is a lot easier to empty
the bucket occasionally than to shovel dirt out of the tub.
 Here is a close-up shot of the super simple slope adjustment mechanism. It is just a piece of 2x4, notched to sit across the top of the tub,
with some screws sticking out of it at about 1/2 inch intervals. I can adjust the slope of the sluice by hanging the bottom end of the sluice
from different screws.
Here is a close-up shot of the super simple slope adjustment mechanism. It is just a piece of 2x4, notched to sit across the top of the tub,
with some screws sticking out of it at about 1/2 inch intervals. I can adjust the slope of the sluice by hanging the bottom end of the sluice
from different screws.
 Here is a shot of the upper end of the sluice with the pump running and the water flowing out of the spray bar. It works great. The flow is good,
and there is only the occasional drip of leakage.
Here is a shot of the upper end of the sluice with the pump running and the water flowing out of the spray bar. It works great. The flow is good,
and there is only the occasional drip of leakage.
 Here is a shot of the lower end of the sluice with the water flowing. For this test run, I put the bilge pump in the bottom of the bucket and
only filled it about with about 3 gallons of water. I just wanted to test everything without filling the tub up with water.
Here is a shot of the lower end of the sluice with the water flowing. For this test run, I put the bilge pump in the bottom of the bucket and
only filled it about with about 3 gallons of water. I just wanted to test everything without filling the tub up with water.