It's easy. You can do it too
|
What is sourdough bread?In the beginning, all bread was sourdough bread. Sourdough is just a catch-all name describing any bread made with wild yeast cultures, rather than cultivated or commercial yeast cultures. In ancient times, wherever people made bread, they did it using cultures of wild local yeast. Commercial cultivated yeast did not exist yet. So all bread was sourdough. There is more to the story than that though. Wild yeast cultures generally also contain bacteria, specifically a kind of lactobacillus. Yeast and a lactobacillus like Lactobacillus sanfranciscensis can form a symbiotic relationship in a culture. In the terminology of baking, a sourdough culture is called a starter. The yeast in the starter use enzymes to break down the starch in flour into various sugars, which they then metabolize. The lactobacillus lives on metabolism by-products of the yeast. The lactobacillus produces lactic acid, which has a sour taste, which is where the sour in sourdough comes from. To create a starter, all you need to do is mix some unbleached bread flour with bottled water to form a thin slurry, and leave it in a warm place to ferment. The flour usually naturally contains some yeast and bacteria spores. If you leave your slurry uncovered and out in the open, wild yeast and bacteria floating on the breeze can also fall into it. I use bottled water to start and maintain my starter because tap water contains chlorine and other chemicals meant to kill bacteria. After a few hours, or most of a day, the starter should begin producing bubbles. This is a sign that something is living in it. Probably lots of things are living in it. Probably many different species of yeast, bacteria and mold. This won't make good bread. The starter needs to stabilize. Over time, given repeated feedings of flour and water, a starter containing yeast and lactobacillus will become stable. The lactic acid produced by the lactobacillus is toxic to most other types of bacteria and molds, so they die off. Because the yeast and lactobacillus flourish in the acidic environment, they also just crowd out everything else that can just barely tolerate it. You wind up with a starter that contains nothing but yeast and lactobacillus. So the starter generally won't go bad, and will produce a bread with consistent flavor for as long as the starter is maintained by periodically feeding it more flour and water. Some bakeries have starters have been used to make bread for more than a hundred years. Sourdough starters can be purchased or acquired from many sources (a list of sources is at the bottom of this page). These are proven starters with a good track record. If you follow the instructions that come with them, you should be able to make decent sourdough bread. I'm more of a do it yourselfer, so I had to try making my own starter. If you already have a starter, you can skip ahead to the proofing the sponge section.
Making your own starter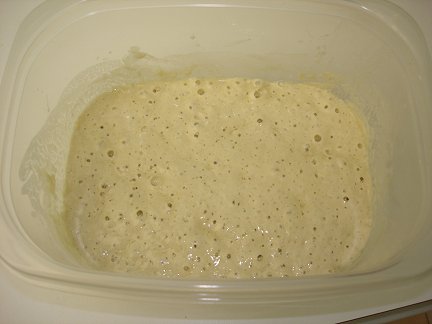 To make my starter, I mixed 1 cup of unbleached bread flour with about 1 cup of bottled water, to make a thin slurry.
I used a wide top plastic container to hold the slurry, and placed it on my warm patio for 6 hours. My patio is screened,
so critters couldn't get in the slurry, but yeast and bacteria floating on the breeze could.
To make my starter, I mixed 1 cup of unbleached bread flour with about 1 cup of bottled water, to make a thin slurry.
I used a wide top plastic container to hold the slurry, and placed it on my warm patio for 6 hours. My patio is screened,
so critters couldn't get in the slurry, but yeast and bacteria floating on the breeze could.By the way, never use metal containers or utensils when working with sourdough starter. The high acid content of the starter will leech metal out of the containers. Metals taste bad, and heavy metals are poisonous. Once bubbles began to form in my starter, I brought it inside, and covered it with a loose-fitting lid. Never use an air-tight container with sourdough starter, because pressure from the gases generated can build up until something gives. 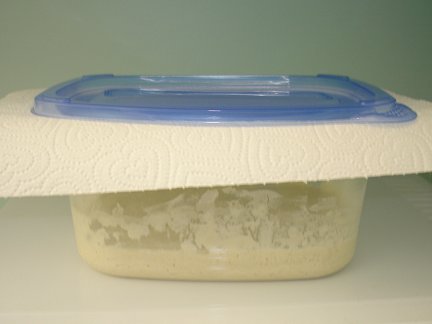 Every day for the next week, I'd throw away half the starter, and then mix in 1/2 cup of flour and 1/2 cup of bottled
water. This sounds very wasteful, but it is an essential step in getting the starter to stabilize. Throwing away half
the starter keeps the volume constant, and gets rid of waste products and impurities. After throwing away half the
starter every day for a week, only 1/128th if the original material you started with remains. Only things that have
adapted to growing in the environment of the starter are re-populating it after each feeding. These conditions favor
a symbiotic culture of yeast and lactobacillus.
Every day for the next week, I'd throw away half the starter, and then mix in 1/2 cup of flour and 1/2 cup of bottled
water. This sounds very wasteful, but it is an essential step in getting the starter to stabilize. Throwing away half
the starter keeps the volume constant, and gets rid of waste products and impurities. After throwing away half the
starter every day for a week, only 1/128th if the original material you started with remains. Only things that have
adapted to growing in the environment of the starter are re-populating it after each feeding. These conditions favor
a symbiotic culture of yeast and lactobacillus.After a week, the starter should be pretty stable and active. A few hours after you feed it, it should get good and bubbly. A day after feeding it, it should smell a little sour, and maybe a little beery, since alcohol is one of the byproducts of the yeast. There may be a layer of dark liquid floating on top of the starter. This is known as hooch. It contains some alcohol, but I wouldn't drink it if I were you. With all the lactic acid present in the starter, it is probably a very bitter brew. Just stir it back into the starter. 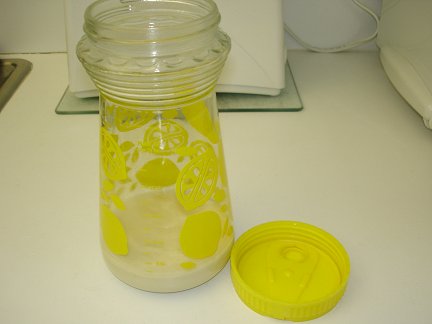 Once you have a good stable starter, you need to contemplate long-term storage options. A glass or ceramic container
with a loose fitting lid is probably best. As usual, throw away half your starter, then feed it with fresh flour and
water, and transfer it to your long-term storage container. Stash it in the fridge. The cold will slow down the
metabolism of the yeast and lactobacillus. You'll only need to feed your starter every week or two from now on.
You could probably go much longer than that. A stable starter is damn hard to kill.
Once you have a good stable starter, you need to contemplate long-term storage options. A glass or ceramic container
with a loose fitting lid is probably best. As usual, throw away half your starter, then feed it with fresh flour and
water, and transfer it to your long-term storage container. Stash it in the fridge. The cold will slow down the
metabolism of the yeast and lactobacillus. You'll only need to feed your starter every week or two from now on.
You could probably go much longer than that. A stable starter is damn hard to kill.This is the container I use for storing my starter. It is an ugly 1970s vintage lemonade container I got at a yard sale for 25 cents. It has three virtues that make it great for use as a sourdough starter container. It has a wide mouth, it is made of glass, and the lid is not air-tight.
Proofing the Sponge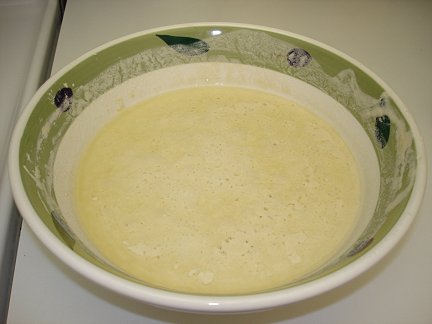 We start by making a sponge. I don't know why it is called that. Basically we need to pre-ferment part of the flour that will
go into the bread to develop the sour flavor.
We start by making a sponge. I don't know why it is called that. Basically we need to pre-ferment part of the flour that will
go into the bread to develop the sour flavor.Empty your container of starter into a large glass or ceramic bowl (do not use metal). Add 1 1/2 cups flour, and stir in enough water to make a slurry about the consistency of pancake batter. Cover the bowl with a cloth, and place it somewhere warm where it can ferment for a few hours. I like to put mine in the oven with the light on. It seems to be just the right temperature. Take this opportunity to thoroughly wash your starter container. The longer you let the sponge ferment, the stronger the sourdough flavor will be. You need to let it go at least until it is bubbly and a froth forms on top. You will need to experiment to find the exact length of time that produces the perfect flavor for you. For me, it takes at least 5-6 hours. Depending on the activity of your starter, you may need to leave it overnight. By the way, the act of fermenting the sponge is called proofing the sponge in baking terminology. Again, I have no idea why. I guess baking has developed its own jargon, just like the medical, legal and technical professions have. The sole purpose of which seems to be just to confuse and/or impress outsiders. Once your sponge is fermented or proofed, you are ready to actually make bread.
Baking sourdough breadThis recipe will make one large round of sourdough bread. These quantities are approximate, especially the amount of flour. You may or may not need the yeast.
One thing you need to know, before continuing, is that sourdough bread dough rises much more slowly than bread made with
commercial yeast cultures. Commercial yeast has been bred to be very fast and consistent. It is like a thoroughbred race
horse. Sourdough starter on the other hand, is like an old barnyard nag. It is slow and moody. The wild yeast strains
aren't as active as their well-bred commercial cousins. Also, the lactic acid present in the starter and sponge further
retards the activity of the yeast. Sourdough bread dough rises very slowly compared to yeast bread dough.
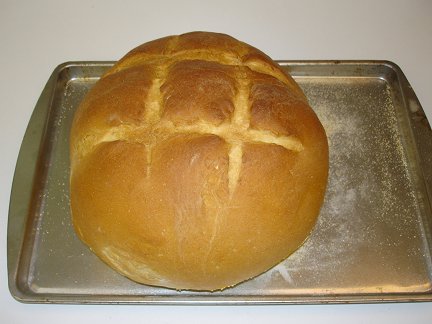
Once the dough has doubled in size, turn it out onto a floured surface and punch it down. Form it into a ball and place it on a cookie sheet that has been sprinkled with some corn meal. Place the loaf on the top rack of your oven. On the bottom rack place a wide pan filled with boiling hot water. Close the oven door and leave the loaf to do its second rise in the warm, moist oven. After about another hour, the loaf should have doubled in size again, if you used the yeast. It will probably take quite a bit longer without the yeast. You can now slash the top of the loaf if you like. It is purely decorative and totally optional. Sometimes I do, sometimes I don't. Leave the loaf in the oven, but remove the pan of water. Do not preheat the oven. Simply start up the oven set to 350 degrees with the bread already inside. Set your timer for 40 minutes. When your timer goes off, check the bread. The crust should be firm, dark and crispy. Thump the bread. It should be firm and hollow sounding. Leave it in for a few more minutes if it doesn't seem done enough yet. When done, remove the loaf from the oven and allow to cool on a wire rack.
Sources of Sourdough StarterNote: I have not used these starters myself, and cannot vouch for them. I am providing these links for people who have trouble creating their own starter, or don't want to bother with their own starter.King Arthur Classic Fresh Sourdough Starter Carl Griffith's 1847 Oregon Trail Sourdough Starter Sourdoughs International MISTER BAKER'S Authentic San Francisco Style Sourdough Bread Starter and Mixes |
|
[Back to Mike's Cooking & Recipe Page]
[Mike's Homepage]
[Email me]
Other places to visit:
[Mike's telescope workshop]
[Mike's home-built jet engine]
[Mike's Home-Built Wind Turbine]
[Mike's Home-Built Solar Panels]
[Mike's gold prospecting page]
© Copyright 2009-2013 Michael Davis, All rights reserved.
 I love Sourdough bread. I first got hooked on it on a vacation trip to San Francisco. Sourdough bread is a San Francisco tradition,
and the standard by which most other sourdough bread is judged.
I love Sourdough bread. I first got hooked on it on a vacation trip to San Francisco. Sourdough bread is a San Francisco tradition,
and the standard by which most other sourdough bread is judged.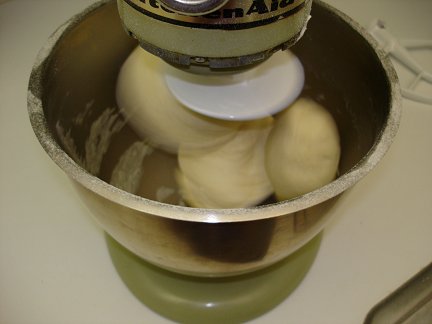 Put 2 cups of the proofed sponge in the bowl of your stand mixer. You should have some sponge left over. This is your
starter for next time. Put it in your freshly cleaned long-term storage container. Feed it with 1/2 cup of flour and 1/2
cup of water, and stash it back in your fridge until the next time.
Put 2 cups of the proofed sponge in the bowl of your stand mixer. You should have some sponge left over. This is your
starter for next time. Put it in your freshly cleaned long-term storage container. Feed it with 1/2 cup of flour and 1/2
cup of water, and stash it back in your fridge until the next time.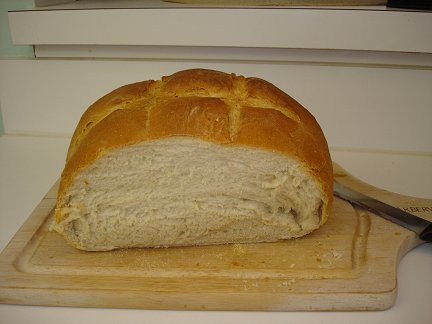 Allow the bread to cool down before slicing it.