My Improvised DC Generator Build
For charging batteries when the wind and sun won't
Here is the latest creation to come out of my top secret, mad scientist, laboratory. It is an improvised DC generator
built from an old lawn edger and a permanent magnet DC motor. The inspiration behind this generator was to have a cheap way to charge up my battery
banks on days when the weather is cloudy and calm, and my solar panels and
wind turbine aren't providing much energy. It was a really quick,
easy and cheap project. I got the lawn edger for only $5 at a yard sale. The permanent magnet motor came from an auction for another $5. The
total cost of the project was only a little over $20! So far I have the output of the generator up to 10 Amps at 12 Volts. Further tinkering
may improve that. This web site will explain how I built it.
My eventual goal is to convert the generator to running on wood gas from
my biomass gasifier project. Stay tuned for that.
This is the 3 Horsepower edger I bought at a yard sale for only $5! It's not much of a looker, but it starts easy and runs great. I would have preferred to
have about a 5 Horsepower engine, but at only $5, I couldn't pass this thing up.
I wanted a gasoline engine I could experiment with converting over to running on wood gas from my gasifier.
Aside from just getting the motor running on wood gas, I wanted it to do something useful, do I decided to build a generator. I'll keep my eyes open for a
cheap 5 horse or bigger engine to play with in the future.
Another view of the edger. It is rusty and dirty, but basically sound. I almost didn't buy it because I couldn't get it to start at the yard sale.
It seemed to have good compression though, so I took a chance for only $5. It tuned out I had the choke lever in the wrong position. Once I figured out
the choke, it starts every time on about the 2nd pull and runs strong. It does vibrate pretty badly though. Something is out of balance on it. I'll live
with it, considering the price.
This is the permanent magnet DC motor I used as the generator. It is a 90 Volt DC, 3/4 Horsepower motor. I got it at an auction for only $5. It acts as a
generator when the output shaft is turned. The output voltage depends on the speed the shaft is spun and the load on the generator. I use motors like
this to build wind turbines. They work great in that application too. The only problem I had
with this particular motor is that it is a metric unit. It has a 14mm shaft. I couldn't find a pulley to fit on that size shaft. So I bored out a 1/2 inch
shaft pulley to fit the 14mm shaft.
I also see motors like this on eBay
all the time. It is a good place to buy them if you can't find one cheap locally.
The first step in the build was to remove the edger blade and arm assembly. It was only held on with one bolt, and came off easy. I saved the rod that
connected to the lever that raised and lowered the blade. I planned on re-using that. I haven't found a use for any of the other parts of the blade assembly,
yet.
Next I needed a place to mount the motor. I bolted a heavy piece of plastic to the handle of the edger using U-bolts. The plastic is 1/2 inch thick
and very tough. I probably should have used metal, but the plastic was free and a lot easier to cut and drill.
Here the motor (generator) is mounted on another piece of the super-tough yellow plastic with big U-bolts. now I just need to mount a hinge to
hold the two pieces together.
This photo shows the hinge that holds the two pieces of plastic together and allows them to move relative to each other. This will allow me
to adjust the tension on the belt driving the generator. I used a large brass door hinge. The beauty of this is That I only have to pop out the
hinge pin to separate the two pieces. Next time I would probably use two hinges to give it added support and strength.
You can see that the plastic the motor is mounted to has warped a little. It was caused by over-tightening the U-bolts. This is where metal would
have worked better like I said above. However, I found a way to fix the problem. See below.
Here I have bolted a piece of steel angle channel to the piece of plastic holding the motor. The steel channel straightens out and reinforces
the plastic where it had been warping before. I also cut away part of the end and bent back the rest to make an anchor point for the rod that
will raise and lower the motor to adjust the belt tension.
I shortened the rod that originally raised and lowered the edger blade. I put a new 90 degree bend in the end of the rod and drilled it to take the
Cotter Pin that originally attached the rod to the blade assembly. To bend it, I clamped the rod in my bench vise, and heated it red hot with a propane
torch. That made it much easier to bend. I got a nice clean bend in it.
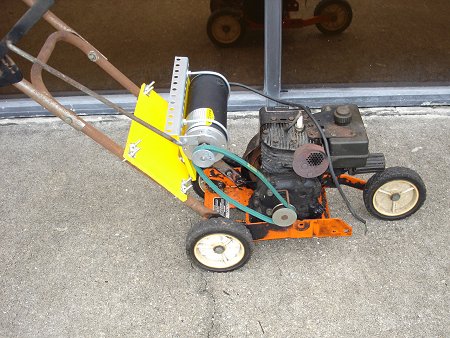
Here is the completed generator, almost ready to be rolled outside and tested. You can see how the rod goes from the lever on the handle, down
to the motor mount. The lever works great for adjusting the belt tension.
At last. Time for testing. At the last minute I decided to replace the belt with a new one. The old belt was cracked and glazed and didn't
look like it was going to last much longer. So I went down to the auto parts store and got a new belt. At nearly $10, the new belt turned
out to be the most expensive piece of the whole project.
Here is an operator's point of view looking down on the generator. To operate, I first move the lever forward a couple of notches to take
the tension off of the belt. Then I start the engine. Once it is up and running good, I can pull the lever back and engage the generator.
Simple!
This is the dummy load I used for testing the generator. It is basically a big light bar with 20 lamp sockets wired in parallel. It takes 12 Volt light bulbs.
Each bulb draws 2 Amps at 12 Volts. So I can adjust the load on the generator simply by changing the number of bulbs installed. This dummy load will
handle up to 40 Amps at 12 Volts. My little generator won't put out anywhere near that amount of current.
Here is a photo of the first test of the generator. I started out with only 4 bulbs installed in the dummy load. This put an 8 Amp load on the generator.
The generator handled the load easily, too easily in fact. The bulbs were burning very bright, and one of them burned out not long into the test. I needed
to load down the generator some more.
Here is the second test with 5 bulbs installed for a load of 10 Amps on the generator. The bulbs are all burning nice and brightly. 10 Amps, or a little more, seems
to be the limit of what this little generator can produce at the moment. Adding more bulbs starts bogging down the engine. I may be able to tweak the
engine to get more power out of it though. I doubt the engine has ever had any maintenance. It is in rough shape. A nice tune-up might help, and
maybe some synthetic oil to reduce internal friction. Some adjustments to the carburetor might also help. I may also tinker with changing the pulley
sizes on the engine and generator. However, even at only 10 Amps of output, this generator still produces enough power to supplement my wind turbine
and solar panels on cloudy, calm days when I really just need a little extra power.
Another problem I was having with the generator was getting the belt tension just right. The correct tension seemed to fall between two
of the detents on the lever (isn't that always the way?). So I cut a section out of the rod and welded in a turnbuckle. Now I can adjust the
length of the rod so that the tension is perfect. I also added a nut and lock washer to one end of the turnbuckle. That allowed me to lock
the turnbuckle in place once I found the sweet spot.
Perfect battery charging voltage.
I should probably mention that when using a generator like this to charge batteries, a blocking diode is needed between the generator and the batteries.
The diode will prevent the batteries from
back-feeding the motor and spinning it. I get around this issue by feeding the power from the generator into the charge controller from my wind
turbine, and then into the batteries. The charge controller has a built in blocking diode, and is specifically designed to safely charge
batteries. So I also don't have to worry about over-charging and damaging the batteries. Details on how I built this charge controller can be
found on my wind turbine web page.
I will probably eventually attempt to convert this generator over to running on gas from my biomass gasifier.
At the moment my gasifier is still producing too much tar to try running an engine. I'm working on cleaning that up though. So stay tuned for further developments.
UPDATE
I've rebuilt the generator. I was starting to have a lot of trouble with the plastic warping and throwing things out of alignment. So I replaced
all the plastic with steel plate. I replaced the brass door hinge with a heavy steel hinge much wider and sturdier than the old one. I built the
hinge out of 3/4 inch threaded rod with big rod coupling nuts as the actual hinge points. By turning the rod, I can move the motor mount side to
side to perfectly align the pulleys. Speaking of the pulleys, I have replaced both the pulley on the engine and the one on the motor. I found that
the belt was slipping under load. The generator was needing more torque than the engine could supply with the old pulleys. So I put a smaller pulley
on the engine and a larger one on the generator to increase the torque delivered to the generator.
Here is another view of the rebuilt generator. The generator is now bolted to a 1/4 inch thick steel plate. Two arms welded to the plate
extend back to and are welded to the two large coupling nuts on the threaded rod. This forms a very strong and stiff hinge with no play.
The position of the generator can be easily adjusted side to side by rotating the threaded rod. The belt tension adjustment mechanism is
essentially unchanged from before. These modifications have enabled me to nearly double the current output of the generator. See photo below.
Now the generator can easily power eight lights at a load of 16 Amps. That's pretty respectable battery charging current. I may be
able to even further improve on this with more tinkering, but on the whole, I am pretty happy with the generator as is. It does the
job it was designed for.
 Another view of the edger. It is rusty and dirty, but basically sound. I almost didn't buy it because I couldn't get it to start at the yard sale.
It seemed to have good compression though, so I took a chance for only $5. It tuned out I had the choke lever in the wrong position. Once I figured out
the choke, it starts every time on about the 2nd pull and runs strong. It does vibrate pretty badly though. Something is out of balance on it. I'll live
with it, considering the price.
Another view of the edger. It is rusty and dirty, but basically sound. I almost didn't buy it because I couldn't get it to start at the yard sale.
It seemed to have good compression though, so I took a chance for only $5. It tuned out I had the choke lever in the wrong position. Once I figured out
the choke, it starts every time on about the 2nd pull and runs strong. It does vibrate pretty badly though. Something is out of balance on it. I'll live
with it, considering the price.
 This is the 3 Horsepower edger I bought at a yard sale for only $5! It's not much of a looker, but it starts easy and runs great. I would have preferred to
have about a 5 Horsepower engine, but at only $5, I couldn't pass this thing up.
This is the 3 Horsepower edger I bought at a yard sale for only $5! It's not much of a looker, but it starts easy and runs great. I would have preferred to
have about a 5 Horsepower engine, but at only $5, I couldn't pass this thing up. This is the permanent magnet DC motor I used as the generator. It is a 90 Volt DC, 3/4 Horsepower motor. I got it at an auction for only $5. It acts as a
generator when the output shaft is turned. The output voltage depends on the speed the shaft is spun and the load on the generator. I use motors like
this to build
This is the permanent magnet DC motor I used as the generator. It is a 90 Volt DC, 3/4 Horsepower motor. I got it at an auction for only $5. It acts as a
generator when the output shaft is turned. The output voltage depends on the speed the shaft is spun and the load on the generator. I use motors like
this to build  The first step in the build was to remove the edger blade and arm assembly. It was only held on with one bolt, and came off easy. I saved the rod that
connected to the lever that raised and lowered the blade. I planned on re-using that. I haven't found a use for any of the other parts of the blade assembly,
yet.
The first step in the build was to remove the edger blade and arm assembly. It was only held on with one bolt, and came off easy. I saved the rod that
connected to the lever that raised and lowered the blade. I planned on re-using that. I haven't found a use for any of the other parts of the blade assembly,
yet.
 Next I needed a place to mount the motor. I bolted a heavy piece of plastic to the handle of the edger using U-bolts. The plastic is 1/2 inch thick
and very tough. I probably should have used metal, but the plastic was free and a lot easier to cut and drill.
Next I needed a place to mount the motor. I bolted a heavy piece of plastic to the handle of the edger using U-bolts. The plastic is 1/2 inch thick
and very tough. I probably should have used metal, but the plastic was free and a lot easier to cut and drill.
 Here the motor (generator) is mounted on another piece of the super-tough yellow plastic with big U-bolts. now I just need to mount a hinge to
hold the two pieces together.
Here the motor (generator) is mounted on another piece of the super-tough yellow plastic with big U-bolts. now I just need to mount a hinge to
hold the two pieces together.
 This photo shows the hinge that holds the two pieces of plastic together and allows them to move relative to each other. This will allow me
to adjust the tension on the belt driving the generator. I used a large brass door hinge. The beauty of this is That I only have to pop out the
hinge pin to separate the two pieces. Next time I would probably use two hinges to give it added support and strength.
This photo shows the hinge that holds the two pieces of plastic together and allows them to move relative to each other. This will allow me
to adjust the tension on the belt driving the generator. I used a large brass door hinge. The beauty of this is That I only have to pop out the
hinge pin to separate the two pieces. Next time I would probably use two hinges to give it added support and strength. Here I have bolted a piece of steel angle channel to the piece of plastic holding the motor. The steel channel straightens out and reinforces
the plastic where it had been warping before. I also cut away part of the end and bent back the rest to make an anchor point for the rod that
will raise and lower the motor to adjust the belt tension.
Here I have bolted a piece of steel angle channel to the piece of plastic holding the motor. The steel channel straightens out and reinforces
the plastic where it had been warping before. I also cut away part of the end and bent back the rest to make an anchor point for the rod that
will raise and lower the motor to adjust the belt tension. Here is the completed generator, almost ready to be rolled outside and tested. You can see how the rod goes from the lever on the handle, down
to the motor mount. The lever works great for adjusting the belt tension.
Here is the completed generator, almost ready to be rolled outside and tested. You can see how the rod goes from the lever on the handle, down
to the motor mount. The lever works great for adjusting the belt tension.
 At last. Time for testing. At the last minute I decided to replace the belt with a new one. The old belt was cracked and glazed and didn't
look like it was going to last much longer. So I went down to the auto parts store and got a new belt. At nearly $10, the new belt turned
out to be the most expensive piece of the whole project.
At last. Time for testing. At the last minute I decided to replace the belt with a new one. The old belt was cracked and glazed and didn't
look like it was going to last much longer. So I went down to the auto parts store and got a new belt. At nearly $10, the new belt turned
out to be the most expensive piece of the whole project.
 Here is an operator's point of view looking down on the generator. To operate, I first move the lever forward a couple of notches to take
the tension off of the belt. Then I start the engine. Once it is up and running good, I can pull the lever back and engage the generator.
Simple!
Here is an operator's point of view looking down on the generator. To operate, I first move the lever forward a couple of notches to take
the tension off of the belt. Then I start the engine. Once it is up and running good, I can pull the lever back and engage the generator.
Simple!
 This is the dummy load I used for testing the generator. It is basically a big light bar with 20 lamp sockets wired in parallel. It takes 12 Volt light bulbs.
Each bulb draws 2 Amps at 12 Volts. So I can adjust the load on the generator simply by changing the number of bulbs installed. This dummy load will
handle up to 40 Amps at 12 Volts. My little generator won't put out anywhere near that amount of current.
This is the dummy load I used for testing the generator. It is basically a big light bar with 20 lamp sockets wired in parallel. It takes 12 Volt light bulbs.
Each bulb draws 2 Amps at 12 Volts. So I can adjust the load on the generator simply by changing the number of bulbs installed. This dummy load will
handle up to 40 Amps at 12 Volts. My little generator won't put out anywhere near that amount of current.
 Here is a photo of the first test of the generator. I started out with only 4 bulbs installed in the dummy load. This put an 8 Amp load on the generator.
The generator handled the load easily, too easily in fact. The bulbs were burning very bright, and one of them burned out not long into the test. I needed
to load down the generator some more.
Here is a photo of the first test of the generator. I started out with only 4 bulbs installed in the dummy load. This put an 8 Amp load on the generator.
The generator handled the load easily, too easily in fact. The bulbs were burning very bright, and one of them burned out not long into the test. I needed
to load down the generator some more.
 Here is the second test with 5 bulbs installed for a load of 10 Amps on the generator. The bulbs are all burning nice and brightly. 10 Amps, or a little more, seems
to be the limit of what this little generator can produce at the moment. Adding more bulbs starts bogging down the engine. I may be able to tweak the
engine to get more power out of it though. I doubt the engine has ever had any maintenance. It is in rough shape. A nice tune-up might help, and
maybe some synthetic oil to reduce internal friction. Some adjustments to the carburetor might also help. I may also tinker with changing the pulley
sizes on the engine and generator. However, even at only 10 Amps of output, this generator still produces enough power to supplement my wind turbine
and solar panels on cloudy, calm days when I really just need a little extra power.
Here is the second test with 5 bulbs installed for a load of 10 Amps on the generator. The bulbs are all burning nice and brightly. 10 Amps, or a little more, seems
to be the limit of what this little generator can produce at the moment. Adding more bulbs starts bogging down the engine. I may be able to tweak the
engine to get more power out of it though. I doubt the engine has ever had any maintenance. It is in rough shape. A nice tune-up might help, and
maybe some synthetic oil to reduce internal friction. Some adjustments to the carburetor might also help. I may also tinker with changing the pulley
sizes on the engine and generator. However, even at only 10 Amps of output, this generator still produces enough power to supplement my wind turbine
and solar panels on cloudy, calm days when I really just need a little extra power.
 Another problem I was having with the generator was getting the belt tension just right. The correct tension seemed to fall between two
of the detents on the lever (isn't that always the way?). So I cut a section out of the rod and welded in a turnbuckle. Now I can adjust the
length of the rod so that the tension is perfect. I also added a nut and lock washer to one end of the turnbuckle. That allowed me to lock
the turnbuckle in place once I found the sweet spot.
Another problem I was having with the generator was getting the belt tension just right. The correct tension seemed to fall between two
of the detents on the lever (isn't that always the way?). So I cut a section out of the rod and welded in a turnbuckle. Now I can adjust the
length of the rod so that the tension is perfect. I also added a nut and lock washer to one end of the turnbuckle. That allowed me to lock
the turnbuckle in place once I found the sweet spot.
 Perfect battery charging voltage.
 I should probably mention that when using a generator like this to charge batteries, a blocking diode is needed between the generator and the batteries.
The diode will prevent the batteries from
back-feeding the motor and spinning it. I get around this issue by feeding the power from the generator into the charge controller from my wind
turbine, and then into the batteries. The charge controller has a built in blocking diode, and is specifically designed to safely charge
batteries. So I also don't have to worry about over-charging and damaging the batteries. Details on how I built this charge controller can be
found on
I should probably mention that when using a generator like this to charge batteries, a blocking diode is needed between the generator and the batteries.
The diode will prevent the batteries from
back-feeding the motor and spinning it. I get around this issue by feeding the power from the generator into the charge controller from my wind
turbine, and then into the batteries. The charge controller has a built in blocking diode, and is specifically designed to safely charge
batteries. So I also don't have to worry about over-charging and damaging the batteries. Details on how I built this charge controller can be
found on  I've rebuilt the generator. I was starting to have a lot of trouble with the plastic warping and throwing things out of alignment. So I replaced
all the plastic with steel plate. I replaced the brass door hinge with a heavy steel hinge much wider and sturdier than the old one. I built the
hinge out of 3/4 inch threaded rod with big rod coupling nuts as the actual hinge points. By turning the rod, I can move the motor mount side to
side to perfectly align the pulleys. Speaking of the pulleys, I have replaced both the pulley on the engine and the one on the motor. I found that
the belt was slipping under load. The generator was needing more torque than the engine could supply with the old pulleys. So I put a smaller pulley
on the engine and a larger one on the generator to increase the torque delivered to the generator.
I've rebuilt the generator. I was starting to have a lot of trouble with the plastic warping and throwing things out of alignment. So I replaced
all the plastic with steel plate. I replaced the brass door hinge with a heavy steel hinge much wider and sturdier than the old one. I built the
hinge out of 3/4 inch threaded rod with big rod coupling nuts as the actual hinge points. By turning the rod, I can move the motor mount side to
side to perfectly align the pulleys. Speaking of the pulleys, I have replaced both the pulley on the engine and the one on the motor. I found that
the belt was slipping under load. The generator was needing more torque than the engine could supply with the old pulleys. So I put a smaller pulley
on the engine and a larger one on the generator to increase the torque delivered to the generator.
 Here is another view of the rebuilt generator. The generator is now bolted to a 1/4 inch thick steel plate. Two arms welded to the plate
extend back to and are welded to the two large coupling nuts on the threaded rod. This forms a very strong and stiff hinge with no play.
The position of the generator can be easily adjusted side to side by rotating the threaded rod. The belt tension adjustment mechanism is
essentially unchanged from before. These modifications have enabled me to nearly double the current output of the generator. See photo below.
Here is another view of the rebuilt generator. The generator is now bolted to a 1/4 inch thick steel plate. Two arms welded to the plate
extend back to and are welded to the two large coupling nuts on the threaded rod. This forms a very strong and stiff hinge with no play.
The position of the generator can be easily adjusted side to side by rotating the threaded rod. The belt tension adjustment mechanism is
essentially unchanged from before. These modifications have enabled me to nearly double the current output of the generator. See photo below.
 Now the generator can easily power eight lights at a load of 16 Amps. That's pretty respectable battery charging current. I may be
able to even further improve on this with more tinkering, but on the whole, I am pretty happy with the generator as is. It does the
job it was designed for.
Now the generator can easily power eight lights at a load of 16 Amps. That's pretty respectable battery charging current. I may be
able to even further improve on this with more tinkering, but on the whole, I am pretty happy with the generator as is. It does the
job it was designed for.