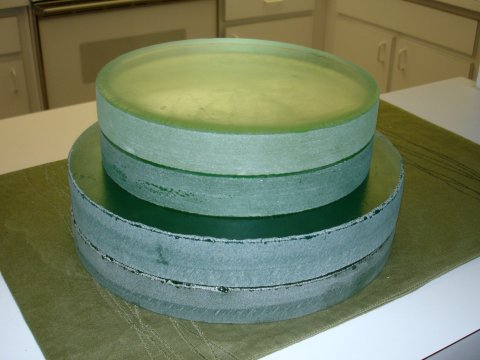
 If you have looked around this web site, you must have seen that I fuse and cast my own thick glass telescope mirrors.
This photo shows four solid glass mirror blanks of eight and ten inches in diameter and 1 1/2 inch thick. I'm making them even bigger now.
If you have looked around this web site, you must have seen that I fuse and cast my own thick glass telescope mirrors.
This photo shows four solid glass mirror blanks of eight and ten inches in diameter and 1 1/2 inch thick. I'm making them even bigger now.
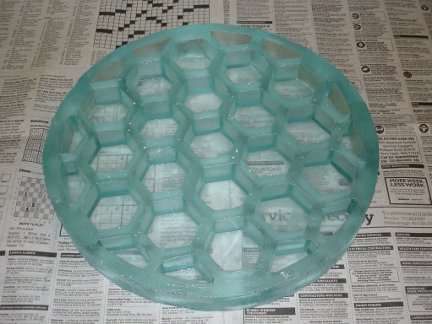 I have also begun casting lightweight, honeycomb-back telescope mirror blanks. This photo shows a
12.5 inch diameter honeycomb-back mirror.
I have also begun casting lightweight, honeycomb-back telescope mirror blanks. This photo shows a
12.5 inch diameter honeycomb-back mirror.
To do this sort of thing I need a lot of glass.
until recently I have been using glass tabletops that I could acquire inexpensively at yard sales or thrift stores. A large and thick glass
tabletop provides enough glass to make several large telescope mirror blanks. The problem I was having with this process was a lack of consistency
in the behavior of different pieces of glass. Different tabletops were made by different manufacturers using different batch formulas and they
behaved differently in my kiln when I attempted to melt and fuse them. I could never predict in advance how a given piece of glass would behave.
Also, the different pieces of glass were not compatible with each other and could not be mixed. This restricted me to always needing to make each
blank from only one sheet of glass. If I was a little short, I couldn't add some glass from another source. My process worked, but could be quite
frustrating at times.
So I decided I needed to find a new source of glass that would be predictable, and behave the same way every time. Various types of art glass are available
for use by glass artists. They are highly predictable in their behavior, and resistant to problems like devitrification. But art glass is also very
expensive. I couldn't possibly afford to buy it in the quantities needed. The new source of glass needed to
be readily available, and as inexpensive as possible. The tabletops I had been using were very readily available, and fairly inexpensive when figured
in dollars per pound of glass. My initial price target for the new glass was $1 per pound, but I was flexible on that if I could find really good glass.
The glass also needed to meet several technical criteria such as:
1. Melt and flow well at temperatures easily achievable in my re-purposed ceramics kilns.
2. Be highly resistant to devitrification.
3. Not be so darkly colored as to be essentially opaque in thick castings.
I decided to acquire samples of lots of different types of commonly available glassware and do melt tests on them to determine how suitable they
were for my application.
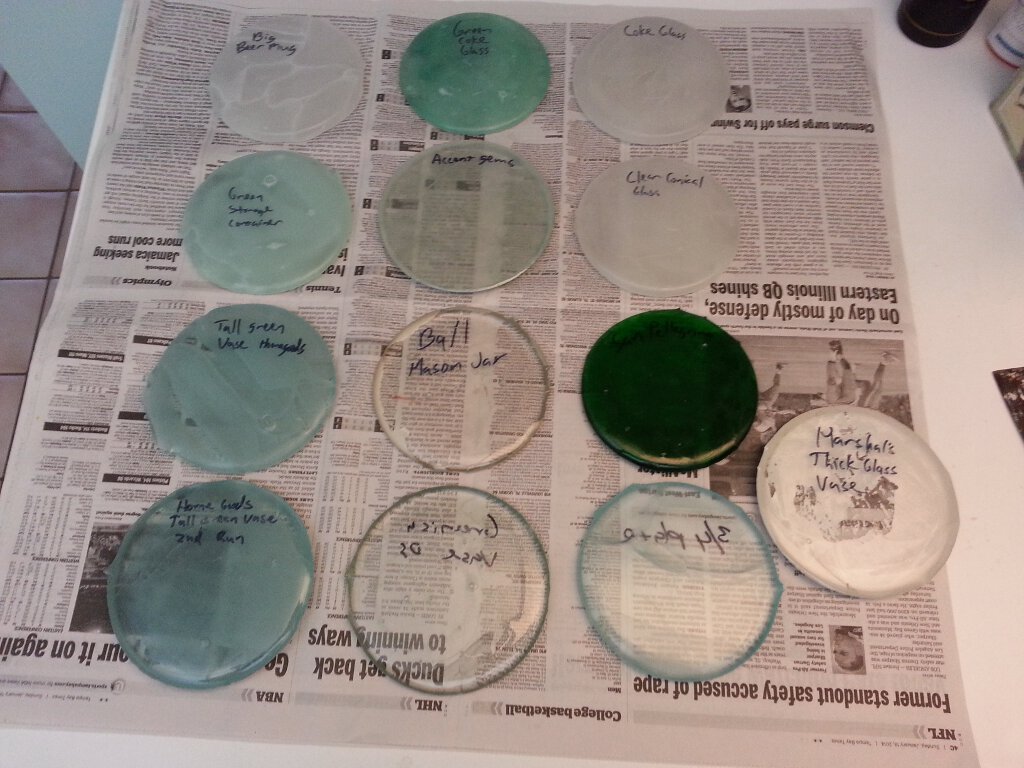
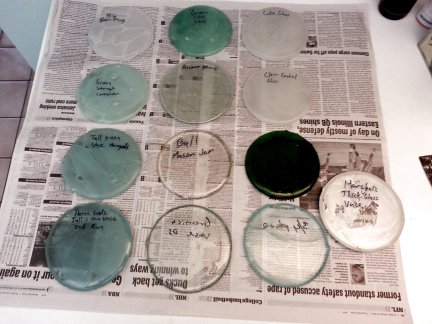 Here is a photo of some of my melt test results. I actually test melted a lot more samples than this, but did not bother to
photograph a lot of the failures. I simply made notes that a certain type of glass didn't work, and threw away the test sample.
The process for melting down the glass samples and producing these test pucks or pancakes is described in detail below.
Here is a photo of some of my melt test results. I actually test melted a lot more samples than this, but did not bother to
photograph a lot of the failures. I simply made notes that a certain type of glass didn't work, and threw away the test sample.
The process for melting down the glass samples and producing these test pucks or pancakes is described in detail below.
I recently had some medical problems and had to take some time off work. I was also very restricted in what I could do physically. So I
had a lot of free time on my hands for a while. It allowed me to do a melt test each day for several weeks. I acquired a lot of data,
mostly on what doesn't work, but that is important data too. I also found a couple of types of glass that do seem to work, So I consider
this experiment a success.
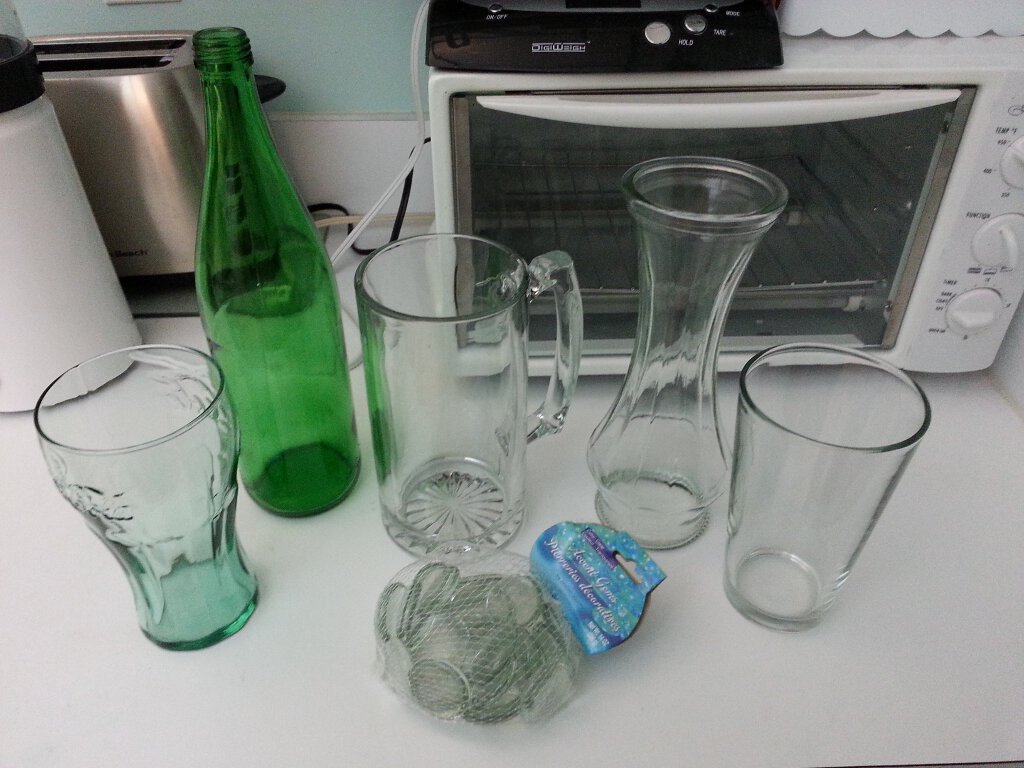
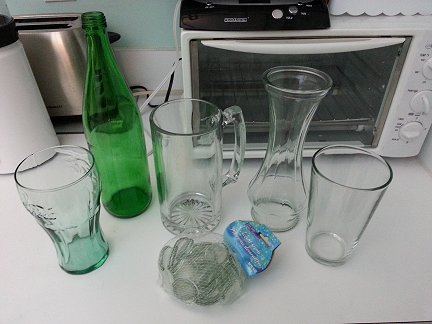 The first thing I had to do was find samples of glass to test. Since I was looking for inexpensive glass, a national chain of Dollar Stores
was my first stop. They had a large selection of glass items. I bought a wide selection of glasses and mugs (some aren't shown). I bought
glasses and mugs from different manufacturers so as to be sure to get different glass types. I also bought a bag of little glass blobs called
Accent Gems. Seeing as all these things came from the dollar store, each of them only cost $1. I had especially high hopes for the large beer mug
in the center of the photo. It weighed nearly 2 1/2 lbs. That is a lot of glass for only a buck. The tall green bottle is from a popular brand of
sparkling water. I included it because I regularly have lots of empties of this kind of bottle.
The first thing I had to do was find samples of glass to test. Since I was looking for inexpensive glass, a national chain of Dollar Stores
was my first stop. They had a large selection of glass items. I bought a wide selection of glasses and mugs (some aren't shown). I bought
glasses and mugs from different manufacturers so as to be sure to get different glass types. I also bought a bag of little glass blobs called
Accent Gems. Seeing as all these things came from the dollar store, each of them only cost $1. I had especially high hopes for the large beer mug
in the center of the photo. It weighed nearly 2 1/2 lbs. That is a lot of glass for only a buck. The tall green bottle is from a popular brand of
sparkling water. I included it because I regularly have lots of empties of this kind of bottle.
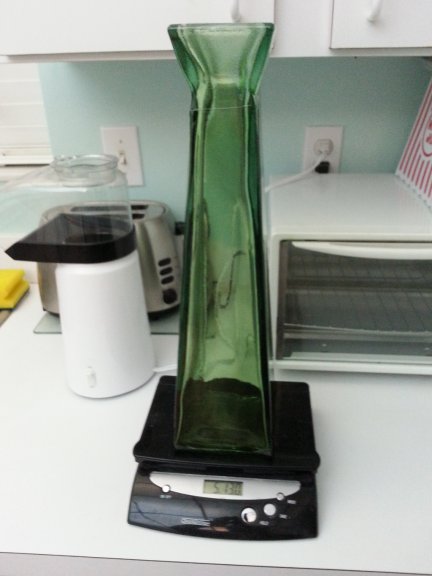 Here is another item I had high hopes for. It is a very tall and heavy glass vase available at a national chain of home decorating stores. It weighed
almost 6 lbs, and was very inexpensive.
Here is another item I had high hopes for. It is a very tall and heavy glass vase available at a national chain of home decorating stores. It weighed
almost 6 lbs, and was very inexpensive.
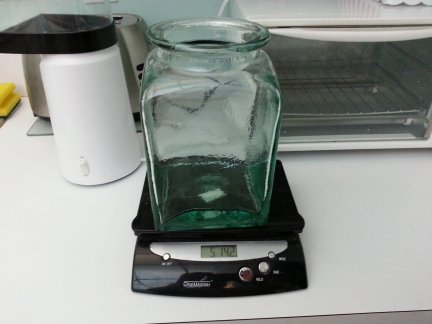 This is another item I found at a national chain of home decorating stores. It is a very large glass container. It also weighed nearly
6 lbs, and cost less than $5. Again, I had high hopes for it.
This is another item I found at a national chain of home decorating stores. It is a very large glass container. It also weighed nearly
6 lbs, and cost less than $5. Again, I had high hopes for it.
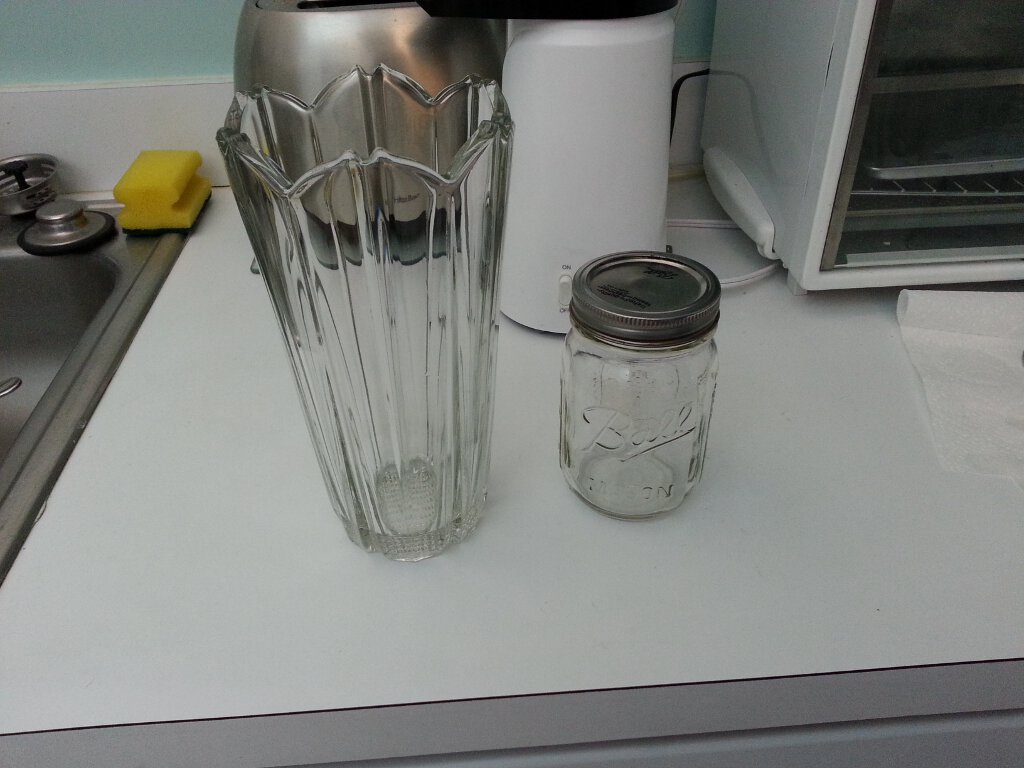
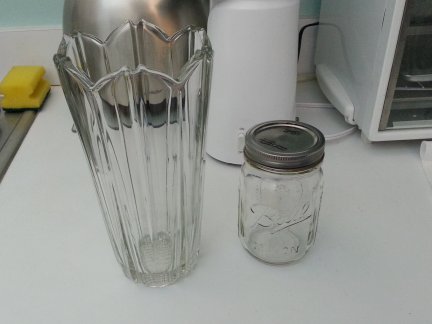 This photo shows a heavy, thick-walled, clear glass vase purchased at a national chain of discount stores. Also shown is a pint-sized
Ball Mason Jar that I almost forgot to include in the testing. I make and can my own pickles, and always have a supply of Mason Jars around the house,
but in my quest for glass to test, I somehow almost completely forgot about the mason jars, and left them for the last round of testing.
This photo shows a heavy, thick-walled, clear glass vase purchased at a national chain of discount stores. Also shown is a pint-sized
Ball Mason Jar that I almost forgot to include in the testing. I make and can my own pickles, and always have a supply of Mason Jars around the house,
but in my quest for glass to test, I somehow almost completely forgot about the mason jars, and left them for the last round of testing.
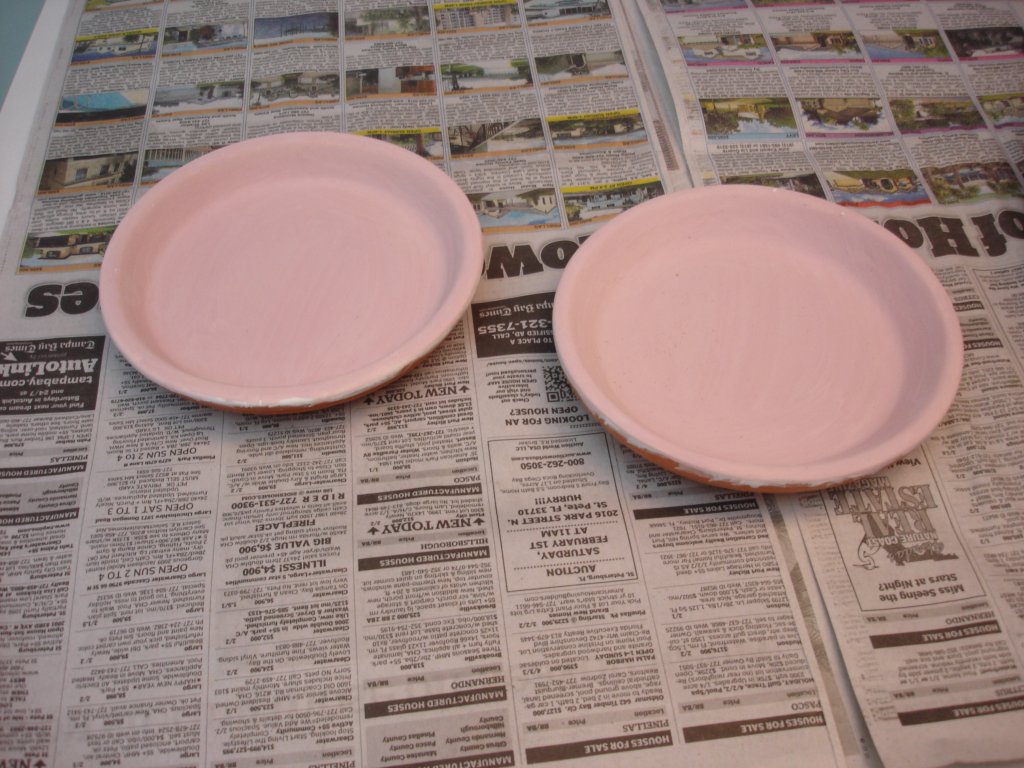
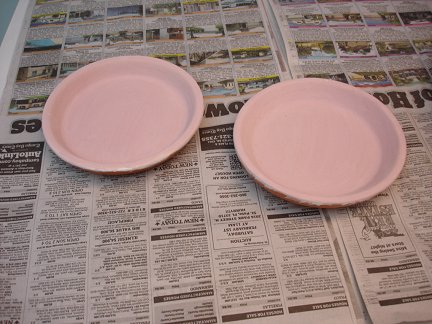 The glass in small terra cotta clay saucers of the type that sit under flower pots. They are dirt cheap and available at just about any
garden center. They were given several coats of kin wash (AKA shelf primer), to prevent the glass from sticking to them. The particular brand
of kiln wash I used in these tests has a pink dye added to it so you can visually see if you have complete coverage of the surface being coated.
The dye burns off in the kiln and the coating turns white.
The glass in small terra cotta clay saucers of the type that sit under flower pots. They are dirt cheap and available at just about any
garden center. They were given several coats of kin wash (AKA shelf primer), to prevent the glass from sticking to them. The particular brand
of kiln wash I used in these tests has a pink dye added to it so you can visually see if you have complete coverage of the surface being coated.
The dye burns off in the kiln and the coating turns white.
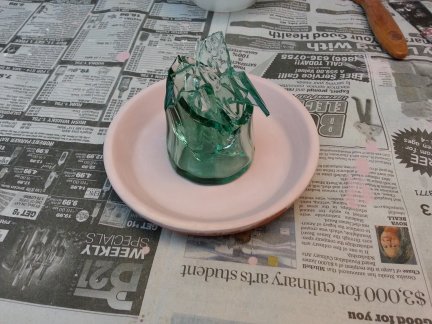 Here the glass to be melted has been placed in one of the prepared saucers. In this case, the glass is from a light green colored drinking glass. The glass
was broken by placing it in a heavy plastic bag to contain the pieces and hitting it with a hammer. The mostly intact base of the glass was used, as well
as several large shards of glass that were inserted into the hollow base. No small pieces of glass (less than several centimeters across) or pieces with
many visible fracture lines were included in an effort to reduce the number of small air bubbles that would be entrained in the melted glass.
Here the glass to be melted has been placed in one of the prepared saucers. In this case, the glass is from a light green colored drinking glass. The glass
was broken by placing it in a heavy plastic bag to contain the pieces and hitting it with a hammer. The mostly intact base of the glass was used, as well
as several large shards of glass that were inserted into the hollow base. No small pieces of glass (less than several centimeters across) or pieces with
many visible fracture lines were included in an effort to reduce the number of small air bubbles that would be entrained in the melted glass.
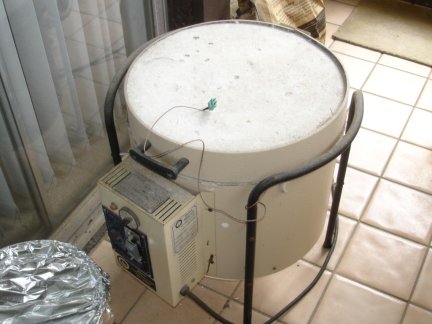 My small Duncan kiln was used to melt each sample of glass. Each prepared saucer with a sample of glass in it was placed an the kiln and fired with
the same firing schedule. The samples were fired one at a time, at the rate of about one sample per day. Since the melted samples were small and thin,
only a minimal annealing hold was required, and the entire cycle from ambient to melt and back to ambient (or at least cool enough to handle) could be
done in 24 hrs.
My small Duncan kiln was used to melt each sample of glass. Each prepared saucer with a sample of glass in it was placed an the kiln and fired with
the same firing schedule. The samples were fired one at a time, at the rate of about one sample per day. Since the melted samples were small and thin,
only a minimal annealing hold was required, and the entire cycle from ambient to melt and back to ambient (or at least cool enough to handle) could be
done in 24 hrs.
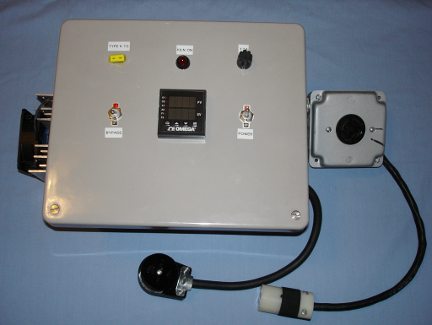 My home-built digital, ramp/soak kiln controller was used to run the kiln. The controller executed the
exact same program for each sample so that the firing schedule was exactly the same for each sample. This meant that the only variable
involved in the experiment was the type of glass.
My home-built digital, ramp/soak kiln controller was used to run the kiln. The controller executed the
exact same program for each sample so that the firing schedule was exactly the same for each sample. This meant that the only variable
involved in the experiment was the type of glass.
Below is the firing schedule used in the testing. Adding up all the time segments makes 23 hrs 45 min. I'd start the kiln melting a sample
in the morning. Then take it out to examine the next morning before loading in the next test sample and starting the cycle again. This went on
for several weeks. AFAP = As Fast As Possible.
| Firing Schedule |
| Segment |
1 |
2 |
3 |
4 |
5 |
| Ramp Time |
300 |
120 |
AFAP |
360 |
360 |
| Temperature |
1250 |
1775 |
1050 |
850 |
90 |
| Soak Time |
45 |
120 |
120 |
0 |
0 |
 This photo shows a typical puck of glass after melting. The pucks are the inside diameter of the saucers and roughly 1/4 inch
thick. This particular puck resulted from melting the above green tinted drinking glass. This particular sample suffered from severe
devitrification. Notice the uneven, blotchy color of the puck, and the overall paleness tending toward white in areas, and the lack of transparency.
That is classic devitrification. Devitrification is the process where crystals of various silicate minerals grow in the molten glass. The process is
essentially impossible to reverse, and in severe cases, like this and many of the other samples tested, completely ruins the glass.
This photo shows a typical puck of glass after melting. The pucks are the inside diameter of the saucers and roughly 1/4 inch
thick. This particular puck resulted from melting the above green tinted drinking glass. This particular sample suffered from severe
devitrification. Notice the uneven, blotchy color of the puck, and the overall paleness tending toward white in areas, and the lack of transparency.
That is classic devitrification. Devitrification is the process where crystals of various silicate minerals grow in the molten glass. The process is
essentially impossible to reverse, and in severe cases, like this and many of the other samples tested, completely ruins the glass.
Many things
can cause or contribute to devitrification, but one of the main causes is holding glass for too long at a temperature which is above its melting point,
but too low to prevent crystals from growing in the melt. This temperature range is different for different types of glass. Different
formulations of glass can also be more or less prone to devitrification. The firing schedule used was roughly the same as would be used
to cast telescope mirror blanks, and the same for each sample. The only variable was the type of glass tested. So this experiment worked
well to determine which types of glass among those tested melt and flow well, but don't devitrify under the process conditions expected in
casting blanks.
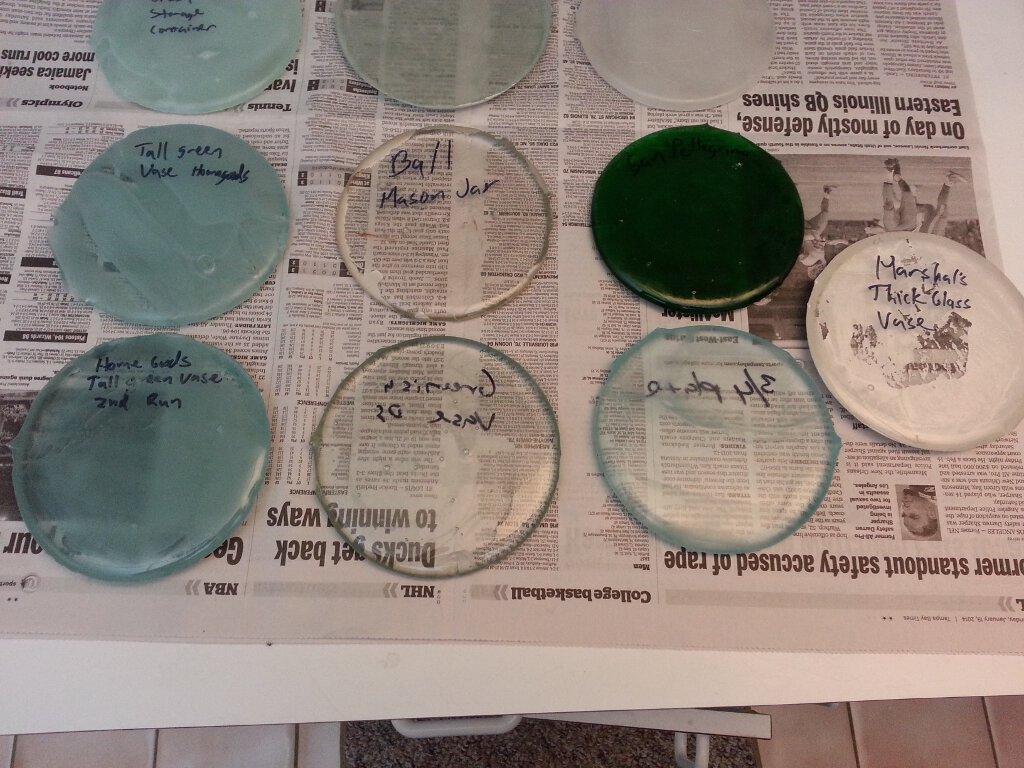
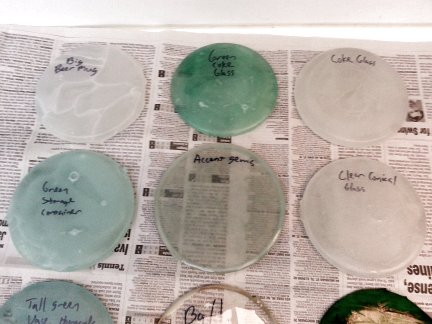
This photo shows the results of 13 different melt tests. A rough idea of how well each sample fared can be seen by how well the newsprint under
them shows through the pucks. Each puck is labeled with the source of the glass used. The results were somewhat surprising to me.
On the whole, the items I had the highest hopes for were the ones that failed the worst. Items I did not expect to do well were often the best performers.
This shows the importance of performing experiments like this. Because we simply cannot trust our own opinions and preconceived notions in many instances.
Details of the results of the individual tests are below.
 The six pucks shown in this photo all failed the test for various reasons. I'm not going to go into too much detail on most of the individual failures. Here is a
quick description of each.
The six pucks shown in this photo all failed the test for various reasons. I'm not going to go into too much detail on most of the individual failures. Here is a
quick description of each.
The puck on the upper left is from the large 2.5 lb beer mug from the Dollar Store I had such high hopes for due to its low cost per pound. Not only did the pieces
of glass in the sample fail to fully consolidate, but the glass suffered probably the worst devitrification of any of the samples. This was a
total failure.
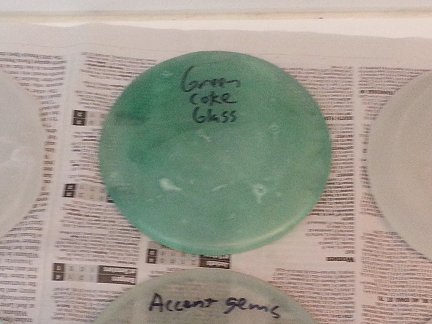
The pucks at top center and top right were from two different Coca Cola glasses from the Dollar Store. One was light green in color and the other clear.
Both failed due to severe devitrification.
The puck on the lower left is from the large, green, inexpensive storage container. It suffered severe devitrification. Interestingly the color also
shifted from green to blue.
The puck on the lower right is from a tall, conical, drinking glass purchased at the Dollar Store. It suffered severe devitrification.
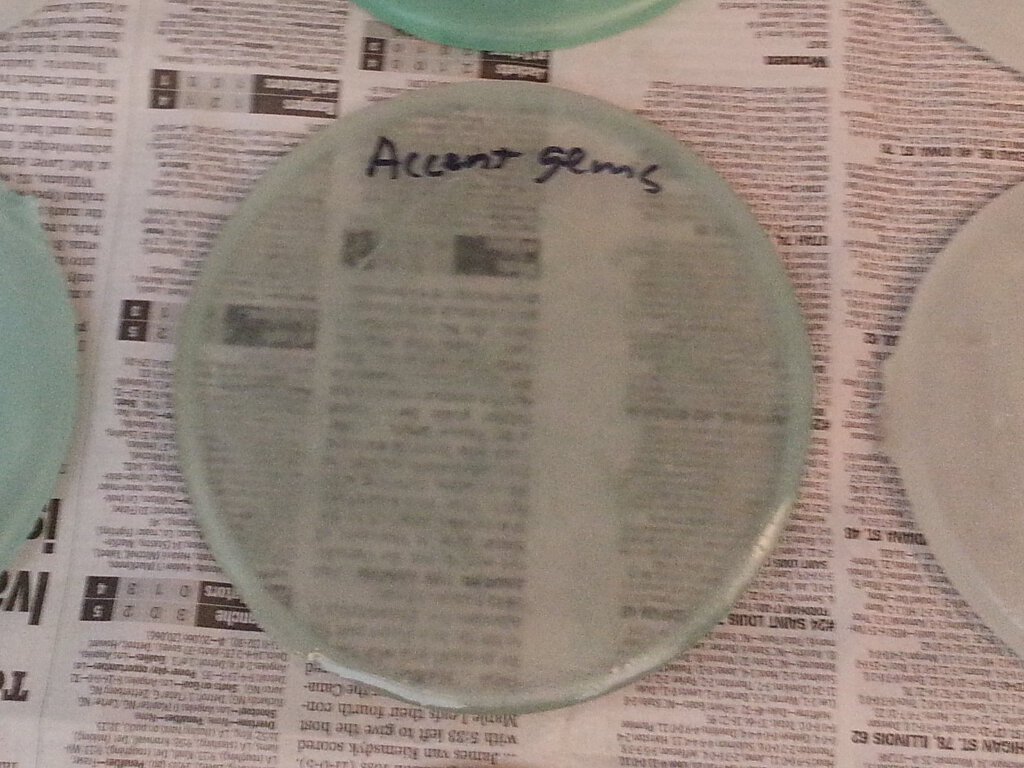
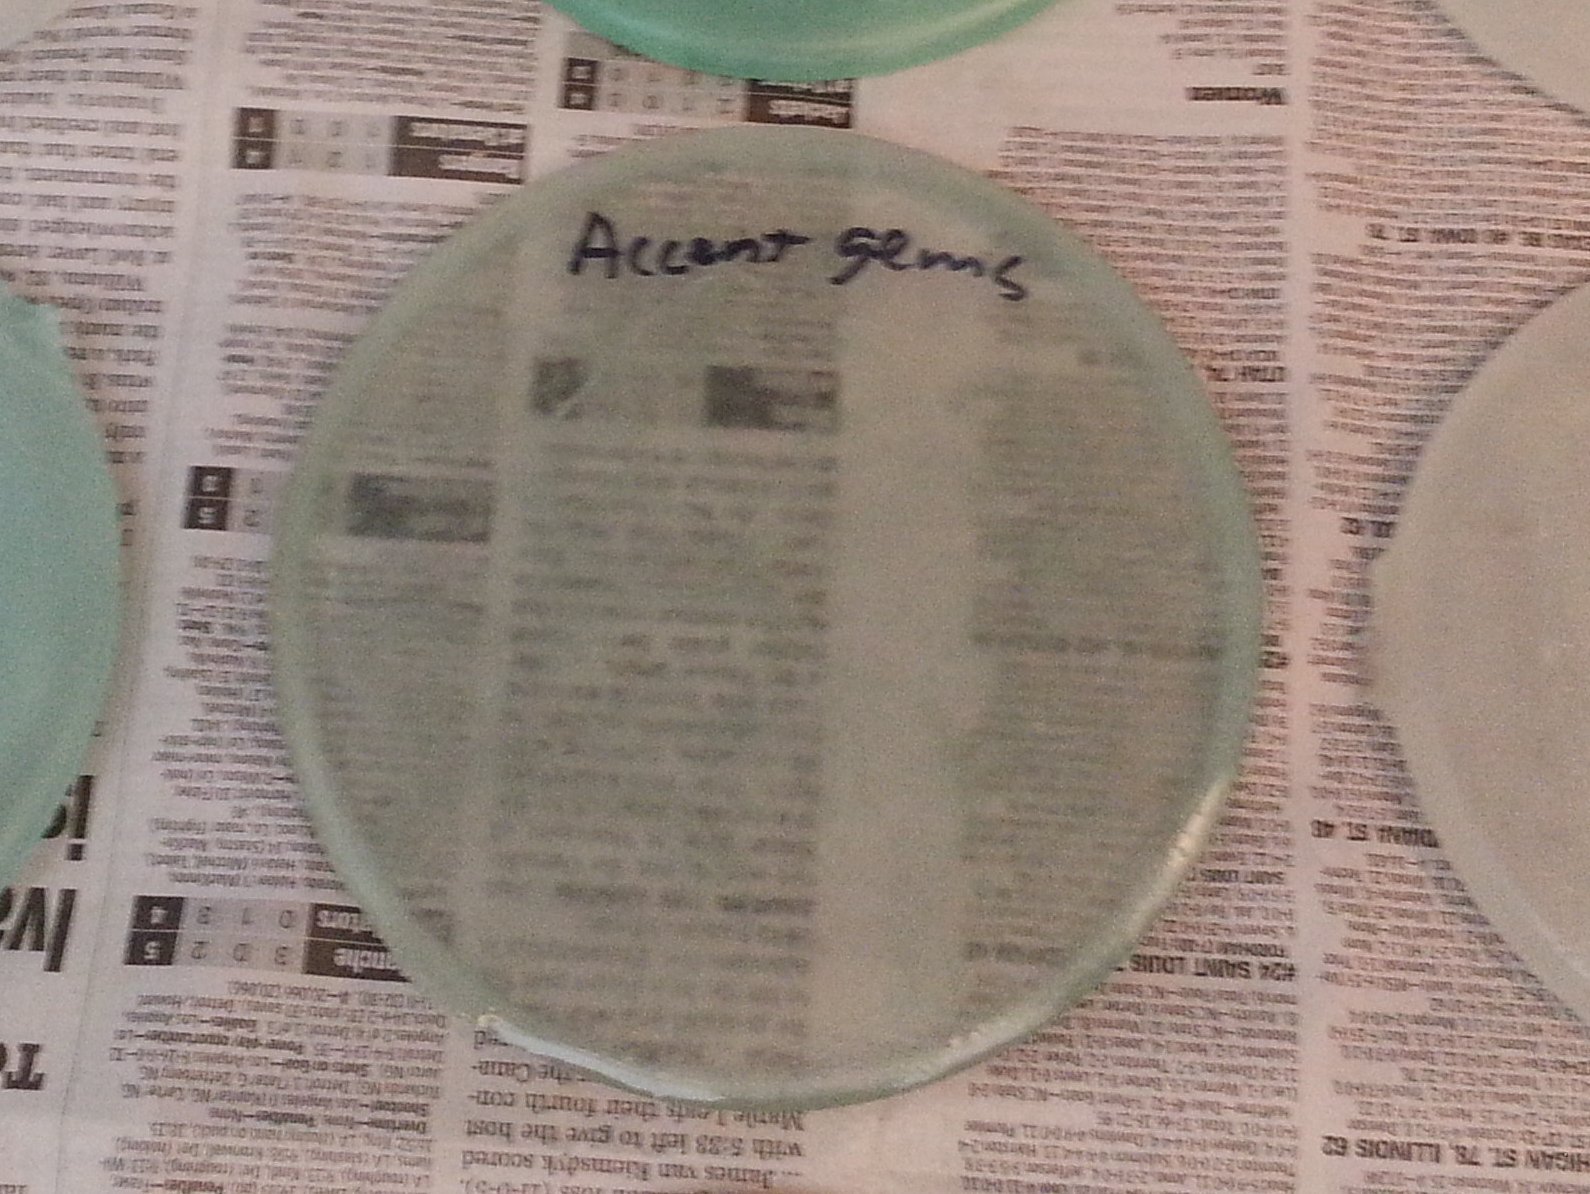 Here is a photo of the only sample from the above group of six that almost passed the test. It was the glass accent gems from the Dollar Store. The glass
melted and consolidated well, and shows no obvious devitrification. However, a coating on the glass gems to give them an iridescent appearance made
the glass cloudy and blotchy, which could mask other problems, and is just plain ugly. If accent gems of the same sort of glass without the iridescent
coating could be found, they might be a viable source of glass.
Here is a photo of the only sample from the above group of six that almost passed the test. It was the glass accent gems from the Dollar Store. The glass
melted and consolidated well, and shows no obvious devitrification. However, a coating on the glass gems to give them an iridescent appearance made
the glass cloudy and blotchy, which could mask other problems, and is just plain ugly. If accent gems of the same sort of glass without the iridescent
coating could be found, they might be a viable source of glass.
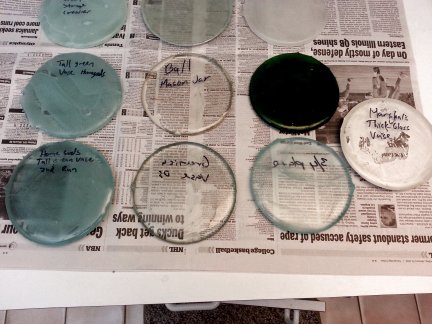 This photo shows another group of seven pucks. This group did much better. Only three of the seven were total failures.
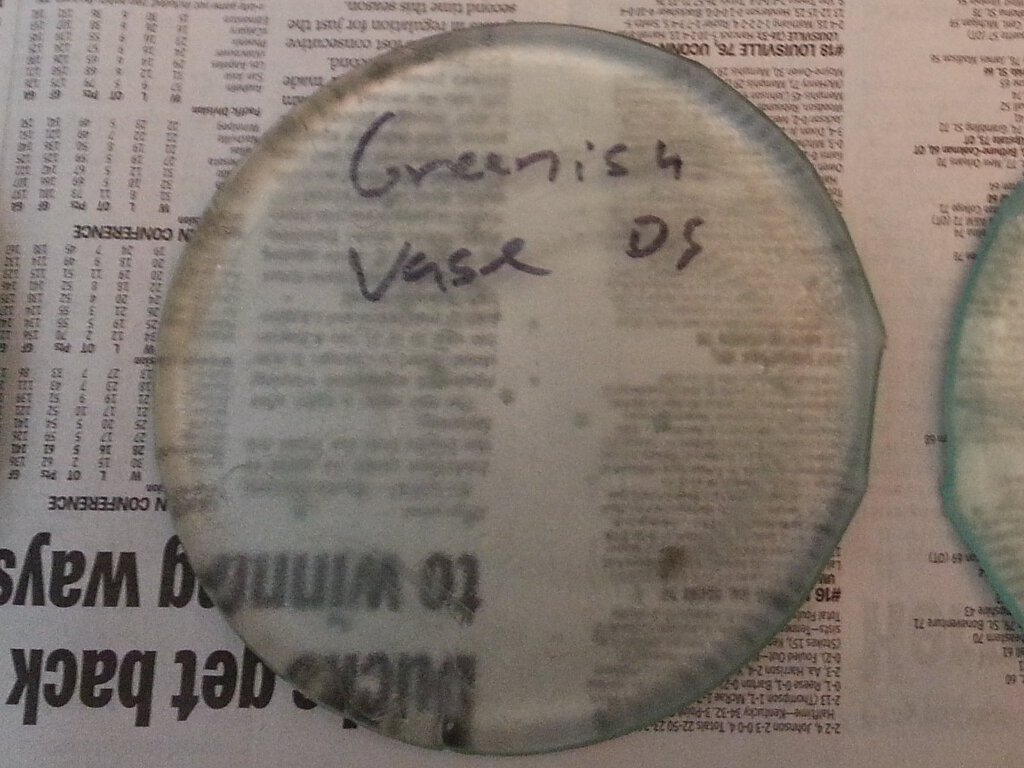
The two light blue pucks on the upper and lower left are both from the same very tall and heavy green vase. This is another sample I had high hopes for
based on the cost per pound of the glass. Unfortunately, the glass did not behave very well in the kiln. The upper left sample shows poor consolidation
and some devitrification. There are areas of clear, good looking glass as well though. I thought that perhaps this glass might work better if processed at a higher
temperature. This thought led me to make the only change to my process during the entire experiment. Another sample of the same glass was melted at
a higher temperature. That is the puck on the lower left. The second test showed much better consolidation, but still suffered from moderate
devitrification. Processing at even higher temperature may make a further improvement, but at the cost of increased wear and tear on the kiln and
increased chance of mold failure. So this glass was determined to be a failure. Interestingly, the color of this glass also shifted from green to blue.
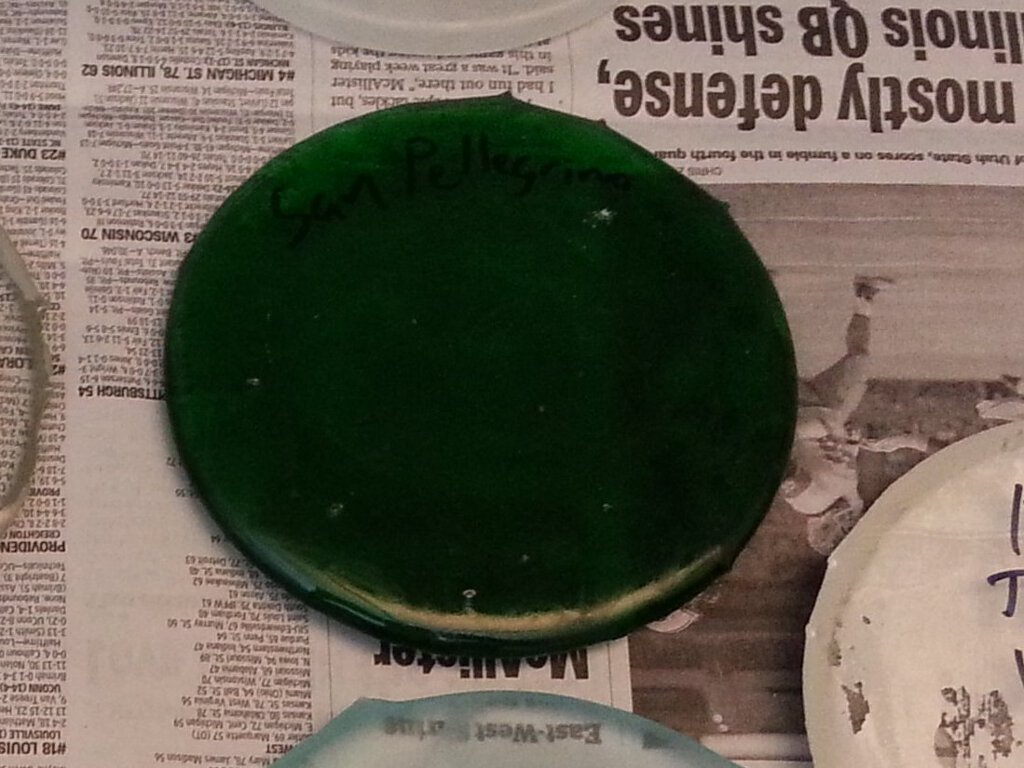
 This puck is from the green sparkling water bottle. The bottle glass did not seem to be so strongly colored. However, breaking the bottle to get samples
for melting showed that the glass was very thin. So it was actually very strongly colored glass that only looked lightly colored in very thin sections.
When melted into a puck roughly 1/4 inch thick, the green color is so strong as to be nearly black. This makes the puck almost completely opaque. Only a
very strong light could weakly penetrate all the way through and reveal an internal haziness and blotchyness that could be devitrification, but it is
difficult to be certain. In any case, the glass would be totally opaque in the 1.5 inch thickness needed for telescope blanks, making examination of
the internal structure for flaws, stress and bubbles impossible. So this glass is a failure.
This puck is from the green sparkling water bottle. The bottle glass did not seem to be so strongly colored. However, breaking the bottle to get samples
for melting showed that the glass was very thin. So it was actually very strongly colored glass that only looked lightly colored in very thin sections.
When melted into a puck roughly 1/4 inch thick, the green color is so strong as to be nearly black. This makes the puck almost completely opaque. Only a
very strong light could weakly penetrate all the way through and reveal an internal haziness and blotchyness that could be devitrification, but it is
difficult to be certain. In any case, the glass would be totally opaque in the 1.5 inch thickness needed for telescope blanks, making examination of
the internal structure for flaws, stress and bubbles impossible. So this glass is a failure.
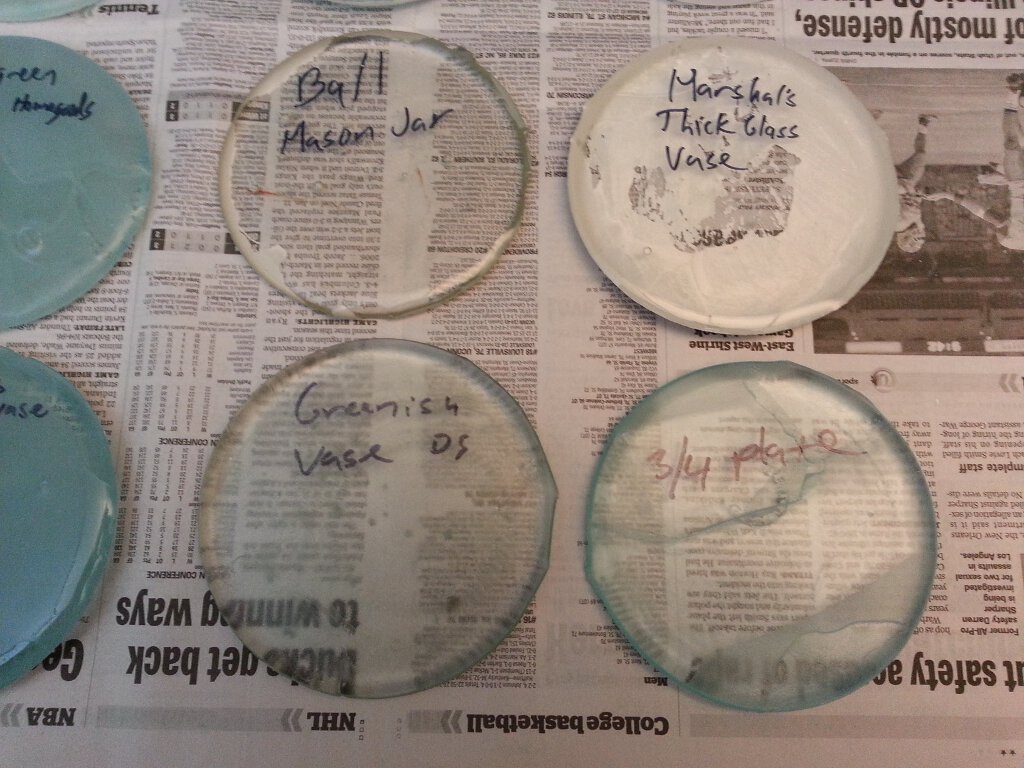
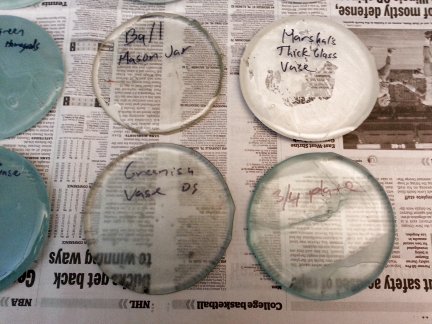 This photo shows the four best test results. Each of these will be discussed in detail below.
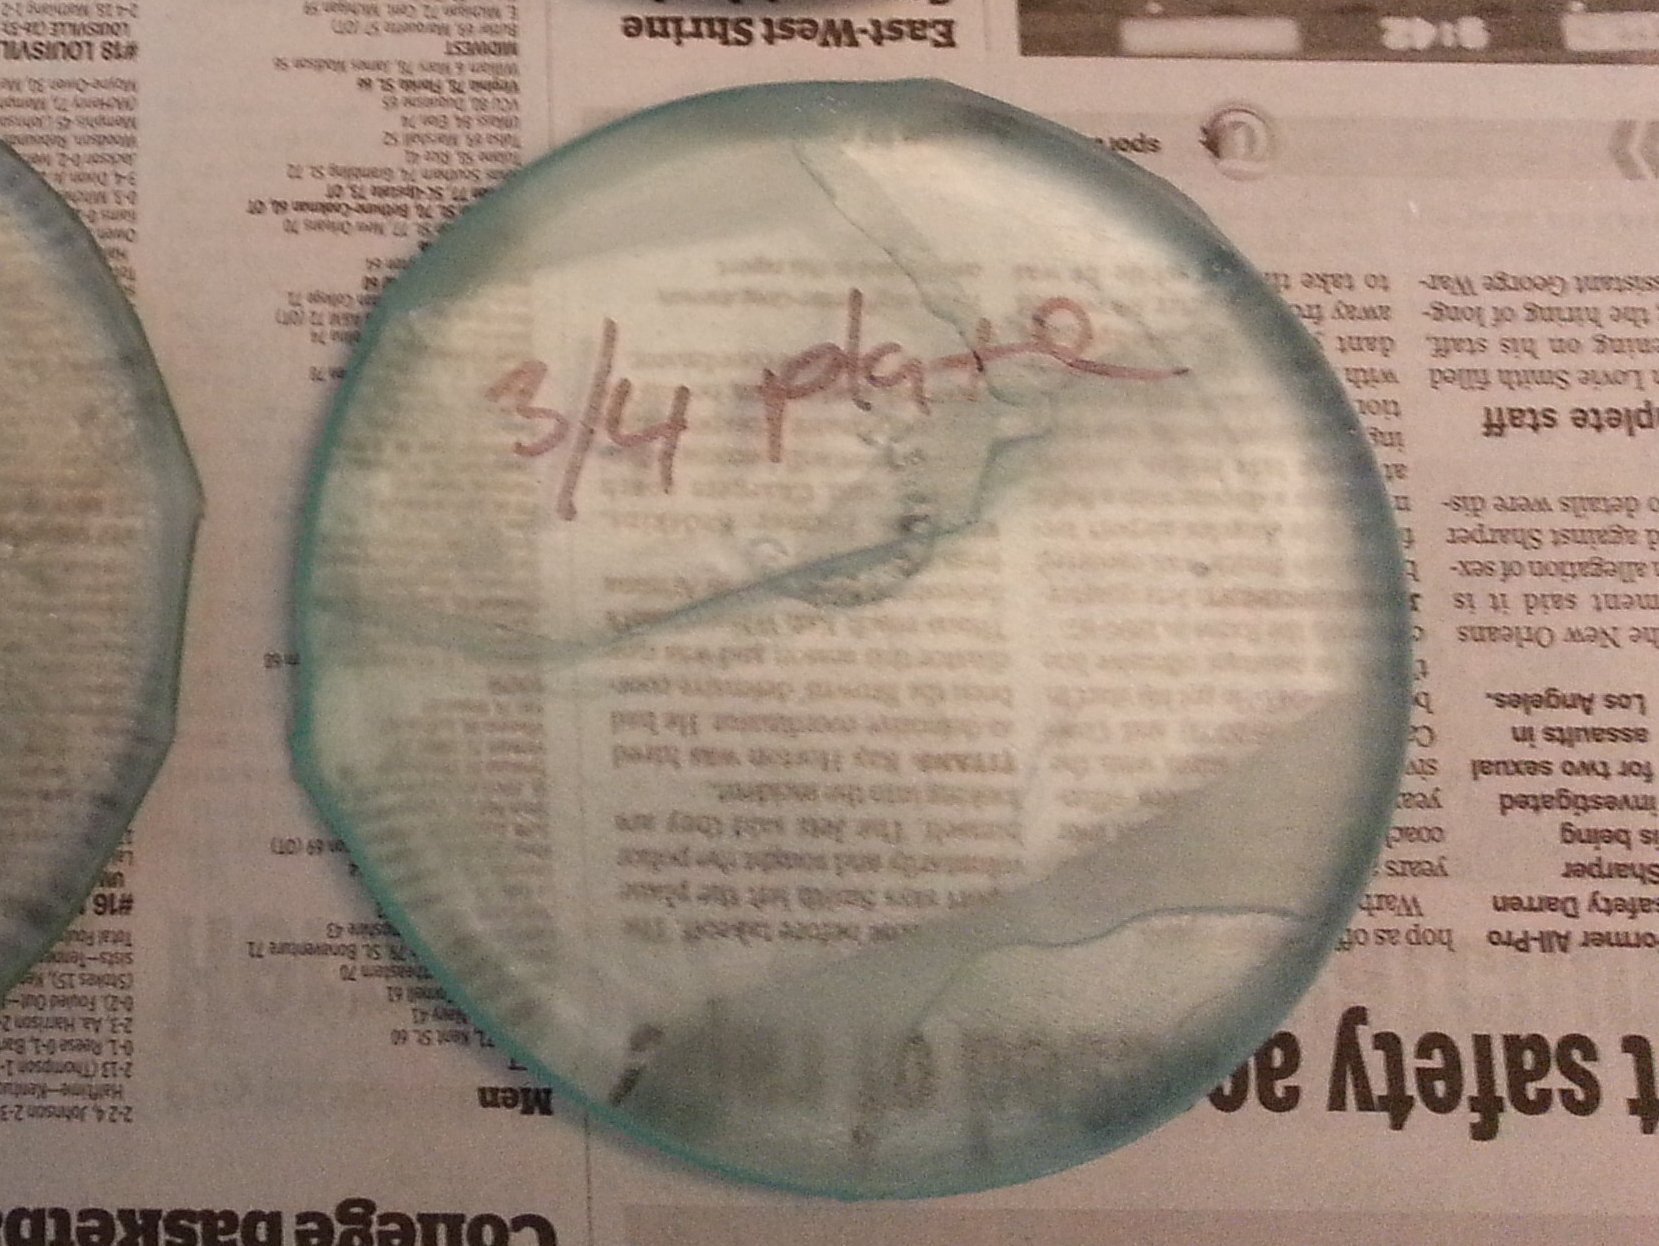 This puck is my control sample. It is from a random piece of 3/4 inch thick plate glass tabletop purchased at a thrift store. This is the sort of glass I had been
fusing and casting into mirror blanks, and it shows some of the typical problems I occasionally encounter. The pieces of glass did not fully consolidate,
and there are areas of minor devitrification. Processing at a higher temperature would probably improve the consolidation and might reduce the devitrificaion, but
there would have been no way to know that in advance. Results like this are what prompted me to perform this series of tests.
This puck is my control sample. It is from a random piece of 3/4 inch thick plate glass tabletop purchased at a thrift store. This is the sort of glass I had been
fusing and casting into mirror blanks, and it shows some of the typical problems I occasionally encounter. The pieces of glass did not fully consolidate,
and there are areas of minor devitrification. Processing at a higher temperature would probably improve the consolidation and might reduce the devitrificaion, but
there would have been no way to know that in advance. Results like this are what prompted me to perform this series of tests.
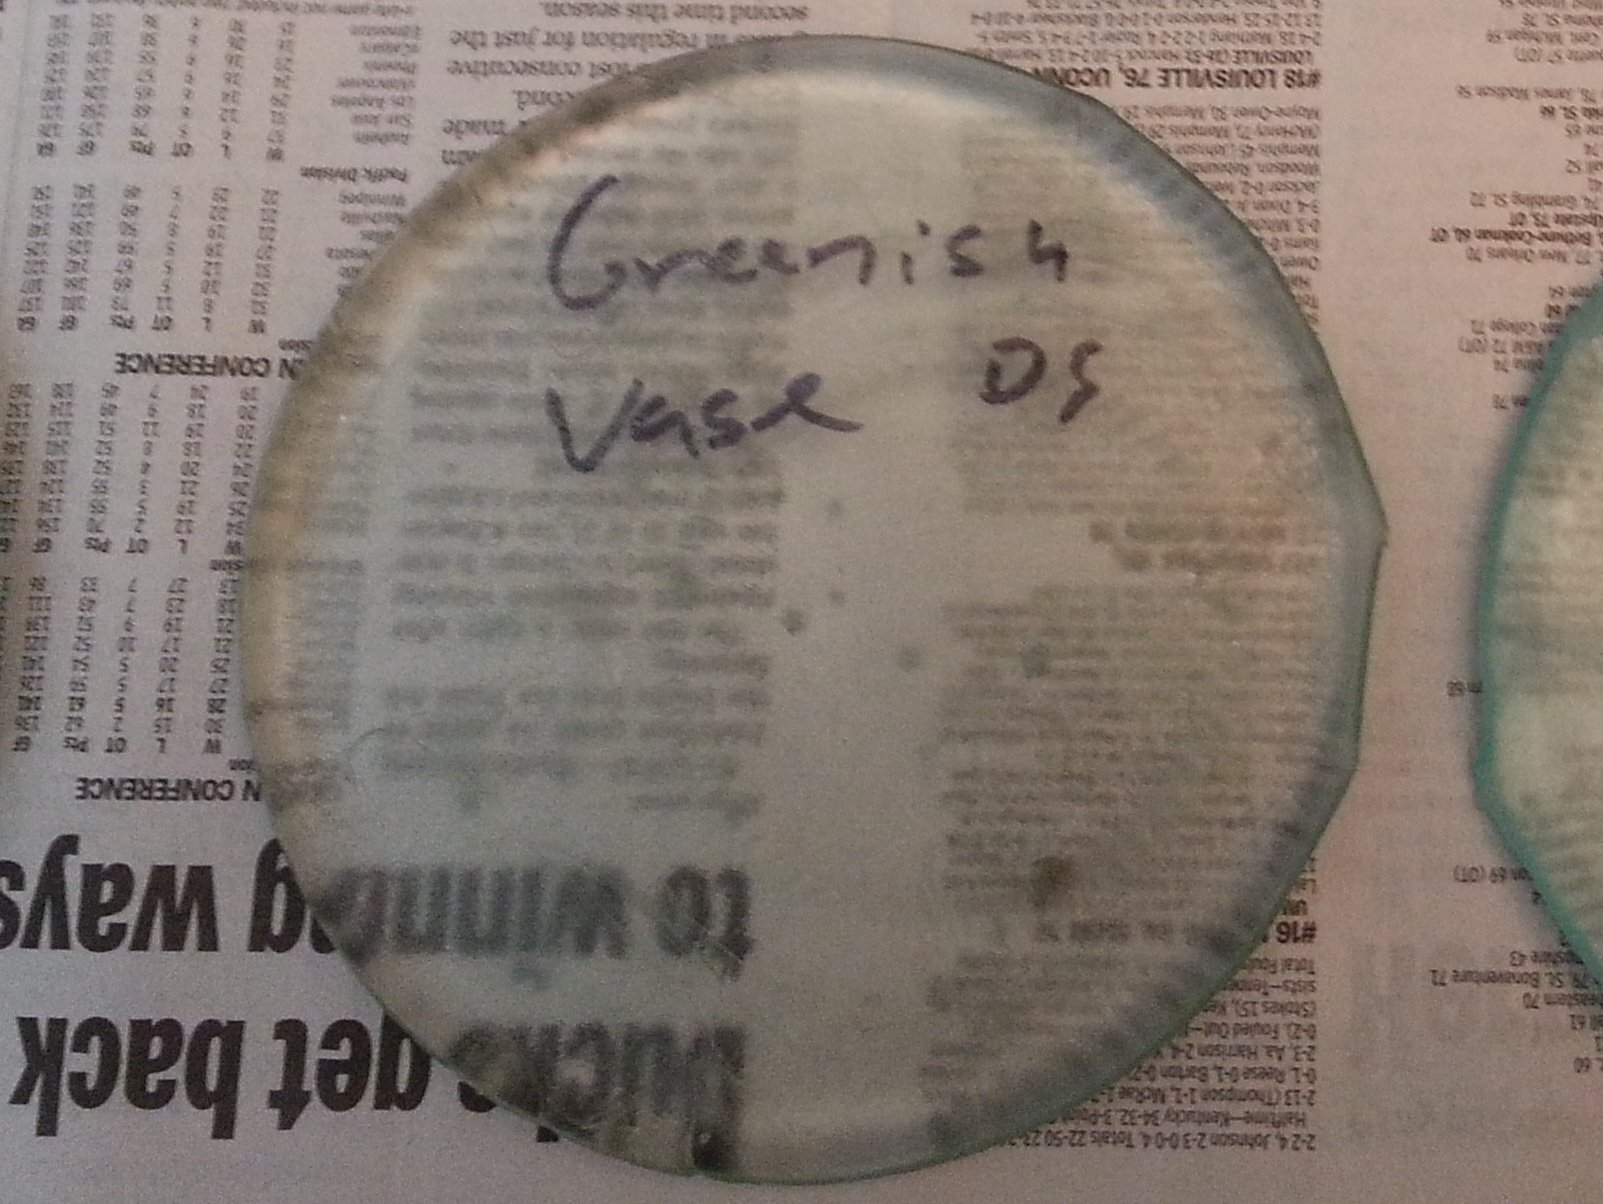 At last, we have a winner! This puck is from the first glass sample to behave reasonably well in the test. It is from a tall, thin, slightly green
vase purchased from the Dollar Store. At 14 oz of glass for $1 + tax, it is a little more expensive than my initial price target of $1 per pound, but
sometimes you have to take what you can get. It met all the other criteria. There a few more bubbles trapped in the glass than I would like, but
longer processing may give them time to rise to the top and pop. The glass is not as transparent as I had hoped for, but is transparent enough for
my purposes. There doesn't seem to be any issue with supply at the present time, since every Dollar Store in my area has dozens of them on the shelf,
and it is possible to purchase them in large quantities on the Dollar Store web site. Supply would only become a problem if they are discontinued.
This glass is definitely a possibility.
At last, we have a winner! This puck is from the first glass sample to behave reasonably well in the test. It is from a tall, thin, slightly green
vase purchased from the Dollar Store. At 14 oz of glass for $1 + tax, it is a little more expensive than my initial price target of $1 per pound, but
sometimes you have to take what you can get. It met all the other criteria. There a few more bubbles trapped in the glass than I would like, but
longer processing may give them time to rise to the top and pop. The glass is not as transparent as I had hoped for, but is transparent enough for
my purposes. There doesn't seem to be any issue with supply at the present time, since every Dollar Store in my area has dozens of them on the shelf,
and it is possible to purchase them in large quantities on the Dollar Store web site. Supply would only become a problem if they are discontinued.
This glass is definitely a possibility.
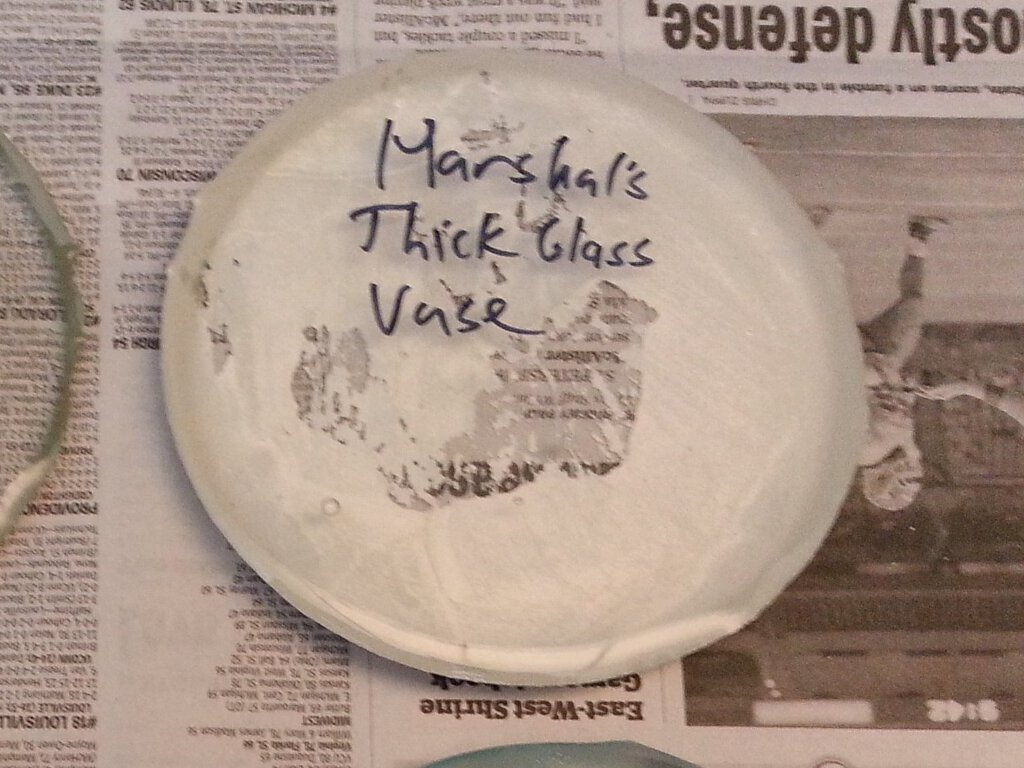
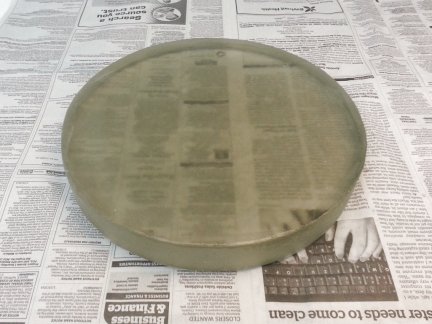
 I thought I had another winner with this sample. It came fome a heavy and thick-walled, but inexpensive clear glass vase sold by a discount store chain.
In spite of the huge amount of kiln wash stuck to the surface of the glass, this is actually the best
looking of all the samples tested. It is perfectly crystal clear with hardly any bubbles, no devitrification, and no real flaws of any kind at all
that I could see. I even cleaned off the stuck on kiln wash with my sand blaster and soft abrasive to get a better look at the puck and still
could find no issues with it.
I thought I had another winner with this sample. It came fome a heavy and thick-walled, but inexpensive clear glass vase sold by a discount store chain.
In spite of the huge amount of kiln wash stuck to the surface of the glass, this is actually the best
looking of all the samples tested. It is perfectly crystal clear with hardly any bubbles, no devitrification, and no real flaws of any kind at all
that I could see. I even cleaned off the stuck on kiln wash with my sand blaster and soft abrasive to get a better look at the puck and still
could find no issues with it.
The deal breaker came when I tried to locate more of these vases. The store where I had bought the initial test sample had others on the shelf at the time, but
none when I returned. None of the other stores in the area had any either. Apparently this was not a normally stocked item and when they sold out,
there would be no more. I do have the name of the manufacturer and name of the product line in my notes. Perhaps I will find a reliable and affordable
source of this glass in the future.
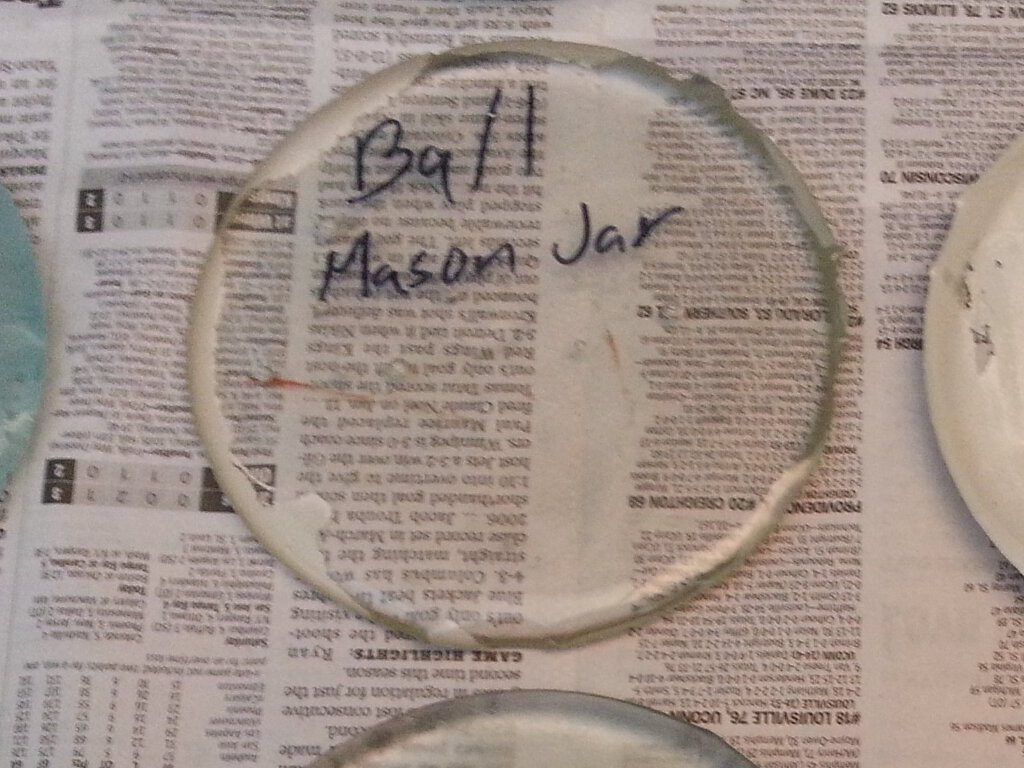
 This photo shows the overall winner of the competition. This puck was melted from glass from a Ball Canning Jar. The glass I almost forgot to test
turned out to be the best overall performer. The glass is well consolidated and free of devitrification. It is also very clear and transparent,
but not quite as clear as the previous sample. It also has a fair number of bubbles trapped in it, but not as many as the green Dollar Store vase.
there is no problem of supply, as the jars are sold in many local stores and are available online. They have been made for decades, and will probably be
made for decades more. The cost per pound of glass is comparable to the green Dollar Store vase, but even less expensive. So this is my choice for future
mirror casting experiments.
This photo shows the overall winner of the competition. This puck was melted from glass from a Ball Canning Jar. The glass I almost forgot to test
turned out to be the best overall performer. The glass is well consolidated and free of devitrification. It is also very clear and transparent,
but not quite as clear as the previous sample. It also has a fair number of bubbles trapped in it, but not as many as the green Dollar Store vase.
there is no problem of supply, as the jars are sold in many local stores and are available online. They have been made for decades, and will probably be
made for decades more. The cost per pound of glass is comparable to the green Dollar Store vase, but even less expensive. So this is my choice for future
mirror casting experiments.
The large number of failures in the testing prompted me to do some research into why it is so difficult to successfully remelt container glass.
I found that most types of container glass used in drinking glasses and bottles are made from a very hard type of glass with a somewhat different
formula than plate glass. The changes in formulation result in a generally higher melting point, which could be the cause of the poor consolidation
of the pieces in some of the tests. The different formulation of container glass also tends to make it more prone to devitrification, and that
explains a lot in my results too. I believe I was lucky to find three types of glass that actually worked well.
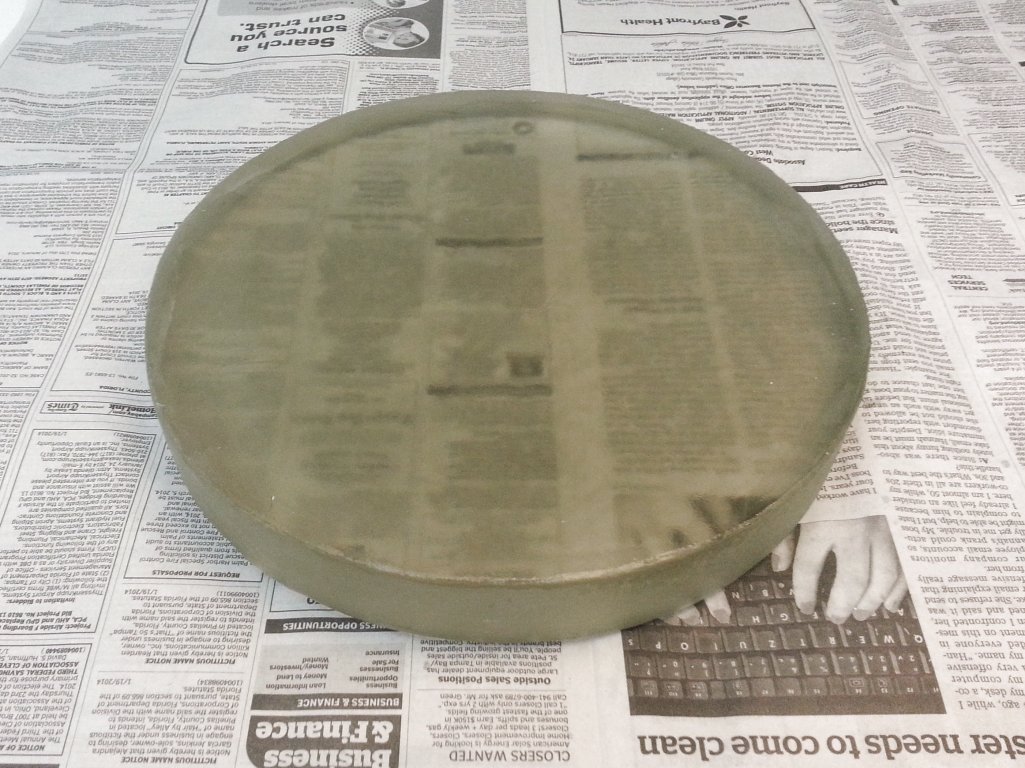
 UPDATE:
This is a photo of my first casting of a telescope mirror blank using glass from Ball Canning Jars. It is a 10 inch diameter blank 1.5 inches thick.
it is made from roughly 12 quart size jars (more like 13-14 jars were used in the actual casting process, but there is always some waste). It came
out very nice. There is no trace of devitrification. The glass is very transparent and almost colorless (more grey than green). The only real issue with this blank is
a large number of very small air bubbles in the glass (too small to show up in this photo). Most are in the top third of the volume of the glass.
These can probably be reduced with modifications to my casting process. I used a "pot melt" process on this first blank, and that has
been a source of excessive bubbles for me in the past. This particular blank should still be
usable, since there don't seem to be any bubbles near the bottom surface. That can be the surface that gets ground and polished to make the telescope
mirror. Bubbles in the bulk of the glass and near the other surface aren't really a problem.
UPDATE:
This is a photo of my first casting of a telescope mirror blank using glass from Ball Canning Jars. It is a 10 inch diameter blank 1.5 inches thick.
it is made from roughly 12 quart size jars (more like 13-14 jars were used in the actual casting process, but there is always some waste). It came
out very nice. There is no trace of devitrification. The glass is very transparent and almost colorless (more grey than green). The only real issue with this blank is
a large number of very small air bubbles in the glass (too small to show up in this photo). Most are in the top third of the volume of the glass.
These can probably be reduced with modifications to my casting process. I used a "pot melt" process on this first blank, and that has
been a source of excessive bubbles for me in the past. This particular blank should still be
usable, since there don't seem to be any bubbles near the bottom surface. That can be the surface that gets ground and polished to make the telescope
mirror. Bubbles in the bulk of the glass and near the other surface aren't really a problem.