How I built a recirculating sluice box for gold prospecting
It was easy. You can do it too
One of my many hobbies is recreational gold prospecting. I've been gold panning on my vacations for many years. It's a lot
of fun. It's great exercise. I get to do it in really scenic locations. I have even found some gold. However, you aren't
likely to find a whole lot of gold by panning alone. To find a lot of gold, you have to pan a lot of dirt. Panning is not a
good method for separating the gold from a lot of dirt. It takes too long and is far too much work. There are other
methods besides panning to separate gold from dirt though. A sluice is a device that separates gold from dirt using the power
of running water. It will process large amounts of material far more quickly and with less effort than is possible by panning
alone. I decided that it was time to step up the amount of gold I recovered on my prospecting outings. I decided I wanted a
sluice.
As with most of my other equipment, (wind turbine,
solar panel,
telescopes,
jet engine, etc., etc.), I decided to try building
one myself, rather than just buying one. The tinkering is half the fun after all. Also, you will get a much greater sense of
satisfaction and accomplishment when you know it is YOUR home-built equipment that is doing such a good job, and not some
store-bought thing.
Here is a video of the finished sluice in operation in its final configuration. Read below to see how I got here.
Here is a video of the sluice being used in a stream in the Bradshaw Mountains of Arizona. I didn't design the sluice to
be used in the stream like this, but it works really well.
This first attempt was a sort of proof of concept sluice. Just to make sure I could build something that actually
separated gold from pay dirt. I didn't put a whole lot of effort (or forethought) into it. I also didn't spend a lot
of money on it. I used scrap lumber from around my workshop. I used a 1 x 6 board 36 inches long for the base and 1 x 3's for the
sides. The only things I bought for it were 1/4 by 1/4 square dowels to use as riffles. I glued the riffles into it spaced
1 1/2 inches apart. It took only an afternoon to build, and most of that was just waiting for the glue to dry.
After the glue was dry, I took it into the back yard and tried it out. I set the bottom of it in a gold pan to catch what
washed through, blocked it up at what seemed like a good angle, and placed the garden hose at the top end to provide a
flow of water. Then I started slowly pouring pay dirt in the top end. The first tests went quite well. The sluice
actually captured most of the gold in the pay dirt. Panning out the material that washed through the sluice only revealed
a couple of small flakes that slipped through. This was very encouraging. However, the mud bog I was making in the back
yard with the hose running for long periods, while tinkering with the sluice, was very discouraging. I decided I needed
to find a way to capture and reuse the water. So I decided to build a recirculating sluice.
I drew up a simple plan for a cradle that would sit on top of a plastic storage bin full of water. The cradle would hold
the sluice and allow me to adjust the angle of tilt. Water would be pumped out of the bin to the top of the sluice. Water
and debris would fall back into the bin at the bottom of the sluice. This would be great! I'd be able to use the sluice
at home without turning the back yard into a mud hole. More importantly though, I'd be able to use it in the field where
there was limited water available. I'd designed a recirculating highbanker. I couldn't wait to build it. All I needed was
a pump.
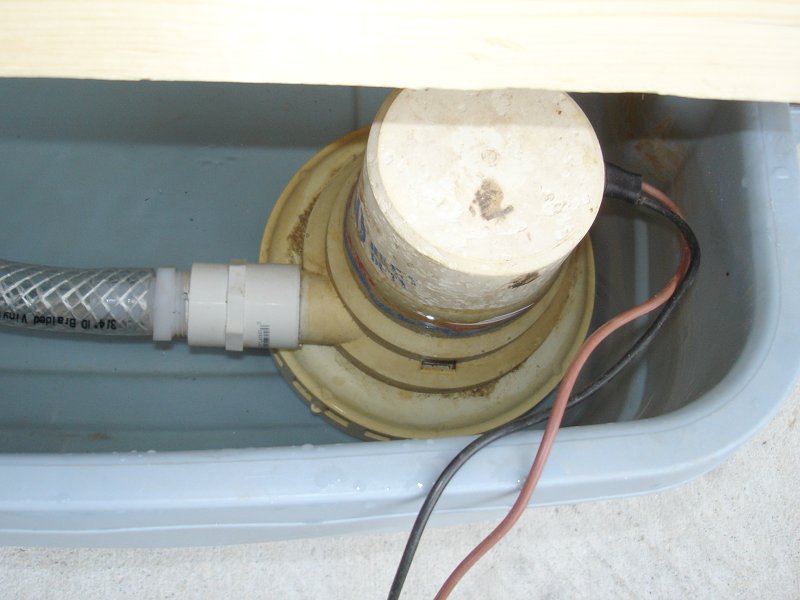
About this time I saw an old bilge pump at a yard sale. The guy was asking $5 for it. I talked him down to $3. It
looks pretty beat up, but it works great. I glued a PVC fitting on the outlet of the pump so I could attach a hose barb
and a smaller hose than the pump was designed for. I went with 1 in. ID hose.
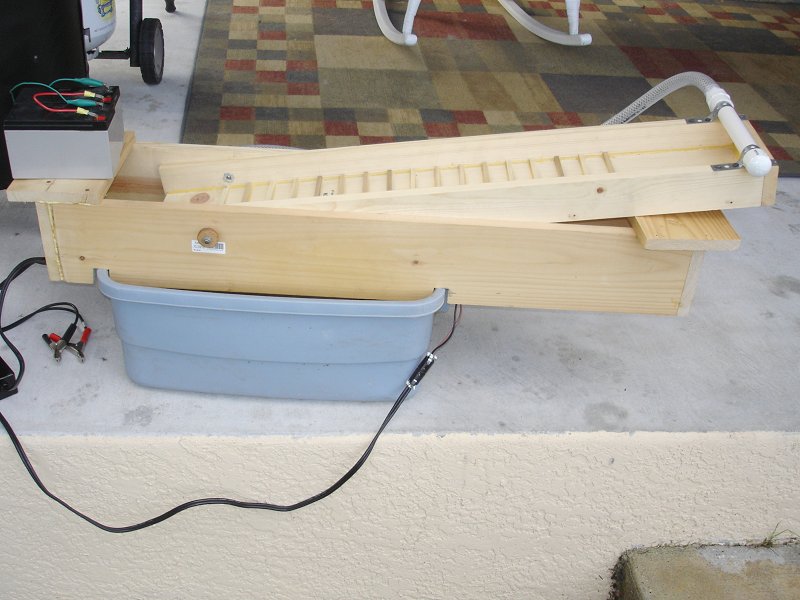
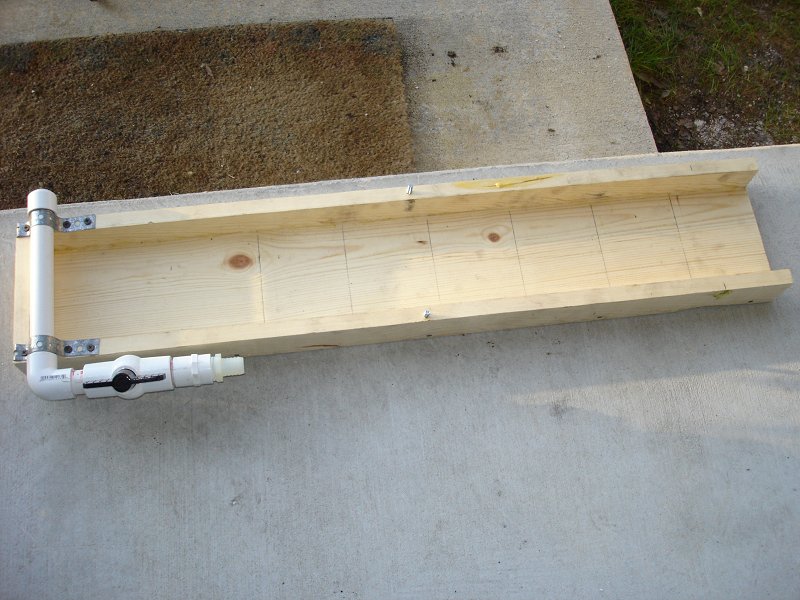
I built the cradle, again from scrap wood. I had to buy a piece of hose and a few PVC fittings. The spray bar at the top
of the sluice is a short piece of PVC pipe with a lot of holes drilled in it. I used a valve to control the water flow.
Again, not much effort, and not enough forethought went into it. I had it done in short order and set it up out back to test.
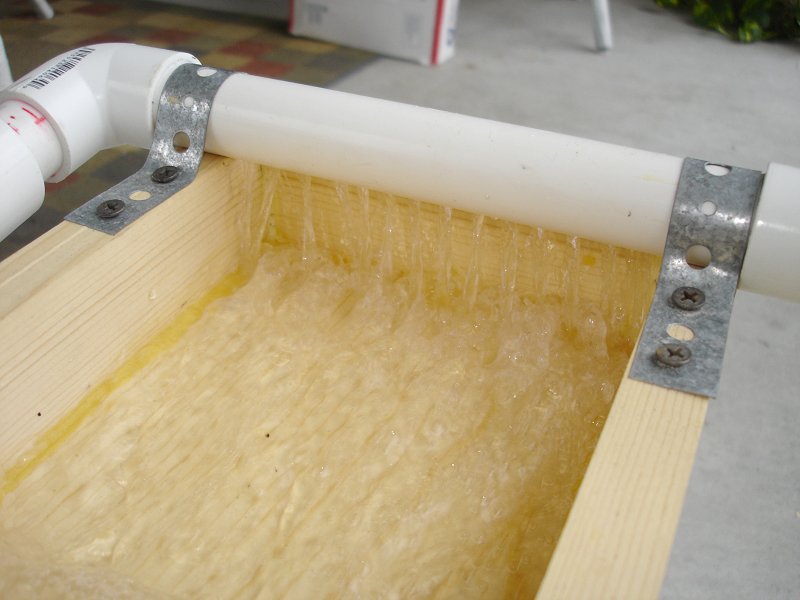
A closeup of the spray bar with the water flowing.
At first, things went well. The bilge pump, powered by a couple of 12V batteries connected in parallel, pumped plenty of
water. Pay dirt went into the top. Water and debris went into the tub at the bottom. Gold was getting trapped in the
sluice. It was going great. I could see some areas where there was room for improvement. The sluice leaked a little.
Also, a lot of water was splashing over the edge of the tub at the bottom of the sluice. I figured I could fix these
problems with some caulking and a splash board on the cradle. Overall, I was very happy with how my recirculating
sluice was working. That is until I was ready to try a cleanup and recover the gold trapped in it. The first huge
problem with this design became apparent. I had planned on removing the sluice from the cradle, putting it into a
5-gallon bucket, and washing the material out of the riffles into the bucket. However, the cradle had been designed
to be a tight fit on the sluice. Both the sluice and cradle had absorbed water and expanded. Now the two pieces were
locked together in a death grip. They weren't coming apart. Oops!
That first cleanup was a mess. I had to do it with the sluice and cradle locked together. I did eventually get them apart.
However, There was no getting them back together again until after the wood had dried and shrank back to its original
dimensions. This just wasn't going to work. Time to build a new cradle.
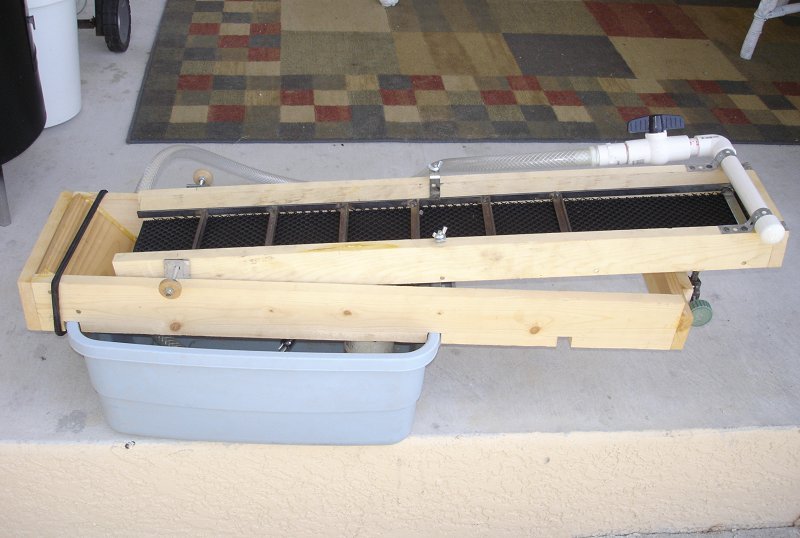
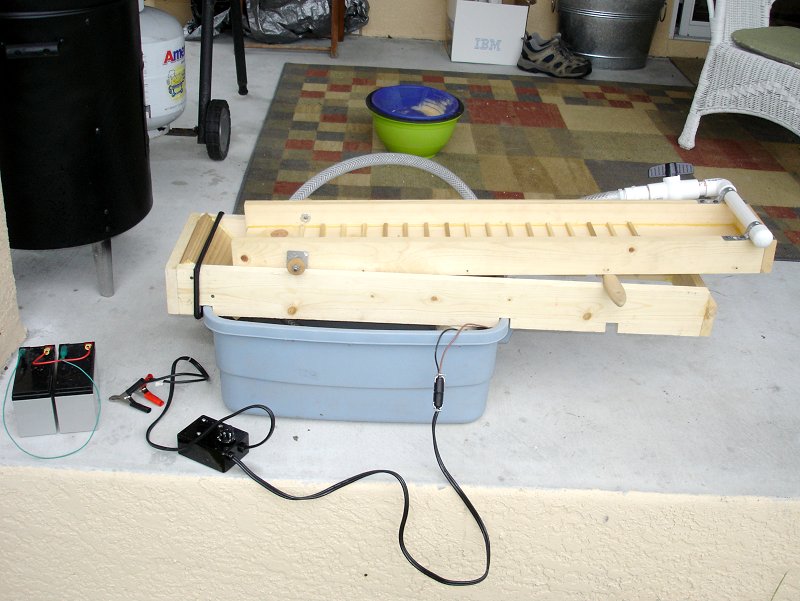
The new cradle has plenty of clearance inside, so there will be no more problems with expanding waterlogged wood. I also
incorporated a splash board to guide water back into the tub and prevent loss. This new cradle made the sluice much
easier to use. Water loss was minimal and cleanups were easy.
I have a large plastic tub I use for storing and carrying all my prospecting equipment. This is the tub I will be using
in the field. I use a smaller tub for testing (that's why there are two sets of notches in the cradle). But because the
small tub is not a long as the bigger one, the sluice/cradle assembly is cantilevered too far out and tends to fall off.
I used the weight of the batteries on the first cradle to keep it balanced on the tub. With the second cradle, I used a
bungee cord to keep the cradle in place and moved the batteries away from the splashing water.
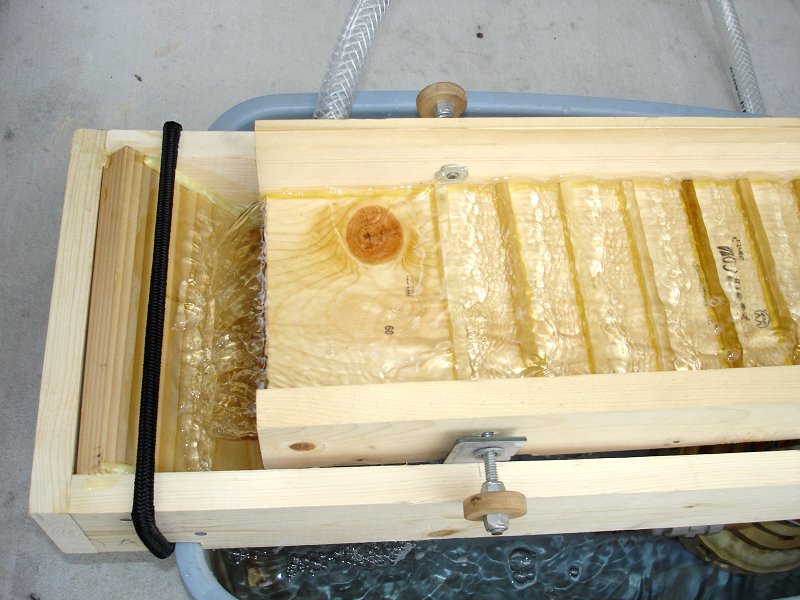
Here you can also see
how the splash board guides the water back into the tub with almost no loss. The photo also shows a closeup of the hinge
assembly that holds the sluice in the cradle.
Click to learn how
to meet them
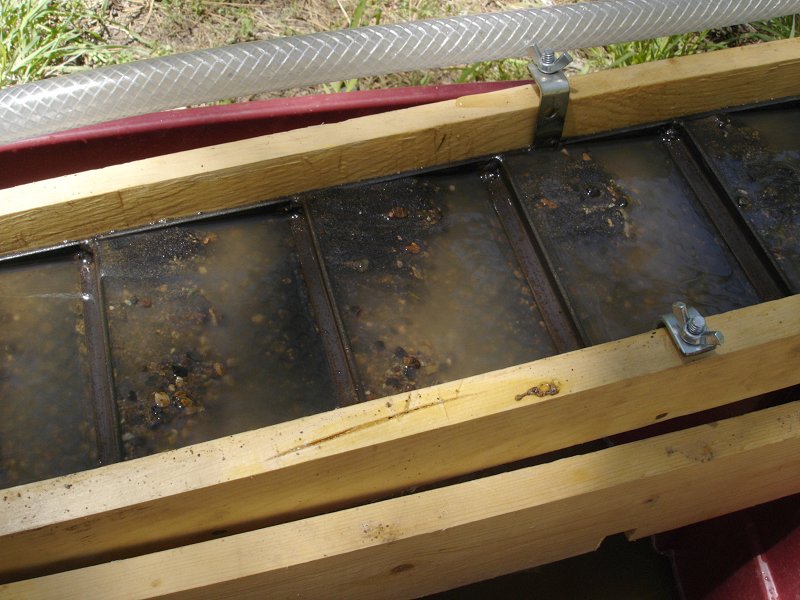
This photo Shows the sluice after running for a while, processing concentrates from a drywashing operation in Arizona.
Note how the black sand and other heavy minerals are staying trapped behind the riffles while the bulk of the material
is getting washed through. The sluice is working pretty well. I tested the sluice by hand panning the waste material in
the tub to see how much gold snuck through. This sluice does a really good job of trapping all but some of the very
finest gold. So there is room for improvement.
This photo shows large pieces of gold in front of the first riffle. The biggest chunks of gold in the concentrates never
make it past the first couple of riffles. The lower riffles aren't trapping much at all.
So I probably have too many riffles in this prototype sluice.
To do a cleanup, I first pick out any large pieces of gold that are stuck behind the first couple of riffles
(see photo above).
Next I unscrew the two hinge bolts that hold the sluice in the cradle and disconnect the water hose. Then I
put the sluice into a 5-gallon bucket and pour water down it to wash the concentrates into the bucket. I generally dip
water out of the plastic tub and gently pour it down the length of the sluice to get the concentrates out. I tried
leaving the pump connected a couple of times and turning on the water flow, but the flow is too strong, and it tends
to blow the concentrates all over the place. Then all I have to do is hand pan out the small amount of material in
the bucket. This is a tremendous reduction in the amount of panning I have to do to get the gold out of the dirt.
I'm loving it.
Here is the results of panning out the concentrates after a cleanup. Look at all that gold!
Click to learn how
to meet them
As I said above, this was just a proof of concept sluice. I had no intention of taking this sluice into the field.
It worked pretty well, but it still had issues. Most of the pay dirt I run through the sluice is crushed ore from
a hard rock gold mine. The gold is big and chunky. The sluice did a real good job of capturing almost all that gold.
Most of the gold never made it past the first riffle or two. However, when I ran concentrates from an Arizona dry-washing
operation through it, the results weren't as good. Much of the gold was very fine. A lot of the finest bits were
washing through the sluice. I needed to capture the finest gold too.
I did something I probably should have done more of at the beginning. I researched how the professionals build sluices.
I then looked at my sluice with a critical eye and saw more flaws that needed fixing. The riffles were too small and too
close together. Also, there were too many riffles and they were made of soft wood that would be quickly destroyed by
pounding rocks. The riffles needed to be removable to make cleanups easier. And finally, it needed a lining of ribbed
matting and miner's moss on the bottom below the riffles that would capture even the finest gold. I also began to think
about how to prolong battery life when using the sluice in the field. The valve did a good job of regulating the flow of
water, but I was afraid the backpressure made the pump work harder and reduced battery life. So I decided the sluice also
needed a PWM speed controller for the pump to maximize efficiency and battery life. It was time to build Sluice MK II.
Not everything needed redoing. I decided to stick with the basic design of 1 x 6 and 1 x 3 wood construction. I could reuse
the second cradle and the spraybar too.
The biggest change was making the new riffles out of steel angle stock. I am an old carpenter. I can make anything
out of wood. Metalworking though is more of a challenge for me. So I hesitated for a while before taking the plunge
and using steel. But I decided it was high time I learned how to weld anyway. So I bought some 1/2 x 1/2 angle stock and
some 1/2 x 1/8 flat stock. My intent was to use the flat stock as rails on either side of the sluice and weld the angle
stock between them to make riffles. The entire steel riffle assembly could then be lifted out of the sluice during
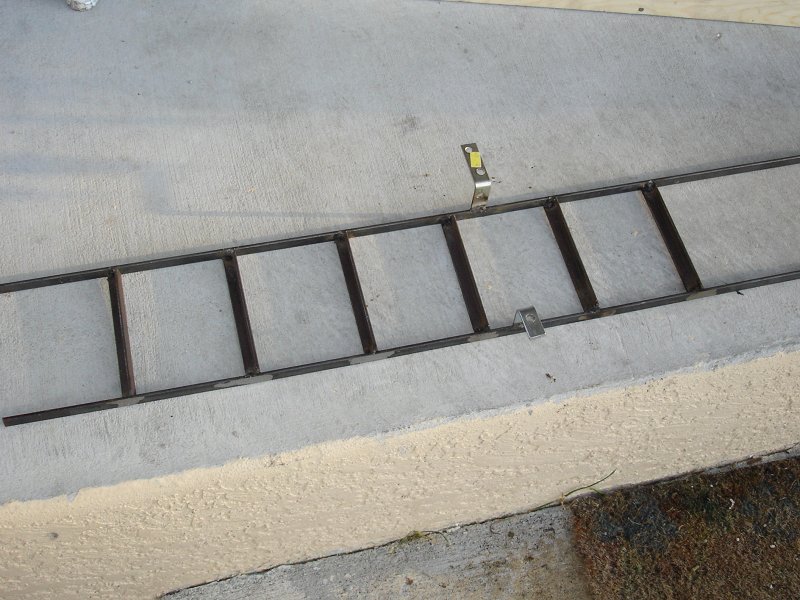
cleanups. I settled on 6 riffles this time. I cut up the steel pieces without too much difficulty, even though I only
had a hacksaw for the job. I don't have a lot of metal working tools.
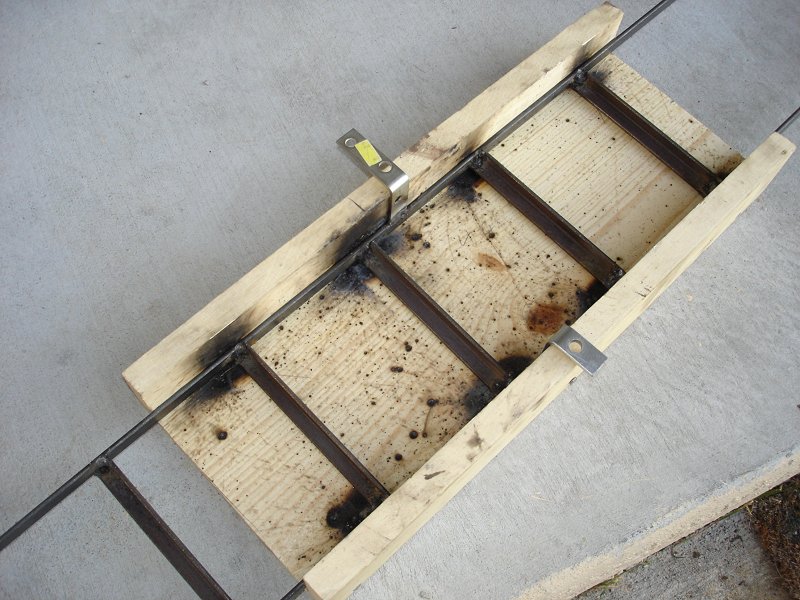
I then built a short section of sluice out of scrap lumber to serve as a jig for welding the pieces together.
I used a borrowed welder to weld the pieces together. My welds are ugly (I need more practice) but they seem
strong enough. I also welded on two angled pieces in the middle of the riffle assembly to serve as anchor points
for holding it in the sluice. Not bad for a welding newbie.
The finished steel riffle assembly.
Click to learn how
to meet them
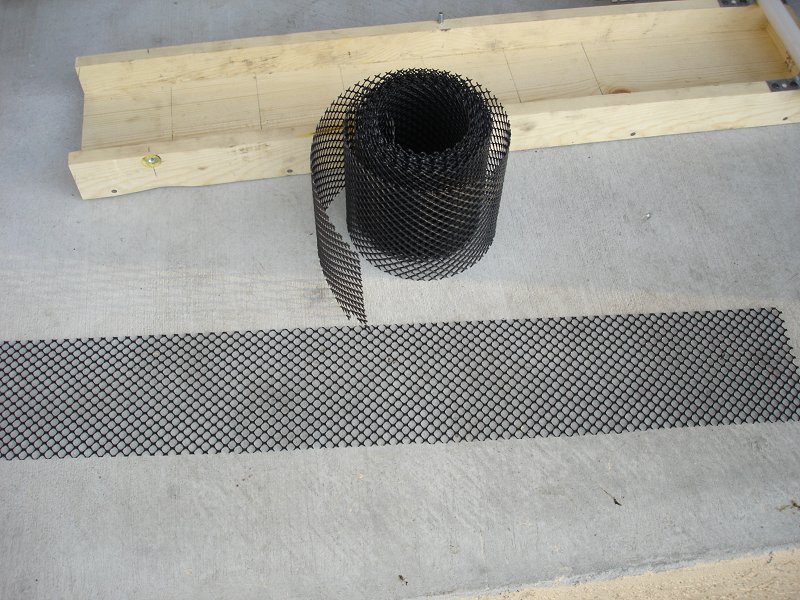
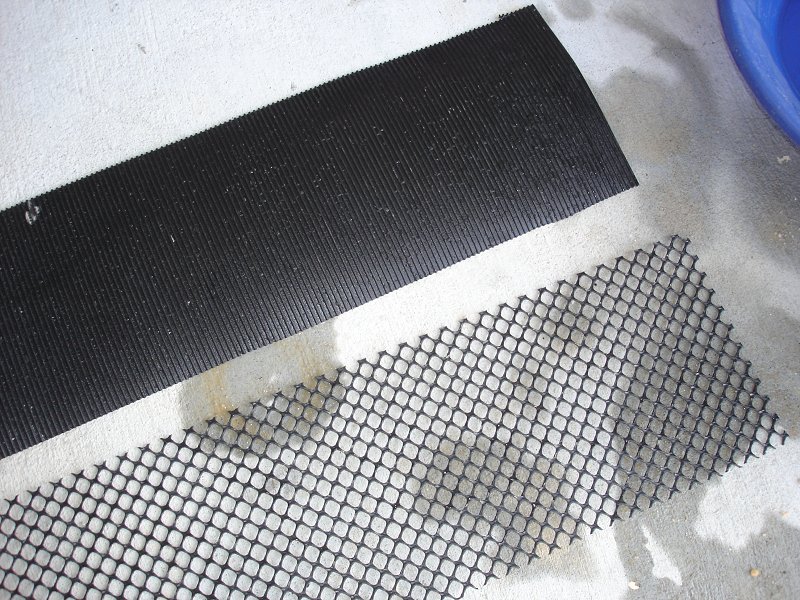
I also noted during my research that a lot of people put expanded metal mesh under the riffles and above the miner's moss.
I found some expanded metal mesh in my local home center store, but it was in 4 x 8 foot sheets with tarpaper backing for
stucco work. I really didn't want to try to cut that. Just down the isle though, I found a roll of plastic mesh meant to
keep leaves out of gutters. It looked almost exactly like the metal mesh, but came in a roll only slightly wider than my
sluice box. It would be easy to cut and it was cheap too.
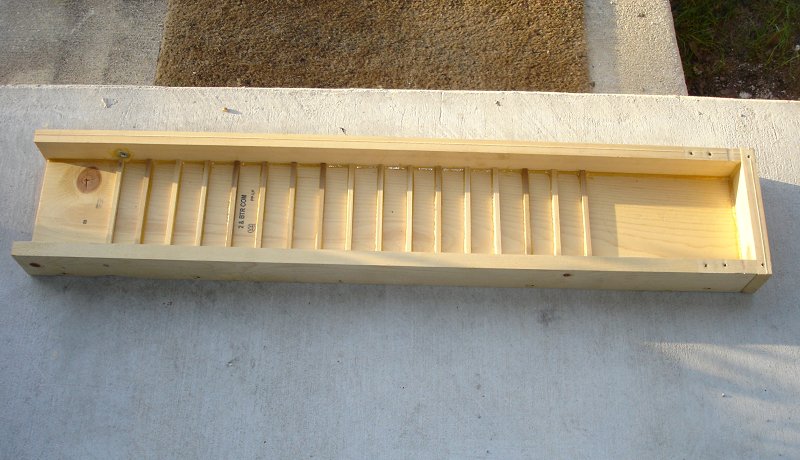
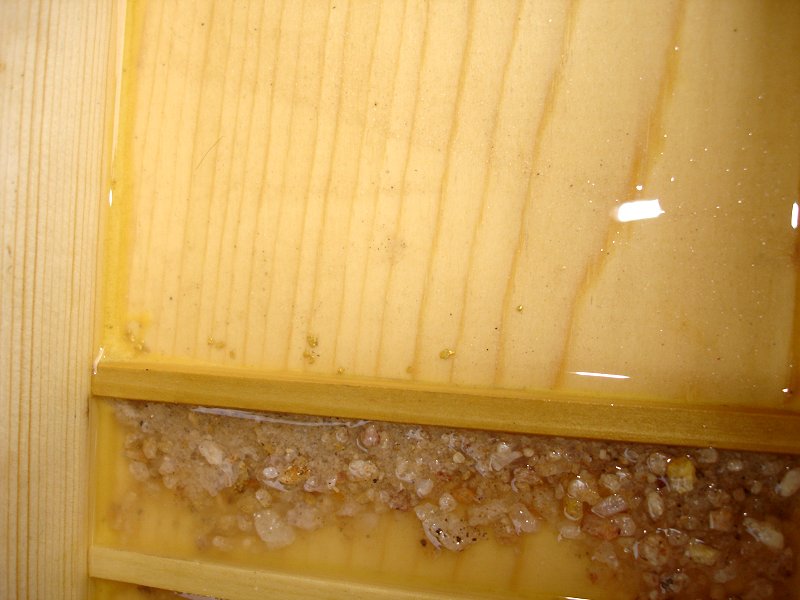
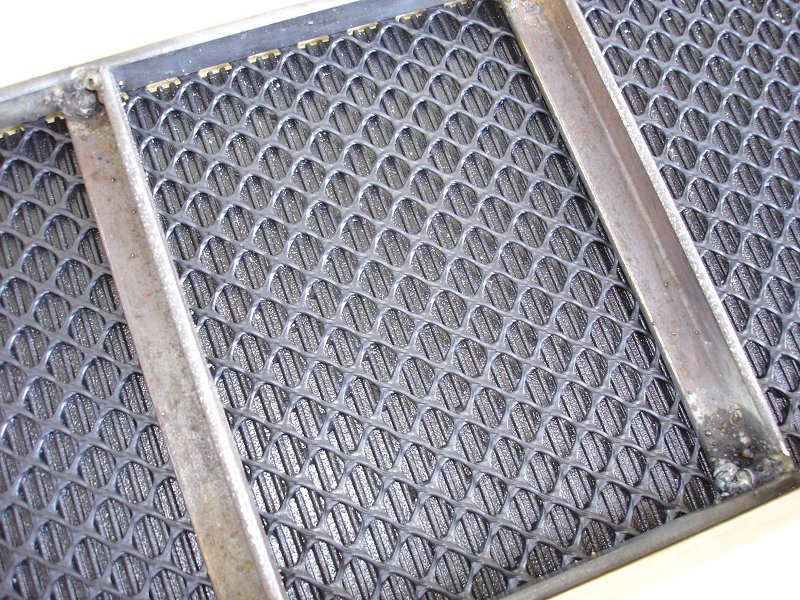
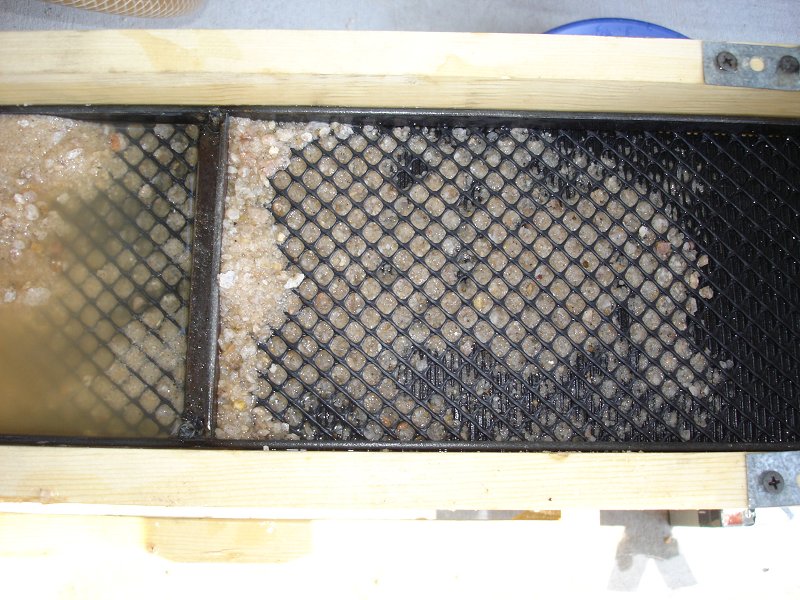
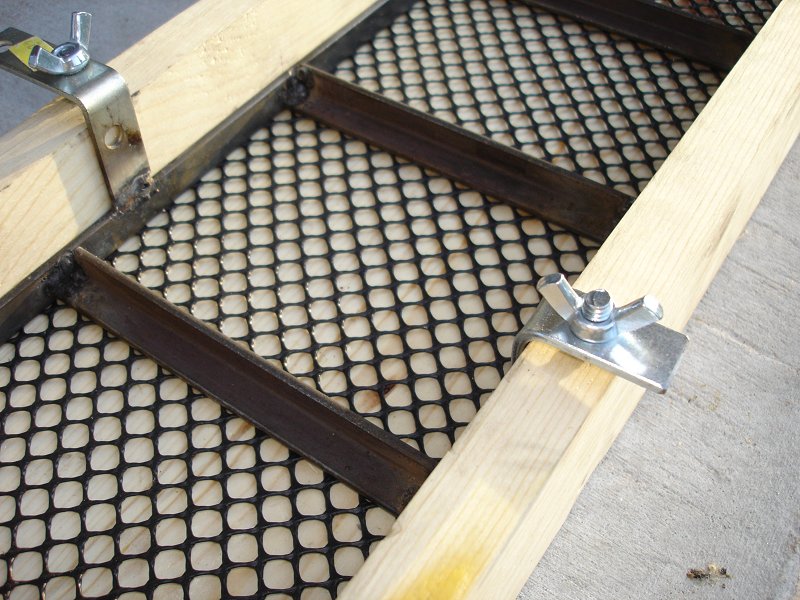
This photo shows the mesh in the sluice under the riffles. It also shows how the riffle assembly is held in place with
a couple of wing nuts on the angled clips. The clips are a little long. I cut them off flush to the edge of the sluice
and rounded them with a file (to protect my fingers from sharp edges) later on.
Next I had to order some ribbed matting and miner's moss from an online miner's supply store.
I had to wait until they arrived before I could test my new and improved sluice.
The PWM (Pulse Width Modulation) speed controller for the pump motor is a fairly simple circuit. It is based on the
ever popular 555 timer integrated circuit. The theory behind this controller is that it controls the pump speed by
turning the pump on and off very quickly and varying the length of time the pump motor is on during each cycle.
The 555 timer creates a series of fast pulses. The width of the
pulses determines how long the pump is turned on during each cycle. The MOSFET is a very efficient switch. Since
the motor is either full on or full off, there is no power wasted like there would be in a resistive speed controller
or even a unit based on power transistors. This gets maximum life out of the batteries. Varying the potentiometer
setting changes the pulse width and pump speed. There is nothing too critical about this circuit. Plus or minus 10%
on the component values is close enough. The resistors should all be 1/4 Watt. Other MOSFETS will work as long as
they can handle the maximum current of the pump. I just happened to have a bunch of IRF540s lying around.
Size the fuse to match the pump you are using. A slow-blow fuse might be a good idea since pumps often have very high
initial inrush current when started.
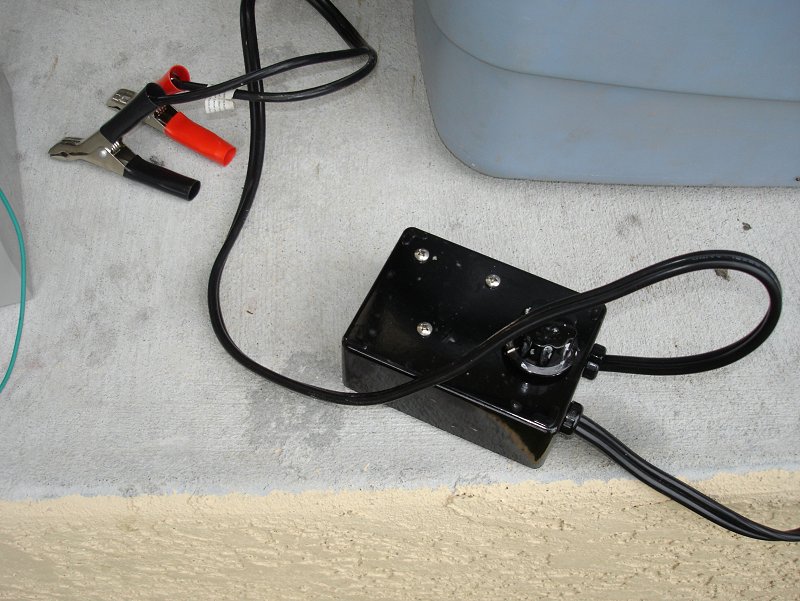
I used a long, heavy cable and large battery clips for my unit. I usually carry some sealed lead acid batteries with
me to power the unit, but this arrangement also allows me to connect to my truck battery if necessary. I didn't bother
with a power switch. You can add one if you like. A PWM speed controller certainly isn't absolutely necessary. However,
I just love to tinker with electronics. So I had to do it.
I had been adjusting the angle of the sluice by just jamming whatever was handy between the sluice and the cradle.
This worked ok, but while sitting around waiting for the miner's moss and ribbed matting to arrive, I decided to get
fancy. I just happened to have a bunch of old 16mm movie projectors lying around the shop at the time
(that's another story). I removed the adjustable tilt mechanism from one of them and mounted it on the back of the
cradle. Now I can adjust the tilt of the sluice with the twist of a knob.
Another view of the tilt adjustment mechanism.
Click to learn how
to meet them
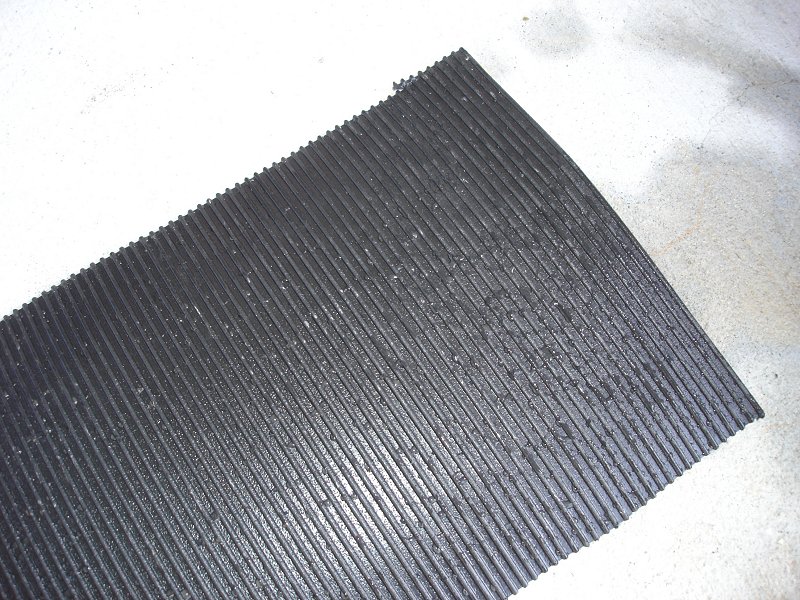
The ribbed matting and miner's moss finally arrived. The ribbed matting is made of black rubber with fine parallel
ridges all along its length. I cut it to the width of the sluice box and laid it down the entire length of the
bottom of the sluice with the ridges perpendicular to he water flow. Each little ridge is like a little riffle.
It is really great at trapping gold.
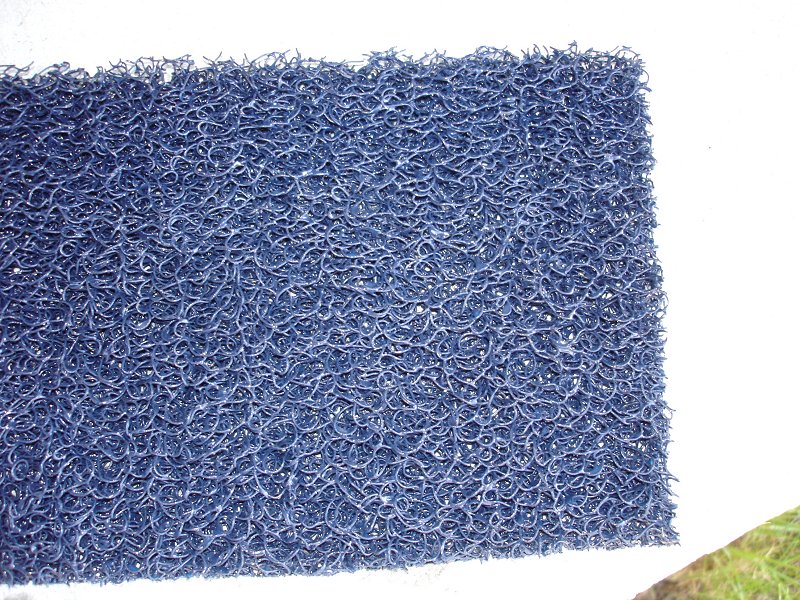
I'd never seen miner's moss before, only read about it. It was thicker than I was expecting. I may not be able
to use it in this sluice. The side walls aren't tall enough. With the extra thickness of the miner's moss under
the riffles, water will spill over the walls of the sluice. I may have to rebuild the sluice again with taller
side walls, and rework the riffle hold-down clips. That's a project for another day though.
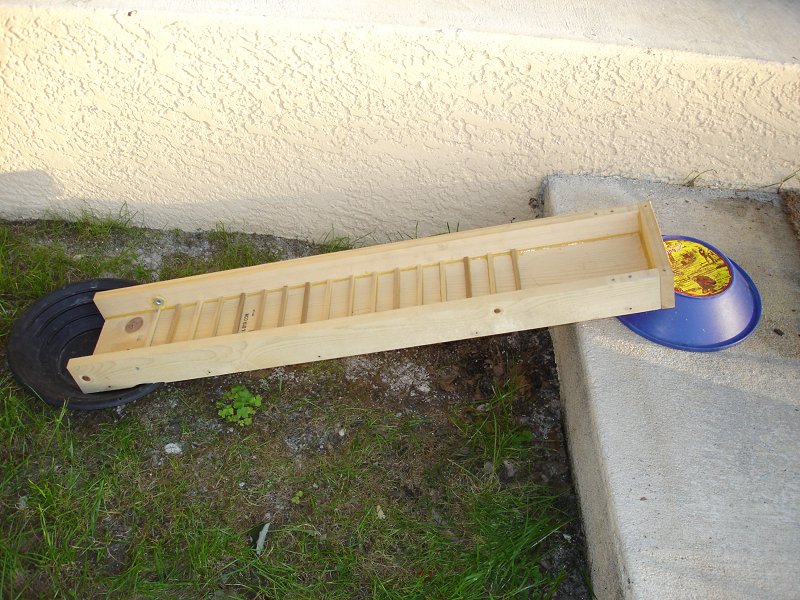
I Really wanted to test the new sluice box, so I decided to go ahead with just the ribbed matting and plastic
mesh under the riffles.
The sluice box with ribbed matting and plastic mesh under the riffles. Don't look too closely at the ugly welds.
I ran some crushed ore through the sluice to see how well it was working. You really can't see much since the ore has a lot
of clay in it that makes the water an opaque brown color.
After running a goodly amount of ore (many panfulls) through the sluice, I shut down to see what it looked like. My Girlfriend
came out to have a look too. Those are her little feet with painted toenails. She's got gold fever almost as bad as I do.
(what woman doesn't like gold?)
Here's a closeup of some of the material left in the sluice. I could see bits of gold here and there stuck in the ribbed
matting. They didn't show up too well in the photos though.
I cleaned the sluice out and dumped the material into my gold pan. Even though I had run a huge amount of material through
the sluice. I only had less than half a pan full of concentrates to pan out by hand. This is a great labor savings. Here
is the gold the sluice caught. I then laboriously panned out all the material in the bottom of the tub that had made it
through the sluice, just to see if any gold made it through. None had. The sluice caught every bit of the gold in the ore.
Now I know I can trust the sluice to get all the gold, as long as it is as large as the gold in the crushed ore. I'm not
sure how it will handle very fine gold. I don't have any more drywasher concentrates to try in it, and probably won't get
any more before my next vacation. I may have to just take it to Arizona and Colorado and try it out in the field to see how well
it really works.
Click to learn how
to meet them
My testing did show one problem area. Sometimes the ribbed matting at the top of the sluice tends to float up off the bottom of the
sluice. Then the water gets behind it and it wants to just pop right out of the sluice all together. So I welded a bar across
the top of the riffle assembly to hold the matting down (my welding is getting better).
So here is the sluice in its final configuration. I am pretty much out of time for making further modifications. Our vacation
is coming up quickly and there is a lot to do before we leave. The next time I use the sluice will probably be in the field
in Arizona and Colorado. I'll post updates in the future about how well it worked in the field.
UPDATE 07/18/08
Here is the recirculating sluice is set up on the banks of one of my favorite gold panning streams in Arizona. It is on
top of the big red tub I actually designed it to work with. The little blue tub was just for testing. Here I have dug
out about 1 2/3 buckets full of paydirt from under and behind boulders in the stream bed. I classified it down to 1/4 inch
and am ready to start feeding it through the sluice. The flow in the stream was down to just a tiny trickle. Later in the
summer it dries up completely. Only a recirculating sluice would work here.
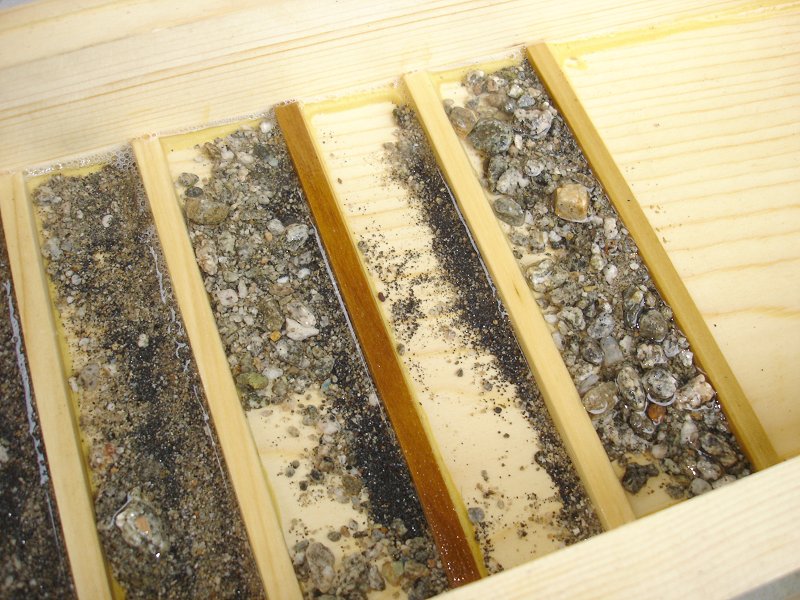
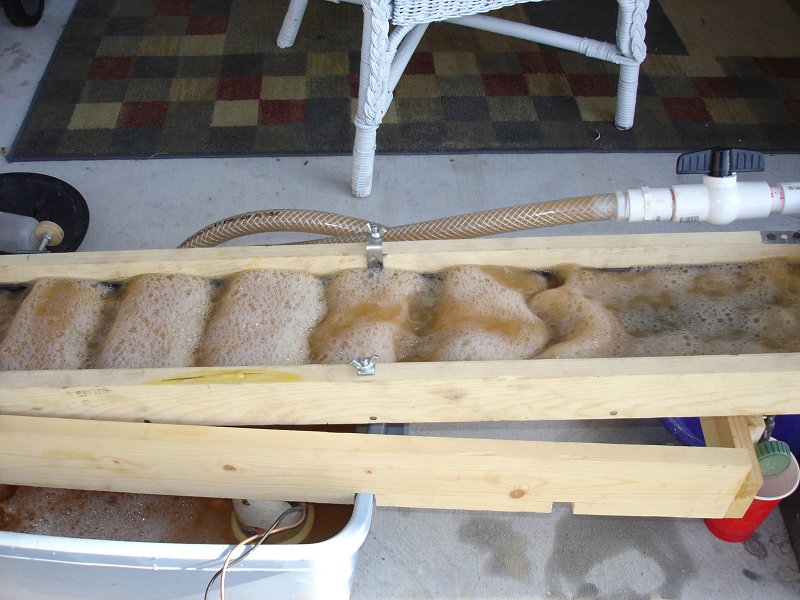
This is a photo of the sluice after running for a while. It is mostly full of black sand, with a few random rocks. So it
is doing what it is supposed to do and is separating out the heavy minerals from the bulk of the material.
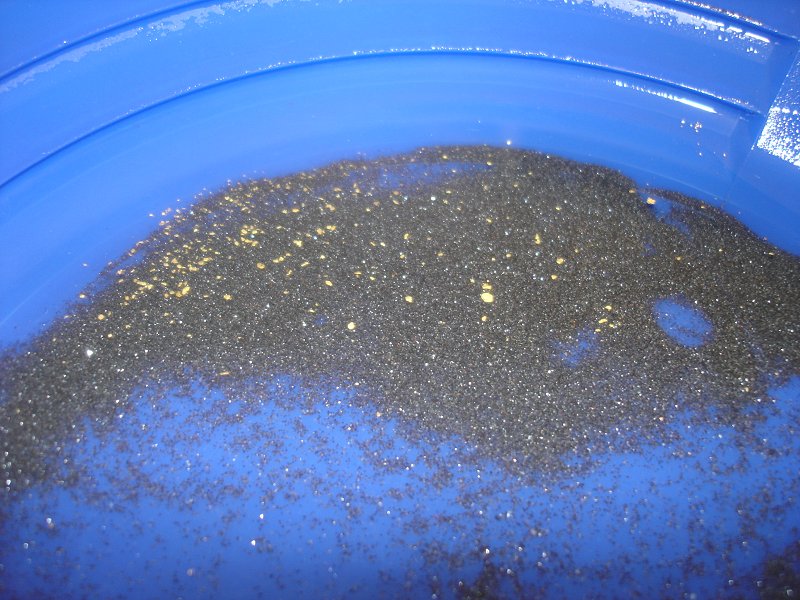
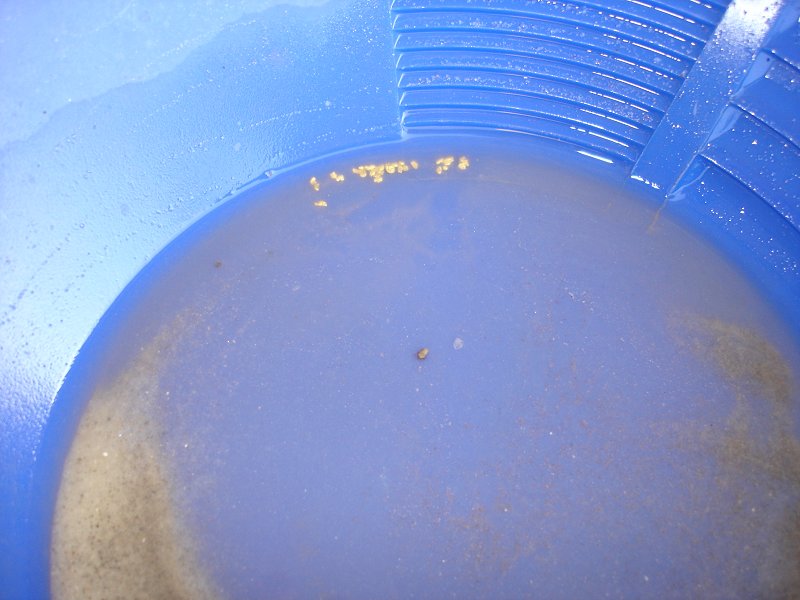
This is a photo of the concentrates remaining after cleaning up the sluice. Maybe 1/8 of a bucket from the 1 2/3 buckets
I started with. I processed a lot of material quickly and only had to pan out a small amount of material. This is great!
On panning out the concentrates, I found some gold, but not nearly as much as I had hoped for (do you ever find as much as
you hope for?). I worried that I may have been feeding the sluice too fast and overloading the riffles. I went and dug up
and classified more material and tried again, feeding it in slower this time. Slower worked better, but I still wasn't finding
enough gold to justify how hard I was working. There were a lot of people out working the stream this time. Normally I have the
place pretty much to myself, but this time it was packed with people. They must have beat me to all the good gold to be had after
the spring floods. So I decided to call it a day and wait until I got into Colorado to do more prospecting.
Click to learn how
to meet them
Later, after I moved up into Colorado, I tried prospecting in several places but had no real luck until my last day there.
Late snows had the rivers and streams swollen with runoff. It was all but impossible to do any panning or sluicing on most
of the streams in the area. The places I did try didn't show enough gold in the pan to bother with. Then, on my last day,
I found a spot that really looked promising. I found good gold test panning the area and decided to set up the sluice and
process a bunch of material. There was a small stream running near where I wanted to dig that had a really good flow. There didn't
didn't seem to be any point in dragging out the whole recirculating setup. Even though this sluice wasn't really designed
for use in a stream, I decided to give it a try. It worked surprisingly well.
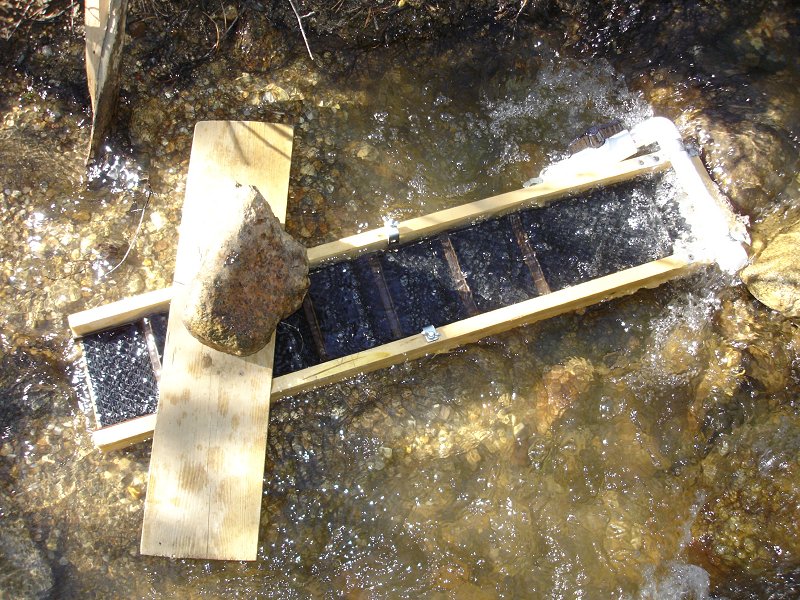
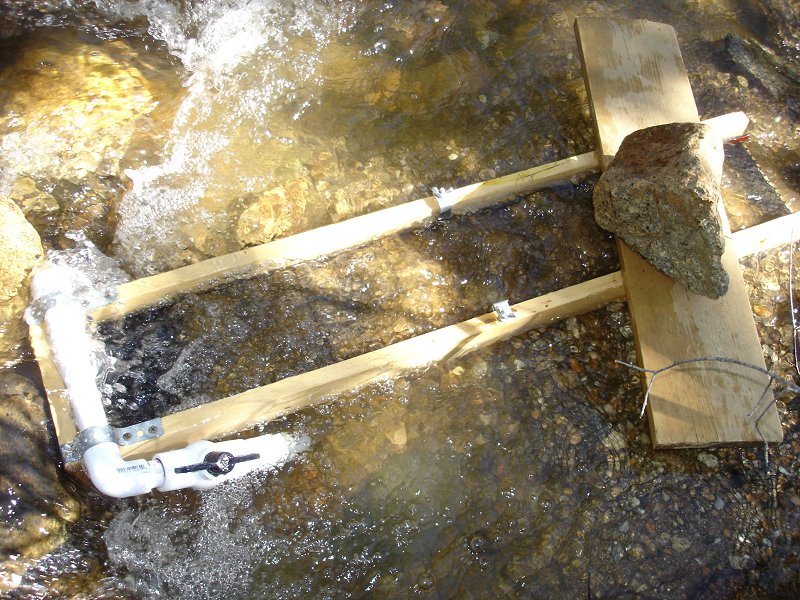
I placed the sluice behind some rocks that were partially damming the stream. I placed a heavy rock on a board on top of
the sluice to keep it from floating up off the bottom of the stream. As the water cascaded over the dam, it fell right
into the top of the sluice box right where the spraybar is located. I built wings of rocks on the sides of the natural
dam to increase the flow into the sluice. I had dug out and classified a couple of buckets of paydirt from a hole in the
hillside not far from the stream. Running the material through the sluice in the stream was fairly quick and easy. I found
that the sluice worked quite well as long as I fed the material slowly and didn't overload it. After adding a scoop of
paydirt, I waited until I could see the mesh on the bottom of the sluice behind the first three riffles
before adding more. This system worked quite well. It allowed heavies to settle to the bottom and lighter material to
clear out. I could occasionally see bits of gold trapped in the sluice, but they would usually quickly get buried under
black sand. I did a quick cleanup after every bucket full of paydirt because the sluice was really filling up with black
sand. I was digging my paydirt out of a bench deposit of old stream material with heavy streaks of black sand in it.
Possibly the richest placer gold deposit I have ever found.
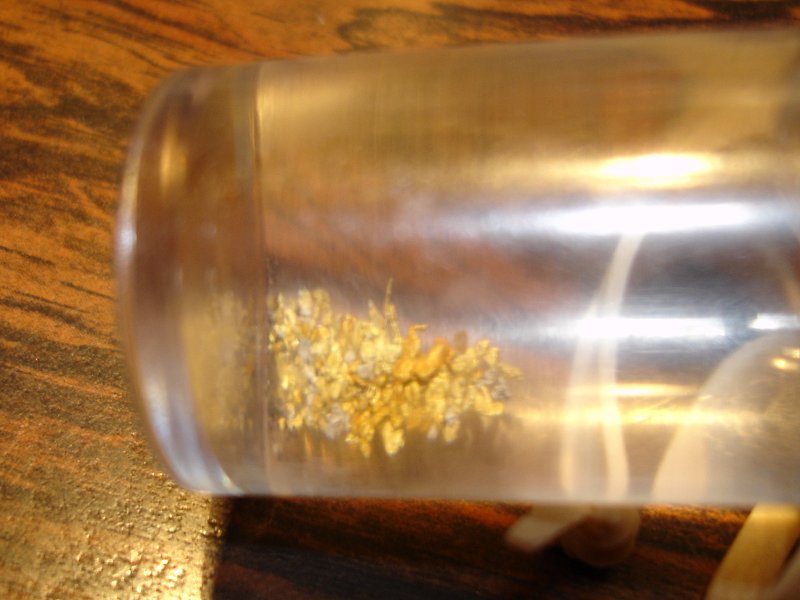
After processing a couple of buckets of material through the sluice, I moved to a calmer area of the stream and panned
out the concentrates. I found some really nice pickers and lots and lots of small flakes in my pan. The black sand is
also just loaded with really fine gold. I brought the black sand home with me and will process it to remove the fine
gold another time.
There was a fellow digging in the same hole as me and processing his material with a commercially made Keene sluice
a little way down stream from me. We compared our gold vials. He was seriously impressed with my take. He was finding
gold, but I was finding more. That gave me a great feeling of accomplishment, knowing my home-built sluice worked as
well or better than a famous name-brand unit. Note the different colors of the gold. It all looks like gold in the pan.
Put it together in one vial though and you can see the different colors due to different levels of impurities in gold
from different veins. Gold from many different sources must have wound up being deposited in those ancient stream
deposits I was digging. Some bits looked coppery. Other bits look almost silvery. Not bad for only a few hours work.
And that's just the stuff worth picking out of the black sand. There is lots more fine gold in my black sand that I
need to separate out another day.
Unfortunately, I only had less than half a day on this particular site in Colorado. All too soon I had to pack up and start
the long drive home. Isn't that the way it always goes? You find the right spot to dig, the right spot to run the
sluice, everything is clicking, you are finding good gold, but then you run out of time. Sheesh! Well, at least I
know where to start out at the next time I am in Colorado.
I may modify the sluice for easier use in a stream. I was thinking about ways to make the spraybar and front
bulkhead easily removable from the sluice. Then I could attach a wood or sheet metal flare to it like a commercially made
sluice has. I'll have plenty of time before my next vacation to tinker with it.
 This photo shows the mesh in the sluice under the riffles. It also shows how the riffle assembly is held in place with
a couple of wing nuts on the angled clips. The clips are a little long. I cut them off flush to the edge of the sluice
and rounded them with a file (to protect my fingers from sharp edges) later on.
This photo shows the mesh in the sluice under the riffles. It also shows how the riffle assembly is held in place with
a couple of wing nuts on the angled clips. The clips are a little long. I cut them off flush to the edge of the sluice
and rounded them with a file (to protect my fingers from sharp edges) later on.