My Home-Made Soap Recipe and Tutorial
Making your own soap at home is easy
Soap making is something that has always interested me. I had been wanting to try it for a long time. I've never been able to find a store-bought
soap I was really happy with. I have patches of dry skin on various
parts of my body. Most store-bought soaps really dry out and irritate those areas. Most so-called moisturizing soaps, aren't much help, and
most are loaded with really objectionable amounts of perfume. I am cursed with an overly-sensitive nose. I can't stand the smell of most
perfume-laden soaps, or how they make me smell when I use them. So eventually, I decided I had to try my hand at making my own soap.
I did some research, and found a lot of soap-making tutorials on the web and Youtube. Almost all were done by women, and most were making the sort
of fancy, over-perfumed soaps I was trying to get away from. However, they did teach me the basics of soap making. I just left out the fancy
scents, colors and exotic additives (do flower petals really make a better soap?). So this is a soap-making tutorial from a man's perspective. The goals
for my soap recipe were: moisturizing, no strong odor, inexpensive to make, cleansing, use common and easy to acquire ingredients and equipment.
It took a few tries to get it right, but I think I have succeeded.
So what is soap? Simply stated, a soap is any one of a large family of molecules (Sodium or Potassium salts of Fatty Acids) that have
an oil soluble part, and an water soluble part. This gives soaps the ability to emulsify oils in water. Soaps are made by treating fats and oils
with strong alkaline chemicals, like Lye (Sodium Hydroxide). This creates a chemical reaction called Saponification. In the Saponification reaction,
the triglycerides that make up fats and oils are broken down into fatty acids and glycerine. The fatty acids are neutralized to sodium salts, thus
producing soap. It sounds horribly complex and scientific, but it is really very easy to do. People have been making soap for thousands of years, often
using nothing more complex than an iron pot over a camp fire and a stick for stirring. So making soap in the modern kitchen is dead easy.
My soap is very moisturizing. I make my soap using a modified cold-process method. So all the glycerine, which is a great moisturizer, remains in the soap.
I also use castor oil and beeswax in the recipe, which I have found really help soothe my dry and irritable patches of skin. The soap is cleansing, and
has very little odor, just a faint, hard to define, "soapy" smell. It is cheap and easy to make. Here is how I make it.
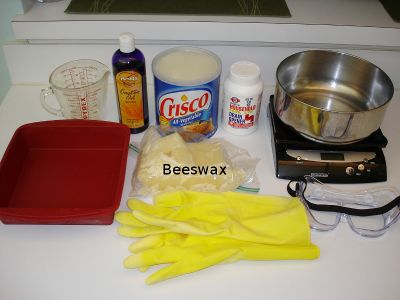
Here is almost everything needed to make my home-made soap. You'll need some measuring and weighing equipment, some safety equipment, a large mixing bowl,
a mold for the soap, and all the ingredients that go into the soap. I'll break it down and describe the all these things in detail below. There are also
a few things I forgot to get in the photo. You'll also need a wire whisk, a plastic spatula, and an electric mixer. An apron also comes in handy.
Let's start with the necessary ingredients. You will need castor oil, Crisco shortening, lye pellets, and beeswax. The only somewhat hard to find
ingredient here is the castor oil. I did a lot of research to try and figure out what oils to include in my soap to soothe my dry and irritable skin.
I finally settled on castor oil. It has proven to be a good choice. Most well stocked drug stores sell castor oil in tiny little bottles of an ounce
or two in size at a really outrageous
price. For a little more than the price of one of those tiny bottles, I got a big 16 oz bottle from a soap making supplier who sells oils on
The beeswax came from my local craft store. You will find it in the candle-making section. I bought a one pound block of it. It should last me for years
of soap making. Beeswax can also be found on
usually cheaper than in the craft store, and in several different grades. I was in a hurry to try
beeswax in my soap recipe though, so I paid a little extra and bought it in the store. I got the refined, hard, white beeswax they sell for candle making. I
may someday also try the raw, yellow beeswax I have seen for sale on
and other places. It looks to be a more natural product. The Cisco and lye need
some extra explanation. see below.
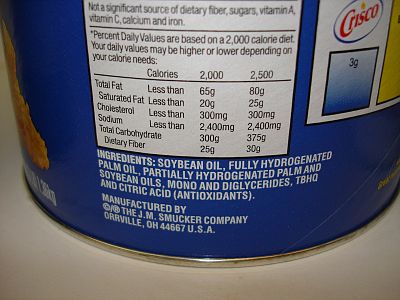
Here is a close-up of the ingredients list on the Crisco Shortening can. I understand that Crisco changes the recipe of the shortening, depending on
the season and which oils are most readily available at that time. I have only made soap with this Soybean and Palm oil version of Crisco. I have
not tried the Cottonseed oil version they sell for part of the year. Also, many store brand shortenings use cottonseed oil. Cottonseed oil
may, or may not, work well in this recipe, I haven't tried it yet. I did a calculation of the amount of lye to use with the cottonseed oil version
and the number was so close to the same that it wasn't worth worrying about the difference. I'll try using cottonseed oil shortening soon and
see if the properties of the soap are the same. If you try it, write me and let me know how it works.
Update:The cottonseed oil version of Crisco, and cottonseed based store brand shortenings seem to work just fine in this soap recipe.
An interesting fact about Crisco Shortening is that it was originally developed for use in soap making. That's why it works so well as a base for so many
soap recipes. It was designed to be an all vegetable oil
replacement for lard in the making of lye soap. It eventually went on to largely replace lard in cooking too. As home soap making died out, people
all but forgot about Crisco's soapy origins.
Lye is needed to make soap. Don't let anyone tell you that soap can be made without it. That just isn't true. Lye is absolutely needed to
create the sponification reaction that turns fats and oils into soap. So to make soap we need real lye. Real lye is getting harder to find.
It used to be in every grocery, drug and hardware store in the country only a few decades ago. Now it has been replaced in most places by
liquid drain openers, and "safer" no lye alternative products. Don't be fooled into buying any of these things. You need real
Sodium Hydroxide lye, in the form of tiny pellets or prills. I get mine at my local Ace Hardware store. They still sell the real stuff. Lye
is also available on
and various other places. Just make sure you are getting the real deal. Make sure the label says Sodium Hydroxide or
NaOH on it.
Lye is dangerous. It is poisonous, and will burn your skin and eyes of you get it on you. So be careful handling it. Use the safety equipment described below
when handling it. Keep it out of reach of children, and anyone else who shouldn't be messing with it. Also, the lid must be kept tightly screwed on the bottle,
or moisture and Carbon Dioxide in the air will make the lye go bad over time. The lye is completely used up during the soap making and curing process, so the resulting
soap is safe to use. Don't worry about that. This recipe uses excess fat, a process called Superfatting, which means the lye is guaranteed to all be used up.
Superfatting also ensures that some moisturizing oils remain in the soap.
Here is the absolute minimum recommended safety equipment.
At the very least, you need to use gloves and wear eye protection while handling the lye, and making the soap. I also wear an apron, just in case anything
splashes on me.
You are going to need a scale that measures to 1/10 ounce. Here I am using my postal scale. Also you will need a large, stainless steel
mixing bowl. Never use aluminum containers or utensils for making soap. The lye attacks aluminum. You could use plastic or glass, but
you'd need to melt the fats in a metal pot to use a plastic or glass mixing bowl. I like this stainless steel bowel because I
can put it right on the stove burner and melt the fats in it, then mix up the soap in it. That means fewer things to wash up when finished.
You will need something to act as a mold for your soap. I am using a square silicone cake pan as my mold. This mold is great because,
being flexible, it can be peeled right off of the solidified soap. It works for small batches of soap like this recipe makes. Many
soap makers build wooden molds. I may do that if I start making larger batches.
This is the electric mixer I use for making soap. It's just a cheap mixer I got at an auction for $5. I only use it for making soap.
Some people swear by a stick blender for making soap. I have one of those too, and I have used it to make soap. I don't really like it
because the soap comes to trace too quickly with the stick blender (more about trace later). My old, reliable hand mixer works just fine.
Now that you have all the materials and ingredients together, here is the recipe:
28 Ounces of Crisco Shortening
3 1/2 Ounces of Castor Oil
1/2 Ounce Beeswax
10 Fluid Ounces of Cold Water
4.1 Ounces of Lye
1 ml (20 drops) of Rosemary Oleoresin Extract
Update:I've been tinkering with this recipe. I have reduced the amount of water slightly, (from 11oz to 10oz),
which results in a harder soap that needs less curing time.
I have also begun adding a small amount of Rosemary Oleoresin Extract as an antioxidant to prevent rancidity. The first few batches of soap I made were
in the winter when it was cool and dry in the house. I had no real problems with rancidity. The last few batches were made in the hot and humid summer though,
and they would start going rancid after a few weeks or a month. I used my vegetable peeler to carve off the dreaded orange bits of rancid soap on the surface of
the bars, and then used them with
no problem. However, I wanted to look into ways of preventing the rancidity in the future. Rosemary Oleoresin Extract is an antioxidant that lots of soap
makers use. So I decided to try it. It should be used in the proportion of about 0.1% of the total fat and oil content of the soap. I add it to the melted
fats after they have cooled down and just before I add the lye water and begin mixing. I had a hard time locating Rosemary Oleoresin Extract, but finally found
several people selling it on
I bought a 1 oz bottle fairly cheap. It should make many batches of soap. I'll report back on how well it prevents rancidity.
Update:The Rosemary Oleoresin Extract does seem to help prevent rancidity, even through the hot, humid summer months. I have only
used it in a couple of batches so far, but it really looks promising. By the way, Rosemary Oleoresin Extract does not make the soap smell like rosemary.
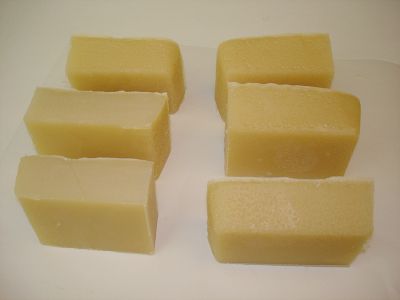
This recipe makes almost three pounds of soap. If you cut it up into six big bars like I do, they will weigh almost 1/2 pound each. You can certainly cut
them into smaller bars if you like.
As mentioned above, this soap recipe is superfatted. That means that less lye is used than would be necessary to totally convert all the fats and oils
present into soap. This ensures that all the lye all gets used up in the saponification reaction, and that some of the moisturizing oils remain in
the finished soap.
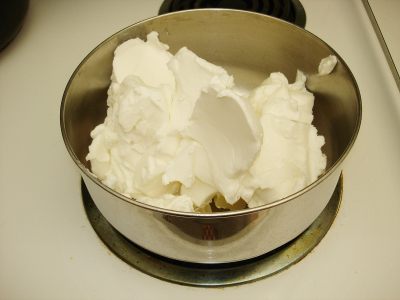
Start by measuring out the Crisco, Castor Oil, and Beeswax into the big stainless steel mixing bowl. I place the empty bowl on the scale,
and press the Tare button to zero it out, then add the ingredients, one at a time, Taring the scale again after each one. Once I have all the
fats and oils in the bowl, I place it on my stove burner on medium to melt.
While the fats are melting, I mix up the lye water. First I put on all the protective gear. Next, I place a smaller stainless steel bowl on
my scale and Tare it. I measure out the required amount of lye. A note here on using plastic containers. Although lye won't attack plastic,
I don't recommend measuring out the lye into a plastic container. The lye prills act a lot like little styrofoam beads. They are very sensitive
to static electricity. I have poured lye into a plastic container, only to see it jump right back out and scatter all over the place because
the plastic container had a static charge on it. So now I only use stainless steel. There is no charge build-up to worry about. Remember, don't use
aluminum.
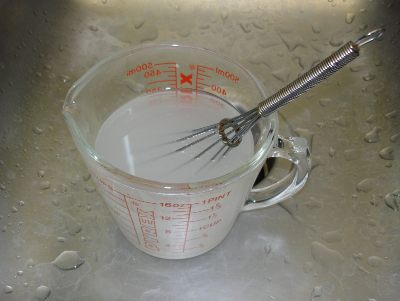
Next, I fill a pyrex measuring cup with 11 fluid ounces of cold water. The next step is somewhat dangerous. The lye must be dissolved in the
water. I do this in my sink, so that if anything spills or sloshes, I can just wash it down the drain. SLOWLY add the lye to the water while
stirring with a wire whisk. A great deal of heat is produced when lye dissolves in water. The water will rapidly heat up and begin steaming
and emitting fumes. Don't breath the fumes. If you add the lye too quickly, the water could heat up to the point where it boils over, or goes
up in a volcanic-like eruption. So go slow. I usually add the lye slowly, in several increments, stirring constantly. Never add the water to the lye,
or you may get the dreaded lye volcanic eruption right in your face. Once all the lye is dissolved, let the lye water sit in the sink to cool.
Once the fats are just about finished melting, I turn off the heat and let carry-over finish the melting process. You don't want to get the fats
too hot, because you just need to wait for them to cool down before you make the soap. Once everything is fully melted, I move the mixing bowl off
the stove and into the other side of my sink.
Now it is just a matter of waiting for things to cool down some. If you try to make the soap while the fat and lye water are still scalding hot, there
is the possibility (more like likelyhood) that the reaction will take off too quickly, and your soap will start to gel before you can get it in the mold.
This happened to me the first time I tried to make soap. It went from trace to semi-solid almost in the blink of an eye. I wait until the fat has cooled
down to the point where it is almost ready to start re-solidifying. I know it is ready when I see the first hint of solidification on the rim of the mixing
bowl. This is much easier than using a thermometer.
While you are waiting, preheat your oven to 175 degrees F. This is a modified cold-process recipe. It includes a low-temp bake in the oven to speed up the
saponification reaction. Also, cut a piece of partchment paper just big enough to cover the top of your soap mold. Once the soap is in the mold, you'll
want to cover the exposed top surface with the partchment paper, or the soap will react with the air and form a layer of soda ash on top. The soda ash
is ugly, but it doesn't really hurt the soap. While waiting, I also get my mixer
and a plastic spatula ready. I also set out the silicone cake pan and put it on a baking sheet. The floppy silicone mold will be hard to handle when filled with
hot, liquid soap. It will be much easier to pick up and move around on the baking sheet.
Once things have cooled down enough, its time to mix up the soap. Put all your protective gear back on. You really don't want to splash any of lye on your
skin. It hurts. Start your mixer on the lowest speed only after you immerse it in the fat. That way you won't splash it all over. While mixing at
low speed, pour in the lye water. You don't have to do it slowly, but go slowly enough that you don't splash it around. Now just continue mixing until
you see trace (more on trace below). This is an oil and water mixture at this point, so it will separate if it is not kept adequately mixed. Don't mix
it too hard though, or you will beat air into the mixture and create a condition called false trace. The lowest speed on my hand mixer is just perfect.
It keeps things well mixed up without beating air into the mix. It may take several minutes, to as long as ten minutes of mixing before you achieve trace.
Always turn off your mixer and allow the beaters to stop before withdrawing them from the liquid, or the beaters will fling the lye mixture all over.
So what is trace? For one thing, it is very difficult to photograph. Basically, trace is the point where the reaction between the lye and the fats has
really taken off. It is the point where the liquid has started to gel. You need to quickly get the soap into your mold before it thickens too much to
pour. Before trace you are just dealing with a liquid. At the point of trace the consistency of the liquid changes to be like a very thin pudding. If
you pull your mixer out of the liquid and drag the (stopped) beaters across the surface of the liquid, they should leave a trail or "trace"
in the liquid that persists. If you look closely at the photo to the left, you can just barely see some lines in the surface of the liquid left by
dragging the beaters across it. That's how you can tell if you are at trace. I stop the mixer from time to time and check for trace. With experience, I
have also learned to watch for bubbles popping at the surface and leaving a persistent crater in the liquid. That is my big hint that the liquid has
started thickening.
I don't use any scents or colors in my soap. But if you want to scent or color your soap, trace is the time to add them. You need to be quick though.
The soap is going to very rapidly thicken from this point on. There is the very real possibility that the soap will seize up on you if you take too
long, or add too much of the wrong thing to it. This particular soap recipe sets up very quickly after reaching trace. It apparently is because of
the castor oil and beeswax, which are both known to accelerate the setting up of soap. You might want to research
other slower setting recipes if you want to put in additives at trace.
Trace would also be the time to put in abrasive additives like pumice or poppy seeds to create a scrubbing "Lava" like hand soap, if that is
your aim. Such soaps are great for people who get their hands really, deep, down dirty, like for example auto mechanics and plumbers. I'm making
bath bars, and don't need a lot of extra scrubbing power.
Quickly pour the soap into the mold. Use the spatula to help the rapidly thickening mixture along. Jiggle and thump the mold a few times to level out
the liquid and get out any big air bubbles. If necessary, level and smooth the top of the soap with the spatula.
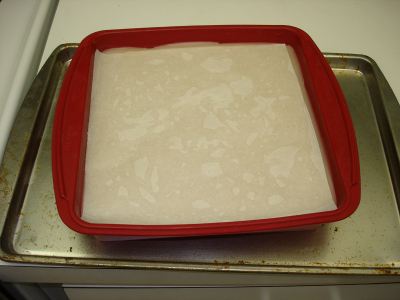
Once the soap is in the mold, lay your pre-cut piece of parchment paper across the top of the soap and try to smooth out any air bubbles under it. As you can
see in this photo, I managed to get a lot of air bubbles under the parchment paper.
Next, place the tray with the soap mold on it in your oven, pre-heated to 175 degrees, for one hour. At the end of that hour, turn the oven off, and
leave the soap inside to slowly cool down. Leave it there overnight (or for at least 12 hours). Don't peek, poke, jiggle or otherwise fiddle with the soap.
Just walk away and leave it alone.
Update:I have been tinkering with this recipe. I now leave the oven on for 1 1/2 hours before turning it off and letting the soap sit and
slowly cool overnight.
This extra amount of time drives the saponification reaction pretty much to completion. The soap has a pH of between 9 and 10 right out of the oven. Combined
with the changes I made in the ingredients, this results in a soap that is ready to use immediately. Curing is now optional, but not necessary.
Here is a photo of the mess left from the soap making process. The bowl, beaters and spatula are just about impossible to clean in this state. However,
stash this stuff in the oven with your soap, and allow it to bake and rest overnight too. Once the sticky, oily, caustic residue has been converted into soap, it is
much easier to clean up.
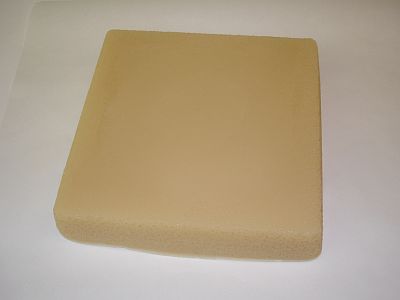
Here is a photo of the soap mold out of the oven the next day, with the parchment paper peeled off. The soap should be fairly solid now, but
still soft enough to easily cut. You can see that the top of the soap is rather
rough because I got a lot of air bubbles under the parchment paper. It is only an aesthetic issue though. It doesn't really effect the soap.
Here I have popped the soap out of the silicone mold. Place the slab of soap on a large cutting board or several sheets of parchment paper
for cutting into bars.
Here I have used a tape measure and a long knife to slice the soap into six, roughly equal sized, large, man-sized bars. I don't get too anal about making them
exactly the same size. The shape of the bars is a little funky too because of the sloped sides of the silicone cake pan I use as a mold. It's not a
problem for me. I'm not too fussy about how my soap looks, as long as it works well. If I were to start making soap for others, or making it in
larger quantities, I might build a proper soap mold and a wire bar cutter.
I'm a big guy, and I like a big bar of soap. Even brand new bars of store-bought soap seem to get smaller and smaller all the time. It's the new
downsizing. Rather than increase the price, manufacturers reduce the size of products. The effect is the same though, you pay more for less.
Before you know it, that store-bought bar of bath soap (which right out of the box is now only the size of a bar of hand soap) shrinks away in the shower until
it is little more than a chiclet, and ready to be tossed. My bars are big. They last a long time before they get too small and thin to use.
One batch of soap easily lasts me two months.
Don't grab a bar and head for the shower just yet though. The soap needs to cure for a while. It is still very soft, and the saponification reaction is not
quite complete.
Here are my newly made bars of soap curing. I stand them on edge, on a sheet of partchment paper, on an empty shelf in my linen closet. I leave them there for
two weeks. My linen closet has a louvered door, so there is good air circulation. I turn the bars over after the first week. That way all sides get exposed
to the air. The bars harden up a lot as they dry out and the saponification reaction runs its course. As an added benefit, everything in my linen closet takes
on a pleasant soapy aroma.
At the end of two weeks, your soap should be ready to use. I always check the pH of the soap, just to make sure I didn't make a mistake and add too much lye.
I use pH test strips I bought dirt cheap on
Here I have put a few drops of water on one of the bars and smeared it around with my finger to dissolve
some of the soap. Then I dip the pH test strip in the slurry.
According to the test strip, this batch of soap has a pH of about 9. That is good. 9 or lower is great for soap. I might use the soap even if it were
at a 10. If the number were higher than 10 though, I would probably let it cure another week or so and try again. So far every batch of my home made
soap has been 9 or lower after 2 weeks of curing. The low temperature bake in the oven really speeds up the saponification reaction. Traditional
cold-process soap needs to cure for six to eight weeks!
The soap is now ready to use. You can grab a bar and head for the shower. The square corners on the soap don't really bother me. They round off nicely after
the first shower or thorough hand washing. However, if they bug you, round off the corners of your bars with a few swipes from a vegetable peeler.
Store your soap in a cool, dry and dark place to prevent it from going rancid. I like to put it in a cardboard box and stash it back in the linen closet. Storing it
in a plastic container, or storing it in your hot, humid bathroom could lead to the soap going rancid. You will know your soap has gone rancid if it develops
yellow or orange spots, and a funny smell. If the soap does go off, just get your vegetable peeler out and shave off the bad spots. The soap is still good
beneath the surface.
 Here is almost everything needed to make my home-made soap. You'll need some measuring and weighing equipment, some safety equipment, a large mixing bowl,
a mold for the soap, and all the ingredients that go into the soap. I'll break it down and describe the all these things in detail below. There are also
a few things I forgot to get in the photo. You'll also need a wire whisk, a plastic spatula, and an electric mixer. An apron also comes in handy.
Here is almost everything needed to make my home-made soap. You'll need some measuring and weighing equipment, some safety equipment, a large mixing bowl,
a mold for the soap, and all the ingredients that go into the soap. I'll break it down and describe the all these things in detail below. There are also
a few things I forgot to get in the photo. You'll also need a wire whisk, a plastic spatula, and an electric mixer. An apron also comes in handy.
 Soap making is something that has always interested me. I had been wanting to try it for a long time. I've never been able to find a store-bought
soap I was really happy with. I have patches of dry skin on various
parts of my body. Most store-bought soaps really dry out and irritate those areas. Most so-called moisturizing soaps, aren't much help, and
most are loaded with really objectionable amounts of perfume. I am cursed with an overly-sensitive nose. I can't stand the smell of most
perfume-laden soaps, or how they make me smell when I use them. So eventually, I decided I had to try my hand at making my own soap.
Soap making is something that has always interested me. I had been wanting to try it for a long time. I've never been able to find a store-bought
soap I was really happy with. I have patches of dry skin on various
parts of my body. Most store-bought soaps really dry out and irritate those areas. Most so-called moisturizing soaps, aren't much help, and
most are loaded with really objectionable amounts of perfume. I am cursed with an overly-sensitive nose. I can't stand the smell of most
perfume-laden soaps, or how they make me smell when I use them. So eventually, I decided I had to try my hand at making my own soap.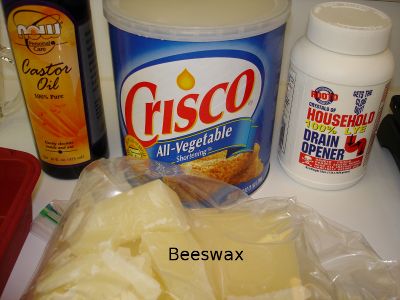 Let's start with the necessary ingredients. You will need castor oil, Crisco shortening, lye pellets, and beeswax. The only somewhat hard to find
ingredient here is the castor oil. I did a lot of research to try and figure out what oils to include in my soap to soothe my dry and irritable skin.
I finally settled on castor oil. It has proven to be a good choice. Most well stocked drug stores sell castor oil in tiny little bottles of an ounce
or two in size at a really outrageous
price. For a little more than the price of one of those tiny bottles, I got a big 16 oz bottle from a soap making supplier who sells oils on
Let's start with the necessary ingredients. You will need castor oil, Crisco shortening, lye pellets, and beeswax. The only somewhat hard to find
ingredient here is the castor oil. I did a lot of research to try and figure out what oils to include in my soap to soothe my dry and irritable skin.
I finally settled on castor oil. It has proven to be a good choice. Most well stocked drug stores sell castor oil in tiny little bottles of an ounce
or two in size at a really outrageous
price. For a little more than the price of one of those tiny bottles, I got a big 16 oz bottle from a soap making supplier who sells oils on
 Here is a close-up of the ingredients list on the Crisco Shortening can. I understand that Crisco changes the recipe of the shortening, depending on
the season and which oils are most readily available at that time. I have only made soap with this Soybean and Palm oil version of Crisco. I have
not tried the Cottonseed oil version they sell for part of the year. Also, many store brand shortenings use cottonseed oil. Cottonseed oil
may, or may not, work well in this recipe, I haven't tried it yet. I did a calculation of the amount of lye to use with the cottonseed oil version
and the number was so close to the same that it wasn't worth worrying about the difference. I'll try using cottonseed oil shortening soon and
see if the properties of the soap are the same. If you try it, write me and let me know how it works.
Here is a close-up of the ingredients list on the Crisco Shortening can. I understand that Crisco changes the recipe of the shortening, depending on
the season and which oils are most readily available at that time. I have only made soap with this Soybean and Palm oil version of Crisco. I have
not tried the Cottonseed oil version they sell for part of the year. Also, many store brand shortenings use cottonseed oil. Cottonseed oil
may, or may not, work well in this recipe, I haven't tried it yet. I did a calculation of the amount of lye to use with the cottonseed oil version
and the number was so close to the same that it wasn't worth worrying about the difference. I'll try using cottonseed oil shortening soon and
see if the properties of the soap are the same. If you try it, write me and let me know how it works. Lye is needed to make soap. Don't let anyone tell you that soap can be made without it. That just isn't true. Lye is absolutely needed to
create the sponification reaction that turns fats and oils into soap. So to make soap we need real lye. Real lye is getting harder to find.
It used to be in every grocery, drug and hardware store in the country only a few decades ago. Now it has been replaced in most places by
liquid drain openers, and "safer" no lye alternative products. Don't be fooled into buying any of these things. You need real
Sodium Hydroxide lye, in the form of tiny pellets or prills. I get mine at my local Ace Hardware store. They still sell the real stuff. Lye
is also available on
Lye is needed to make soap. Don't let anyone tell you that soap can be made without it. That just isn't true. Lye is absolutely needed to
create the sponification reaction that turns fats and oils into soap. So to make soap we need real lye. Real lye is getting harder to find.
It used to be in every grocery, drug and hardware store in the country only a few decades ago. Now it has been replaced in most places by
liquid drain openers, and "safer" no lye alternative products. Don't be fooled into buying any of these things. You need real
Sodium Hydroxide lye, in the form of tiny pellets or prills. I get mine at my local Ace Hardware store. They still sell the real stuff. Lye
is also available on
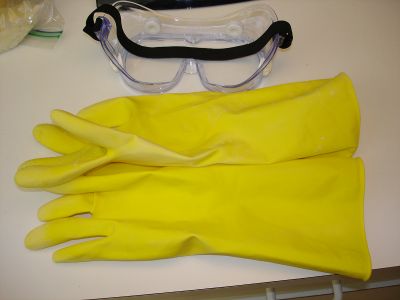 Here is the absolute minimum recommended safety equipment.
At the very least, you need to use gloves and wear eye protection while handling the lye, and making the soap. I also wear an apron, just in case anything
splashes on me.
Here is the absolute minimum recommended safety equipment.
At the very least, you need to use gloves and wear eye protection while handling the lye, and making the soap. I also wear an apron, just in case anything
splashes on me.
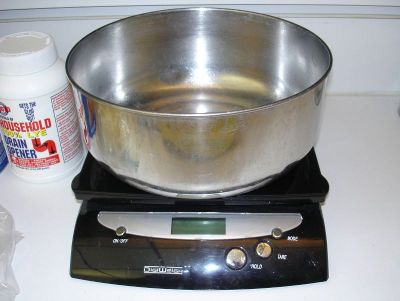 You are going to need a scale that measures to 1/10 ounce. Here I am using my postal scale. Also you will need a large, stainless steel
mixing bowl. Never use aluminum containers or utensils for making soap. The lye attacks aluminum. You could use plastic or glass, but
you'd need to melt the fats in a metal pot to use a plastic or glass mixing bowl. I like this stainless steel bowel because I
can put it right on the stove burner and melt the fats in it, then mix up the soap in it. That means fewer things to wash up when finished.
You are going to need a scale that measures to 1/10 ounce. Here I am using my postal scale. Also you will need a large, stainless steel
mixing bowl. Never use aluminum containers or utensils for making soap. The lye attacks aluminum. You could use plastic or glass, but
you'd need to melt the fats in a metal pot to use a plastic or glass mixing bowl. I like this stainless steel bowel because I
can put it right on the stove burner and melt the fats in it, then mix up the soap in it. That means fewer things to wash up when finished.
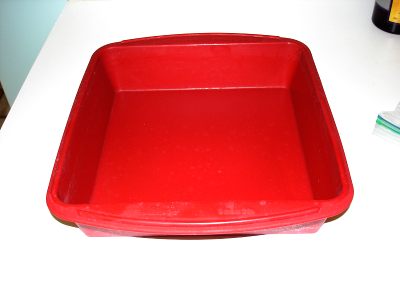 You will need something to act as a mold for your soap. I am using a square silicone cake pan as my mold. This mold is great because,
being flexible, it can be peeled right off of the solidified soap. It works for small batches of soap like this recipe makes. Many
soap makers build wooden molds. I may do that if I start making larger batches.
You will need something to act as a mold for your soap. I am using a square silicone cake pan as my mold. This mold is great because,
being flexible, it can be peeled right off of the solidified soap. It works for small batches of soap like this recipe makes. Many
soap makers build wooden molds. I may do that if I start making larger batches.
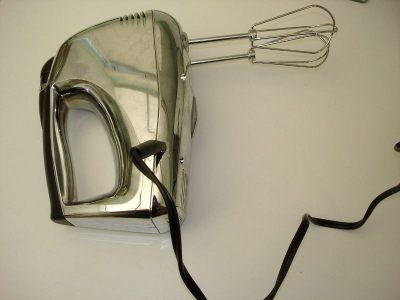 This is the electric mixer I use for making soap. It's just a cheap mixer I got at an auction for $5. I only use it for making soap.
Some people swear by a stick blender for making soap. I have one of those too, and I have used it to make soap. I don't really like it
because the soap comes to trace too quickly with the stick blender (more about trace later). My old, reliable hand mixer works just fine.
This is the electric mixer I use for making soap. It's just a cheap mixer I got at an auction for $5. I only use it for making soap.
Some people swear by a stick blender for making soap. I have one of those too, and I have used it to make soap. I don't really like it
because the soap comes to trace too quickly with the stick blender (more about trace later). My old, reliable hand mixer works just fine.
 Start by measuring out the Crisco, Castor Oil, and Beeswax into the big stainless steel mixing bowl. I place the empty bowl on the scale,
and press the Tare button to zero it out, then add the ingredients, one at a time, Taring the scale again after each one. Once I have all the
fats and oils in the bowl, I place it on my stove burner on medium to melt.
Start by measuring out the Crisco, Castor Oil, and Beeswax into the big stainless steel mixing bowl. I place the empty bowl on the scale,
and press the Tare button to zero it out, then add the ingredients, one at a time, Taring the scale again after each one. Once I have all the
fats and oils in the bowl, I place it on my stove burner on medium to melt.
 While the fats are melting, I mix up the lye water. First I put on all the protective gear. Next, I place a smaller stainless steel bowl on
my scale and Tare it. I measure out the required amount of lye. A note here on using plastic containers. Although lye won't attack plastic,
I don't recommend measuring out the lye into a plastic container. The lye prills act a lot like little styrofoam beads. They are very sensitive
to static electricity. I have poured lye into a plastic container, only to see it jump right back out and scatter all over the place because
the plastic container had a static charge on it. So now I only use stainless steel. There is no charge build-up to worry about. Remember, don't use
aluminum.
While the fats are melting, I mix up the lye water. First I put on all the protective gear. Next, I place a smaller stainless steel bowl on
my scale and Tare it. I measure out the required amount of lye. A note here on using plastic containers. Although lye won't attack plastic,
I don't recommend measuring out the lye into a plastic container. The lye prills act a lot like little styrofoam beads. They are very sensitive
to static electricity. I have poured lye into a plastic container, only to see it jump right back out and scatter all over the place because
the plastic container had a static charge on it. So now I only use stainless steel. There is no charge build-up to worry about. Remember, don't use
aluminum.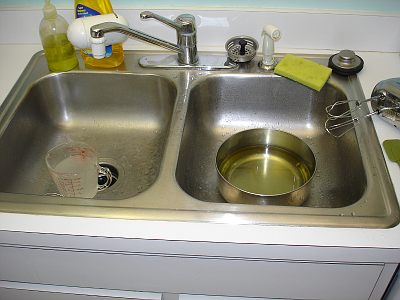 Once the fats are just about finished melting, I turn off the heat and let carry-over finish the melting process. You don't want to get the fats
too hot, because you just need to wait for them to cool down before you make the soap. Once everything is fully melted, I move the mixing bowl off
the stove and into the other side of my sink.
Once the fats are just about finished melting, I turn off the heat and let carry-over finish the melting process. You don't want to get the fats
too hot, because you just need to wait for them to cool down before you make the soap. Once everything is fully melted, I move the mixing bowl off
the stove and into the other side of my sink.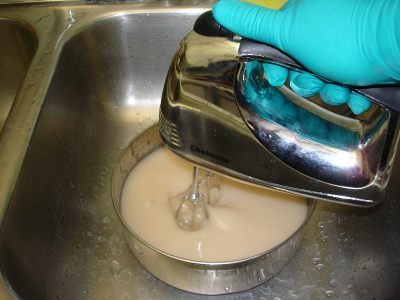 Once things have cooled down enough, its time to mix up the soap. Put all your protective gear back on. You really don't want to splash any of lye on your
skin. It hurts. Start your mixer on the lowest speed only after you immerse it in the fat. That way you won't splash it all over. While mixing at
low speed, pour in the lye water. You don't have to do it slowly, but go slowly enough that you don't splash it around. Now just continue mixing until
you see trace (more on trace below). This is an oil and water mixture at this point, so it will separate if it is not kept adequately mixed. Don't mix
it too hard though, or you will beat air into the mixture and create a condition called false trace. The lowest speed on my hand mixer is just perfect.
It keeps things well mixed up without beating air into the mix. It may take several minutes, to as long as ten minutes of mixing before you achieve trace.
Always turn off your mixer and allow the beaters to stop before withdrawing them from the liquid, or the beaters will fling the lye mixture all over.
Once things have cooled down enough, its time to mix up the soap. Put all your protective gear back on. You really don't want to splash any of lye on your
skin. It hurts. Start your mixer on the lowest speed only after you immerse it in the fat. That way you won't splash it all over. While mixing at
low speed, pour in the lye water. You don't have to do it slowly, but go slowly enough that you don't splash it around. Now just continue mixing until
you see trace (more on trace below). This is an oil and water mixture at this point, so it will separate if it is not kept adequately mixed. Don't mix
it too hard though, or you will beat air into the mixture and create a condition called false trace. The lowest speed on my hand mixer is just perfect.
It keeps things well mixed up without beating air into the mix. It may take several minutes, to as long as ten minutes of mixing before you achieve trace.
Always turn off your mixer and allow the beaters to stop before withdrawing them from the liquid, or the beaters will fling the lye mixture all over.
 So what is trace? For one thing, it is very difficult to photograph. Basically, trace is the point where the reaction between the lye and the fats has
really taken off. It is the point where the liquid has started to gel. You need to quickly get the soap into your mold before it thickens too much to
pour. Before trace you are just dealing with a liquid. At the point of trace the consistency of the liquid changes to be like a very thin pudding. If
you pull your mixer out of the liquid and drag the (stopped) beaters across the surface of the liquid, they should leave a trail or "trace"
in the liquid that persists. If you look closely at the photo to the left, you can just barely see some lines in the surface of the liquid left by
dragging the beaters across it. That's how you can tell if you are at trace. I stop the mixer from time to time and check for trace. With experience, I
have also learned to watch for bubbles popping at the surface and leaving a persistent crater in the liquid. That is my big hint that the liquid has
started thickening.
So what is trace? For one thing, it is very difficult to photograph. Basically, trace is the point where the reaction between the lye and the fats has
really taken off. It is the point where the liquid has started to gel. You need to quickly get the soap into your mold before it thickens too much to
pour. Before trace you are just dealing with a liquid. At the point of trace the consistency of the liquid changes to be like a very thin pudding. If
you pull your mixer out of the liquid and drag the (stopped) beaters across the surface of the liquid, they should leave a trail or "trace"
in the liquid that persists. If you look closely at the photo to the left, you can just barely see some lines in the surface of the liquid left by
dragging the beaters across it. That's how you can tell if you are at trace. I stop the mixer from time to time and check for trace. With experience, I
have also learned to watch for bubbles popping at the surface and leaving a persistent crater in the liquid. That is my big hint that the liquid has
started thickening.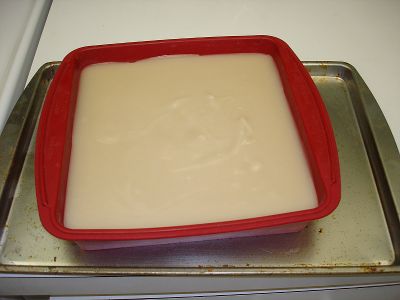 Quickly pour the soap into the mold. Use the spatula to help the rapidly thickening mixture along. Jiggle and thump the mold a few times to level out
the liquid and get out any big air bubbles. If necessary, level and smooth the top of the soap with the spatula.
Quickly pour the soap into the mold. Use the spatula to help the rapidly thickening mixture along. Jiggle and thump the mold a few times to level out
the liquid and get out any big air bubbles. If necessary, level and smooth the top of the soap with the spatula.
 Once the soap is in the mold, lay your pre-cut piece of parchment paper across the top of the soap and try to smooth out any air bubbles under it. As you can
see in this photo, I managed to get a lot of air bubbles under the parchment paper.
Once the soap is in the mold, lay your pre-cut piece of parchment paper across the top of the soap and try to smooth out any air bubbles under it. As you can
see in this photo, I managed to get a lot of air bubbles under the parchment paper.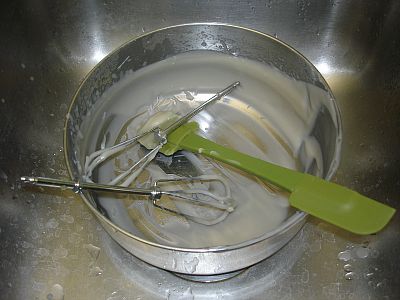 Here is a photo of the mess left from the soap making process. The bowl, beaters and spatula are just about impossible to clean in this state. However,
stash this stuff in the oven with your soap, and allow it to bake and rest overnight too. Once the sticky, oily, caustic residue has been converted into soap, it is
much easier to clean up.
Here is a photo of the mess left from the soap making process. The bowl, beaters and spatula are just about impossible to clean in this state. However,
stash this stuff in the oven with your soap, and allow it to bake and rest overnight too. Once the sticky, oily, caustic residue has been converted into soap, it is
much easier to clean up.
 Here is a photo of the soap mold out of the oven the next day, with the parchment paper peeled off. The soap should be fairly solid now, but
still soft enough to easily cut. You can see that the top of the soap is rather
rough because I got a lot of air bubbles under the parchment paper. It is only an aesthetic issue though. It doesn't really effect the soap.
Here is a photo of the soap mold out of the oven the next day, with the parchment paper peeled off. The soap should be fairly solid now, but
still soft enough to easily cut. You can see that the top of the soap is rather
rough because I got a lot of air bubbles under the parchment paper. It is only an aesthetic issue though. It doesn't really effect the soap.
 Here I have popped the soap out of the silicone mold. Place the slab of soap on a large cutting board or several sheets of parchment paper
for cutting into bars.
Here I have popped the soap out of the silicone mold. Place the slab of soap on a large cutting board or several sheets of parchment paper
for cutting into bars.
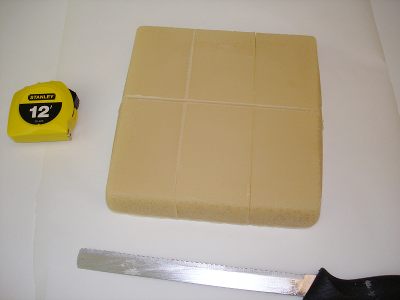 Here I have used a tape measure and a long knife to slice the soap into six, roughly equal sized, large, man-sized bars. I don't get too anal about making them
exactly the same size. The shape of the bars is a little funky too because of the sloped sides of the silicone cake pan I use as a mold. It's not a
problem for me. I'm not too fussy about how my soap looks, as long as it works well. If I were to start making soap for others, or making it in
larger quantities, I might build a proper soap mold and a wire bar cutter.
Here I have used a tape measure and a long knife to slice the soap into six, roughly equal sized, large, man-sized bars. I don't get too anal about making them
exactly the same size. The shape of the bars is a little funky too because of the sloped sides of the silicone cake pan I use as a mold. It's not a
problem for me. I'm not too fussy about how my soap looks, as long as it works well. If I were to start making soap for others, or making it in
larger quantities, I might build a proper soap mold and a wire bar cutter.
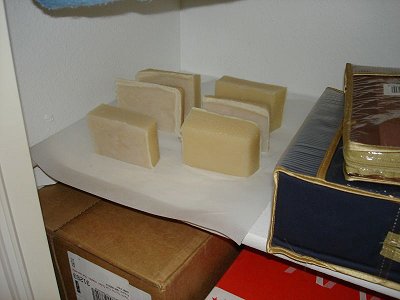 Here are my newly made bars of soap curing. I stand them on edge, on a sheet of partchment paper, on an empty shelf in my linen closet. I leave them there for
two weeks. My linen closet has a louvered door, so there is good air circulation. I turn the bars over after the first week. That way all sides get exposed
to the air. The bars harden up a lot as they dry out and the saponification reaction runs its course. As an added benefit, everything in my linen closet takes
on a pleasant soapy aroma.
Here are my newly made bars of soap curing. I stand them on edge, on a sheet of partchment paper, on an empty shelf in my linen closet. I leave them there for
two weeks. My linen closet has a louvered door, so there is good air circulation. I turn the bars over after the first week. That way all sides get exposed
to the air. The bars harden up a lot as they dry out and the saponification reaction runs its course. As an added benefit, everything in my linen closet takes
on a pleasant soapy aroma.
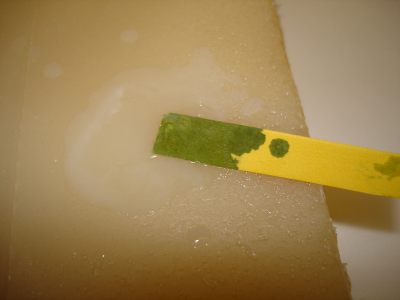 At the end of two weeks, your soap should be ready to use. I always check the pH of the soap, just to make sure I didn't make a mistake and add too much lye.
I use pH test strips I bought dirt cheap on
At the end of two weeks, your soap should be ready to use. I always check the pH of the soap, just to make sure I didn't make a mistake and add too much lye.
I use pH test strips I bought dirt cheap on
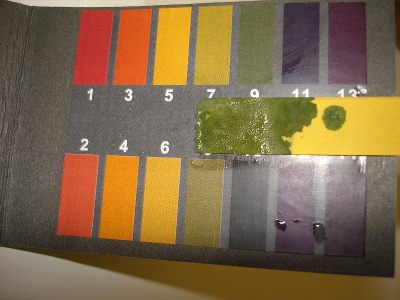 According to the test strip, this batch of soap has a pH of about 9. That is good. 9 or lower is great for soap. I might use the soap even if it were
at a 10. If the number were higher than 10 though, I would probably let it cure another week or so and try again. So far every batch of my home made
soap has been 9 or lower after 2 weeks of curing. The low temperature bake in the oven really speeds up the saponification reaction. Traditional
cold-process soap needs to cure for six to eight weeks!
According to the test strip, this batch of soap has a pH of about 9. That is good. 9 or lower is great for soap. I might use the soap even if it were
at a 10. If the number were higher than 10 though, I would probably let it cure another week or so and try again. So far every batch of my home made
soap has been 9 or lower after 2 weeks of curing. The low temperature bake in the oven really speeds up the saponification reaction. Traditional
cold-process soap needs to cure for six to eight weeks!