A firmer bread for sandwiches
|
This recipe will make 2 small loaves, or one large loaf. Here are the necessary ingredients:
I start by measuring out the flour, powdered milk, wheat gluten and salt into the bowl of my stand mixer and attaching the dough hook. The brand of powdered milk I bought had a very coarse consistency, almost like very course bread crumbs. So I use my blender to turn it into a fine, flour-like powder before adding it to the other ingredients. I'm not sure it is necessary, but I assume all the dry ingredients should have about the same consistency for best results. I then add the sugar and yeast into the warm water and stir vigorously. Set that aside for a few minutes for the yeast to bloom. It is ready when a froth begins to form on top of the water. Once the yeast has bloomed, I melt the butter and have it ready to go.
Now you are ready to make the dough. Start your stand mixer at low speed and pour in the melted butter, then slowly add
rest of the liquid mixture in. If the dough is too sticky, sprinkle a little extra flour in until the dough comes together
in a ball. If the dough is too dry, sprinkle in a little extra water. Once the dough comes
together into a ball, speed up the mixer to kneed the dough. Kneed it for at least 5 minutes. Once finished kneeding, drizzle a
little olive oil in the bowl and turn the dough ball several times to coat it and the inside of the bowl. Cover the bowl with a
damp cloth and set aside somewhere warm for the dough to rise. I like to turn on my oven for just a few seconds to warm it up,
then stash the dough inside it to rise. If I leave the oven light on, it seems to get to the perfect dough rising temperature. Once the dough has doubled in size, turn it out onto a floured surface and punch it down. Divide it into two more or less equal halves. Flatten each half out into a rectangle and then roll it up into a loaf shape, with the seam down, and pat the ends together. Place each loaf into a loaf pan that has some corn meal sprinkled in the bottom. Place the two loaf pans on the top rack of your oven. On the bottom rack place a wide pan filled with boiling hot water. Close the oven door and leave the loaves to do their second rise in the warm, moist oven. After about another hour, the loaves should have doubled in size again and should be well above the tops of the loaf pans. In a departure from my previous bread making method, I have begun leaving the pan of water in the oven during the entire baking time (To be honest, I forgot to take it out once, and was impressed with the resulting bread). I also don't bother pre-heating anymore. Once the bread has risen to my satisfaction, I just turn on the oven to 350, and start my timer for 45 minutes. When your timer goes off, check the bread. The crust should be brown and crispy. Thump the bread. It should be firm and hollow sounding. This particular bread is denser and doesn't sound as hollow as my other bread recipes. Leave it in for a few more minutes if it doesn't seem done enough yet. When done, remove the loaves from the oven and allow them to cool in the pans until cool enough to handle without getting burned. turn the loaves out of the pans. This bread tends to fall right out of the pans, unlike my honey wheat bread which tends to stick in the pans.
|
|
[Back to Mike's Cooking & Recipe Page]
[Mike's Homepage]
[Email me]
Other places to visit:
[Mike's telescope workshop]
[Mike's home-built jet engine]
[Mike's Home-Built Wind Turbine]
[Mike's Home-Built Solar Panels]
[Mike's gold prospecting page]
© Copyright 2010-2013 Michael Davis, All rights reserved.
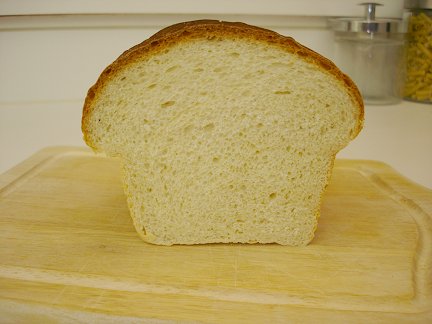 This is my second take on making a good white bread.
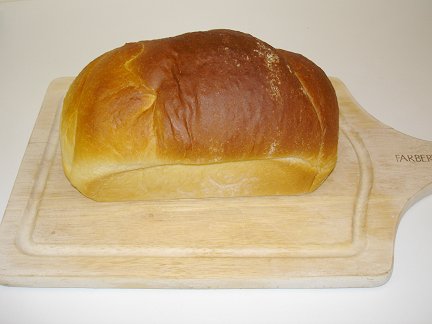 As I said above, this bread is better for making sandwiches because the crumb is firmer and the bread doesn't fall apart as easily.
It stands up to the rigors if sandwich duty quite well, be it a PB&J, grilled cheese,
As I said above, this bread is better for making sandwiches because the crumb is firmer and the bread doesn't fall apart as easily.
It stands up to the rigors if sandwich duty quite well, be it a PB&J, grilled cheese,