What is a paper telescope? It's a telescope that has been designed, but not yet built. It exists only on paper. All telescopes get designed, but not all get built, at least not right away. This will be a gallery of scopes I haven't gotten around to building yet. Some I do want to eventually build. Some I hope I can build, but I'm not sure I have the skills to actually build. And some will just be wild flights of fancy that may not even be possible to build.
An invaluable aid for designing telescopes or any other optical system is the OSLO optical design software from Lambda Research. The full-blown Oslo package is quite expensive. However, they do offer a trial version called Oslo-EDU which, although crippled in many ways and limited to only 10 optical surfaces, is still a very useful program. You can download it here. My main gripe with this software is that there is no Linux version available. As A huge Linux advocate, it is a real pain to have to boot up one of my computers into Windoze to have to run Oslo. It's a real endorsement from me of how useful this program is that I'm willing to do it. Some people claim to have had success running Oslo in Linux using WINE. I've tried and failed though. If you know the trick, let me know.
All telescopes and optical accessories presented on this page will be available in Oslo file format so that any interested persons out there can play around with them. Let me know if you improve on my designs. Especially let me know if you actually build any of them.
#1 A 14.5 inch diameter f/12 classical Cassegrain
 This is a 14.5 inch diameter f/12 classical Cassegrain design. A couple of years ago the St. Petersburg Astronomy
Club lost its lease on the Hickory Hill Observing Complex and we had to move all our equipment off the site. The
telescope that used to reside in The Raden Observatory wound up being stored in my garage until we find a new
permanent home for it.
This is a 14.5 inch diameter f/12 classical Cassegrain design. A couple of years ago the St. Petersburg Astronomy
Club lost its lease on the Hickory Hill Observing Complex and we had to move all our equipment off the site. The
telescope that used to reside in The Raden Observatory wound up being stored in my garage until we find a new
permanent home for it.
The Raden Telescope is a 14.5 inch f/4 Newtonian reflector. However, the primary mirror
obviously began its life as a classical Cassegrain before it came into our possession. The primary mirror has a
very short focal ratio, has a curved back and is cored through the middle just like every other Catadioptric
primary mirror I have ever seen. I've often wondered if this telescope couldn't be turned back into a Cassegrain.
Or better yet, a combination Newtonian/Cassegrain design that could go either way. This is the result my brainstorming
along those lines.
In designing this telescope I relied heavily on the advice available in the book Telescope Optics: Evaluation and
Design by Rutten and van Venrooij. This design is sort of a compromise between the two extremes of an instrument
optimized for visual use, and one optimized for photography. If this scope were ever built and installed in a
St. Petersburg Astronomy Club observatory, it would be expected to perform both functions. Visual observing on
public nights when we would be open to the public, and photography at other times. A limiting factor in this
design is the fact that I am dealing with a primary mirror with fixed parameters. The mirror already exists and
refiguring it isn't practical. So the only degrees of freedom I have are in the secondary mirror. The secondary diameter,
radius of curvature, location and conic constant are the only variables I can change.
Since it is a compromise instrument, it is not ideal for either photography or visual observing.
The secondary is larger than it needs
to be for a purely visual instrument, which introduces more diffraction than is desirable visually. The focal
plane is also has more curvature than would be desirable in a purely photographic instrument. The curvature is
not so bad that it couldn't accommodate a CCD chip up to about 1 inch across, but wide format photography would
not be possible. Distortion might even be noticeable at the corners of a 35mm film frame.
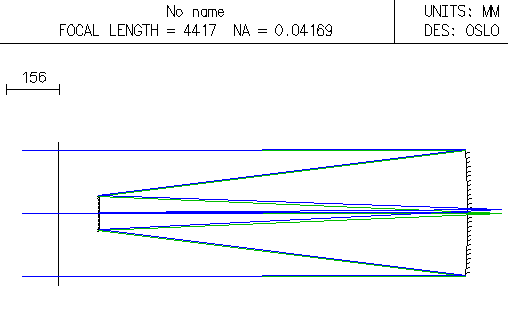
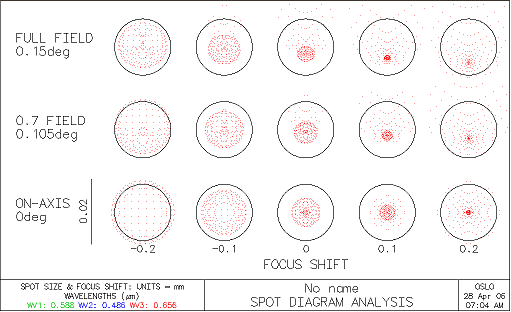 Here is the spot diagram Oslo generates for this design. Not too bad. The design is nearly diffraction limited
over a field 0.3 degrees in diameter. The spot sizes are smaller than the magic 25 micron size considered by
many to be the maximum for photography. So as far as I can tell without actually building it, this scope ought
to work both visually and photographically.
Here is the spot diagram Oslo generates for this design. Not too bad. The design is nearly diffraction limited
over a field 0.3 degrees in diameter. The spot sizes are smaller than the magic 25 micron size considered by
many to be the maximum for photography. So as far as I can tell without actually building it, this scope ought
to work both visually and photographically.
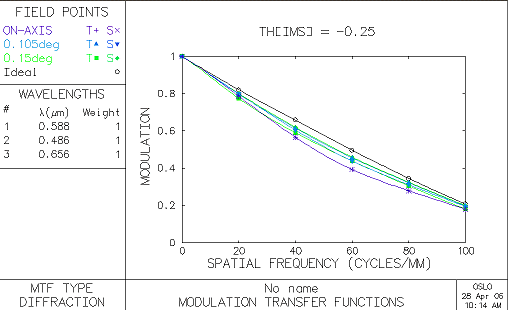 Here is a plot of the Modulation Transfer Function for this telescope. Again, not too shabby. The design may be
a bit over-corrected since (according to the plot) it actually performs better slightly off axis than on axis.
This is no doubt a result of trying to optimize the design to get as large a usable field for photography as
possible. Beyond 0.15 degrees off axis though, it goes to hell fast.
Here is a plot of the Modulation Transfer Function for this telescope. Again, not too shabby. The design may be
a bit over-corrected since (according to the plot) it actually performs better slightly off axis than on axis.
This is no doubt a result of trying to optimize the design to get as large a usable field for photography as
possible. Beyond 0.15 degrees off axis though, it goes to hell fast.
Here is a printout of the paraxial constants for this design.
*PARAXIAL CONSTANTS
   Effective focal length:  4.4166e+03    Lateral magnification:  -4.4166e-17
   Numerical aperture:        0.041695    Gaussian image height:    11.562673
   Working F-number:         11.991870    Petzval radius:         -984.134964
   Lagrange invariant:       -0.482
And a printout of the optical prescription.
*LENS DATA
14.5 f12 Cas
 SRF      RADIUS      THICKNESS   APERTURE RADIUS       GLASS  SPE  NOTE
 OBJ       --        1.0000e+20    2.6180e+17             AIR

 AST       --        1.2000e+03    210.000000 A           AIR   *

  2   -2.9464e+03   -1.0800e+03    184.150000      REFL_HATCH   *

  3   -1.1800e+03    1.1788e+03 S   52.815939 S    REFL_HATCH   *

 IMS       --         -0.300000 V   11.573172 S
What doesn't show up in the above prescription are the conic constants for the two mirrors. The primary is of course a concave parabola with a conic constant of -1. The secondary is a convex hyperbola with a conic constant of -4.157. Fabricating the secondary mirror is going to be the hard part of making this telescope a reality. I did set the secondary diameter at 4.25 inches though, which is a common size for mirror blanks.
The real beauty of this design is that the Cassegrain secondary mirror could be mounted on a removable holder in front of the Newtonian secondary. This would allow the scope to operate as either a Cassegrain or a Newtonian depending on whether the Cassegrain secondary is installed or not. Another option would be to add a tertiary mirror to reflect the light cone out through the side of the tube in front of of the primary mirror making it somewhat more accessible for visual observing (like a Newtonian).
You can download a copy of the Oslo file for this telescope here.
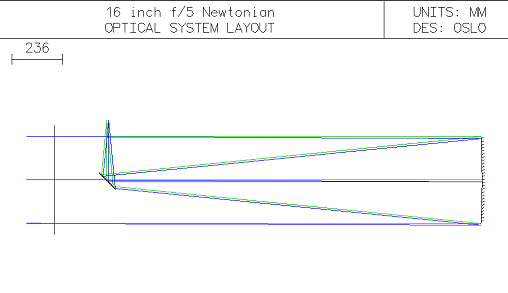
#2 A 16 inch diameter f/5 Newtonian reflector
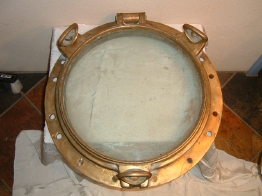
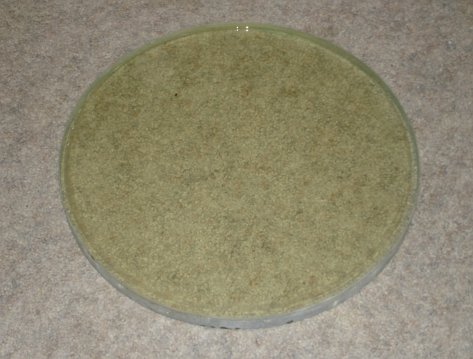
 Here is a simpler project. It's just a garden variety Newtonian reflector. The story behind this paper
telescope is a mirror blank I got cheap. Several years ago I bought an old porthole on Ebay. It was similar to
the photo below. It was a
massive bronze thing, heavily corroded, and must have been close to 100 years old. The 1 inch thick, 16 inch
diameter glass disk was perfectly intact though. The best part was that it only cost me 80 bucks! Try finding
one that big on Ebay that cheap these days. These things are most often sold as decorator items to add a
nautical flair to your living room or seafood eatery. They are quite collectible, and so the price has been
going up. By the way, if you decide to try buying a porthole for the glass, make sure it is OLD. Newer
portholes use tempered glass which is useless for telescope mirrors.
Here is a simpler project. It's just a garden variety Newtonian reflector. The story behind this paper
telescope is a mirror blank I got cheap. Several years ago I bought an old porthole on Ebay. It was similar to
the photo below. It was a
massive bronze thing, heavily corroded, and must have been close to 100 years old. The 1 inch thick, 16 inch
diameter glass disk was perfectly intact though. The best part was that it only cost me 80 bucks! Try finding
one that big on Ebay that cheap these days. These things are most often sold as decorator items to add a
nautical flair to your living room or seafood eatery. They are quite collectible, and so the price has been
going up. By the way, if you decide to try buying a porthole for the glass, make sure it is OLD. Newer
portholes use tempered glass which is useless for telescope mirrors.
 I had other ideas for the porthole though. I wanted the glass to use as a mirror blank. I thought I would
"simply" remove the glass and still have the perfectly wonderful porthole frame which I might be
able to resell on Ebay and get most if not all or even more of my money back. Well, it didn't quite turn out that
way. Getting the glass out
of the bronze porthole frame proved to be quite a challenge. The bronze was heavily corroded (or had
a nice patina as a decorator would say). I manufactured a huge spanner wrench in order to try and remove the
locking ring that held the glass in place. No dice. It wouldn't turn no matter how much torque I put on it.
As I said, it must have been close to 100 years old. The parts had corroded together pretty thoroughly. Even
after letting the whole thing soak in a bath of penetrating oil for several days, it still wouldn't budge.
I had other ideas for the porthole though. I wanted the glass to use as a mirror blank. I thought I would
"simply" remove the glass and still have the perfectly wonderful porthole frame which I might be
able to resell on Ebay and get most if not all or even more of my money back. Well, it didn't quite turn out that
way. Getting the glass out
of the bronze porthole frame proved to be quite a challenge. The bronze was heavily corroded (or had
a nice patina as a decorator would say). I manufactured a huge spanner wrench in order to try and remove the
locking ring that held the glass in place. No dice. It wouldn't turn no matter how much torque I put on it.
As I said, it must have been close to 100 years old. The parts had corroded together pretty thoroughly. Even
after letting the whole thing soak in a bath of penetrating oil for several days, it still wouldn't budge.
There was nothing else to do but bite the bullet and cut the frame apart to get the glass out. So much for
the idea of reselling it. A die grinder and a diamond cutting wheel made short work of cutting through the
heavy bronze frame. I switched to a hacksaw once I got close to the glass so I wouldn't have to worry about
nicking it with the fast-cutting diamond wheel. In the end, I got the glass out unscathed. However, the frame
had to be cut into many small pieces. So I was left with a 5 gallon bucket full of about 50 pounds of scrap
bronze instead of a nice frame I could resell. Oh well. At least I got the mirror blank, and I sold the bronze
bits for a few bucks at the local scrap yard.
 I cleaned up the blank and took it to our resident mad scientist, James Lerch, to check it for stress. I'd heard
he had a quick and easy method for stress-testing large glass blanks and wanted to see how it's done. His method
is ingenious and simple at the same time. Take a laptop computer (or other computer with an LCD monitor) and
open a blank Word or Notepad document. Maximize it so it fills the screen with a blank white background.
Put on a pair of polarizing sunglasses. Since the light from LCD monitors is polarized, if you hold your head
at just the right orientation, the polarized sunglasses will block all the light from the monitor and it will
appear black. If you now hold the glass blank in front of the monitor, any stress in the glass will rotate
the polarization angle of the light from the monitor allowing it to pass through the sunglasses. The stress will
appear as colored streamers in the glass. I could kick myself for not thinking of this test on my own.
Anyway, the verdict was that it was a completely stress free piece of glass that should someday make an
excellent telescope mirror. Now all I have to do is find the several months time needed to actually grind
the mirror. Fat chance! Maybe after I retire.
I cleaned up the blank and took it to our resident mad scientist, James Lerch, to check it for stress. I'd heard
he had a quick and easy method for stress-testing large glass blanks and wanted to see how it's done. His method
is ingenious and simple at the same time. Take a laptop computer (or other computer with an LCD monitor) and
open a blank Word or Notepad document. Maximize it so it fills the screen with a blank white background.
Put on a pair of polarizing sunglasses. Since the light from LCD monitors is polarized, if you hold your head
at just the right orientation, the polarized sunglasses will block all the light from the monitor and it will
appear black. If you now hold the glass blank in front of the monitor, any stress in the glass will rotate
the polarization angle of the light from the monitor allowing it to pass through the sunglasses. The stress will
appear as colored streamers in the glass. I could kick myself for not thinking of this test on my own.
Anyway, the verdict was that it was a completely stress free piece of glass that should someday make an
excellent telescope mirror. Now all I have to do is find the several months time needed to actually grind
the mirror. Fat chance! Maybe after I retire.
It may be a while before I can build this scope, but designing it only takes a few minutes. I've built a lot of
Newtonians over the years. They are pretty simple. A program like Oslo isn't really needed for such a simple
optical system. However, I got into a discussion about secondary mirror offsets with some friends and thought
I could illustrate it in Oslo. Why the secondary mirror of a Newtonian telescope needs to be offset, which
direction to offset it, and how far to go are issues which often confuse the novice telescope builder. Well
a picture is worth 1000 words. So here it is.
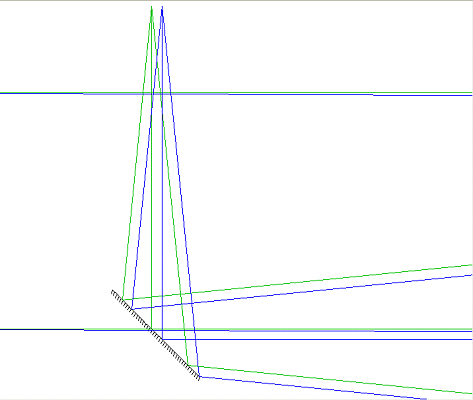 If you look closely, you can see that the secondary mirror has been offset downward (away from the focal plane)
by 4mm. The offset would be even more obvious in a faster scope. The reason for the offset is that the converging
light cone is fatter where it first hits the bottom of the secondary mirror. It continues converging and gets
narrower before hitting the top of the mirror. The mirror needs to be offset downward to fully catch the fatter
part of the light cone. I designed this scope to have a fully illuminated field 1/2 degree in diameter. This
picture shows how the light cone from a star 1/4 degree off axis is just fully intercepted by the mirror. If
the mirror were not offset and instead centered on the optical axis, some of that light would miss the mirror
and not make it to the focal plane causing vignetting.
If you look closely, you can see that the secondary mirror has been offset downward (away from the focal plane)
by 4mm. The offset would be even more obvious in a faster scope. The reason for the offset is that the converging
light cone is fatter where it first hits the bottom of the secondary mirror. It continues converging and gets
narrower before hitting the top of the mirror. The mirror needs to be offset downward to fully catch the fatter
part of the light cone. I designed this scope to have a fully illuminated field 1/2 degree in diameter. This
picture shows how the light cone from a star 1/4 degree off axis is just fully intercepted by the mirror. If
the mirror were not offset and instead centered on the optical axis, some of that light would miss the mirror
and not make it to the focal plane causing vignetting.
You can download a copy of the Oslo file for this telescope here.
#3 A Coma Corrector Using Standard off the shelf Lenses
 The problem with Newtonian telescopes like the one above is that they have a lot of coma that makes stars
at the corners and edges of wide-field astrophotos into little seagull shapes. Commercial coma correctors
exist, but where's the fun in that? I've always wanted to build my own coma corrector.
The problem with Newtonian telescopes like the one above is that they have a lot of coma that makes stars
at the corners and edges of wide-field astrophotos into little seagull shapes. Commercial coma correctors
exist, but where's the fun in that? I've always wanted to build my own coma corrector.
A search of the web turns up lots of designs for coma correctors. The three lens Wynne design seems to be
the most common and best performing. Every design I found though used custom-made lenses. Well, I'm not
experienced or equipped to make lenses. So I set out on a quest to design a Wynne corrector that used
standard off the shelf lenses. This was the most challenging optical design problem I have ever set for
myself. i've worked on this project on and off for many months. Along the way I learned a lot about
optics and about using Oslo to its full potential.
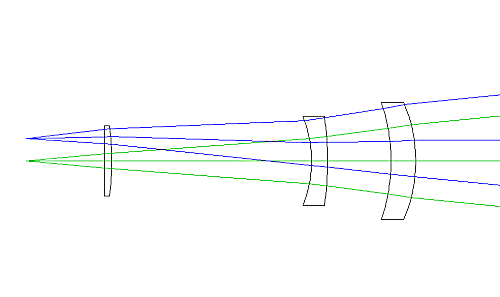
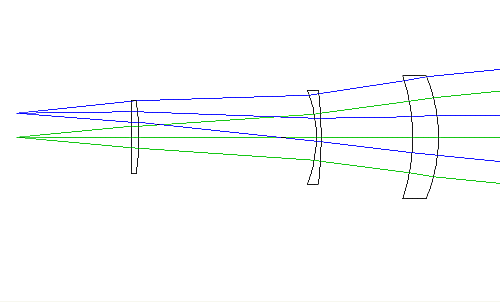
This "final" design uses 5 standard BK7 lenses available from Ross Optics. Wait, you say, I
only see three lenses in the above diagram. Well the answer to that is that the two lenses on the right
are actually each built from two lenses cemented together. From left to right
on the drawing above, the first lens is a L-PCX220 plano-convex. The second lens is made up of a
L-PCC086 plano-concave lens cemented to a LPCX252 plano-convex lens. The third lens is made up of
a L-PCC109 plano-concave lens cemented to a L-PCX288 plano-convex lens. Since the demo version of
Oslo is is limited to only 10 optical surfaces, I can't show the four individual elements of the
right two lenses. But hey, the four lenses get cemented together into only two lenses anyway.
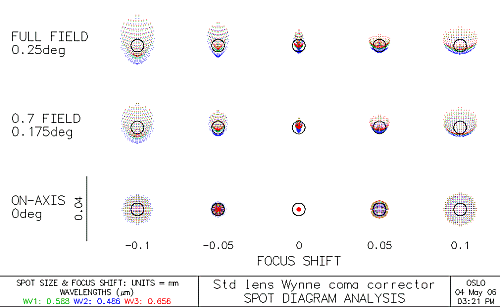
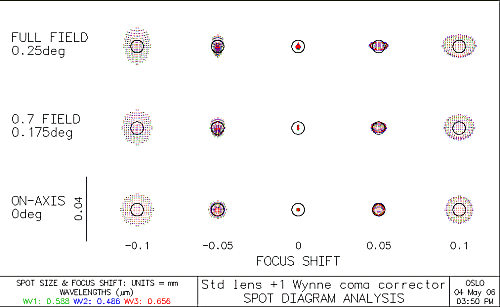
 The real question though is how does it work? Here are some spot diagrams of the above 16 inch f/5 scope
without the corrector first, and with it second. Note the difference in scale between the two diagrams.
While not obvious at first, the off-axis spot sizes in the second diagram are actually much smaller. About 15
microns with the corrector versus about 67 microns without the corrector. That's a 4.46 times size
improvement which should equate to about a 20 times increase in brightness for stars 0.25 degrees
off axis.
The real question though is how does it work? Here are some spot diagrams of the above 16 inch f/5 scope
without the corrector first, and with it second. Note the difference in scale between the two diagrams.
While not obvious at first, the off-axis spot sizes in the second diagram are actually much smaller. About 15
microns with the corrector versus about 67 microns without the corrector. That's a 4.46 times size
improvement which should equate to about a 20 times increase in brightness for stars 0.25 degrees
off axis.
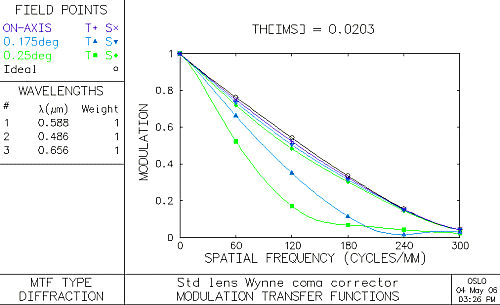
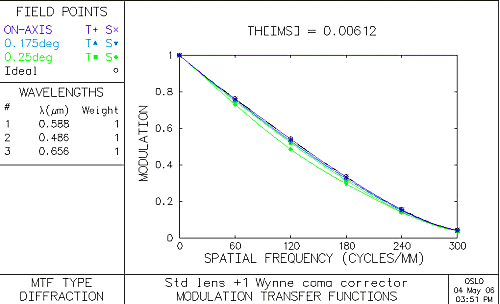
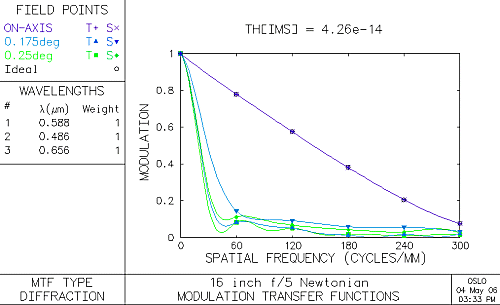 Here are a set of modulation transfer function plots. again, the first one is without the corrector
and the second is with the corrector. The improvement here is a lot more obvious.
Here are a set of modulation transfer function plots. again, the first one is without the corrector
and the second is with the corrector. The improvement here is a lot more obvious.
This coma corrector is not ideal by any means. It has some drawbacks. There is only 33.5 mm of back-focus,
it increases the focal length of the telescope a little (from f/5 to f/5.4), and it only works out to 1/4
degree off axis before it begins vignetting. However, its one virtue of being made from off the shelf lenses
is a real biggie. The price of the five lenses is about the same as buying a low-end commercial corrector,
but the added cachet of being able to say you made it yourself is priceless
For those who have lens making skills, this design can be VASTLY improved by replacing the center
lens with a custom made lens. More on that below.
You can download a copy of the Oslo file for this coma corrector here.
#4 A Coma Corrector Using Only One Custom-Made Lens
 This design is an improvement on the above coma corrector. It does require that the middle lens be
custom-made though. The material for the center lens is also different. it is K5. So this is a design
for someone with more advanced fabricating skills. As you
can see from the spot diagram, this design produces much smaller off-axis spot sizes. The MTF plot
compared to the one above really shows the improvement. This design also has
more back focus distance (46.6 mm versus 33.5 for the above design). That extra back focus distance
alone makes this an appealing design. The cost of these improvements is increased field curvature
though, but not enough to preclude using even fairly large CCD chips.
This design is an improvement on the above coma corrector. It does require that the middle lens be
custom-made though. The material for the center lens is also different. it is K5. So this is a design
for someone with more advanced fabricating skills. As you
can see from the spot diagram, this design produces much smaller off-axis spot sizes. The MTF plot
compared to the one above really shows the improvement. This design also has
more back focus distance (46.6 mm versus 33.5 for the above design). That extra back focus distance
alone makes this an appealing design. The cost of these improvements is increased field curvature
though, but not enough to preclude using even fairly large CCD chips.
While this is a far more optimized design that the one above, there is room for even more improvement.
By custom making all three lenses it is possible to do even better. I'll leave that as an exercise for
anyone interested.
You can download a copy of the Oslo file for this coma corrector here.